
We downloaded the required files in the previous chapter. There are three files in our download folder:
setup_bi_platform-12.2.1.0.0_win64.exesetup_bi_platform-12.2.1.0.0_win64-2.zipsetup_bi_client-12.2.1.0.0-20151015073141-win64.exe
Here are the steps to install BI Server software:
- Double-click on the BI platform
setup_bi_platform-12.2.1.0.0_win64.exeexecution file:
You will be presented with the Welcome page, as shown in the following screenshot:

- Select Skip Auto Updates and click on Next:

- Enter the location to install the software by selecting the Oracle Home path. This will be
C: fmw_obiee_Oracle_home:Tip
This is the path we created in Chapter 2 , Installing the Prerequisite Software, in the Installing the WebLogic Server section.

- This step allows you to choose whether to install BI Platform Distribution with Samples. In this case, we will install them. If you were installing on a server that will be part of a cluster, you would not normally install the samples. Choose the second option and click on Next:

- The installer will perform a quick check. You will need green ticks to proceed. If your checks are successful, click on Next:

- The next screen is a little surprising but, essentially, it enables the installation to work. If you do get this popup, we recommend that you click on Next. If it does not appear, ignore this step:

Tip
Over the last few years, there have been reported instances of slight difficulties in configuring the OBIEE software, and one common way to fix installation problems is to run the Visual C++ Redistributable Maintenance program. If you experience problems later, try downloading and running
vcredist_x64.exe(available from Microsoft).
We have now reached the end of the installation of the BI Server software!

At this point, nothing is actually running, or even capable of being run. We have simply installed the binaries. Our next task is to create an area in our metadata database for some OBIEE components. After that, we will be able to create the OBIEE domain.
To create the metadata schema we will again use the Repository Creation Utility (RCU) that we used in
Chapter 4
, Reviewing the Features of the Reporting Repository. The command is the same one we ran in that chapter, but this time there will be one more schema to choose from-the BI_PLATFORM schema:
- Open a cmd window.
- Change directory to
C:fmw_obieeOracle_homeoracle_commonbin. - Run the
rcu.batcommand. - When the Welcome dialog box appears, click on Next.
- On the Step 2 page, select System Load and Product Load. Click on Next:

- On the Step 3 page, enter the connection details for your database. We used
localhost,port1433, because that's where our database is installed. If you have installed your database on another server, then put that server's details in here. - Click on Next:

The installer will now run a quick check to make sure your database is compliant.
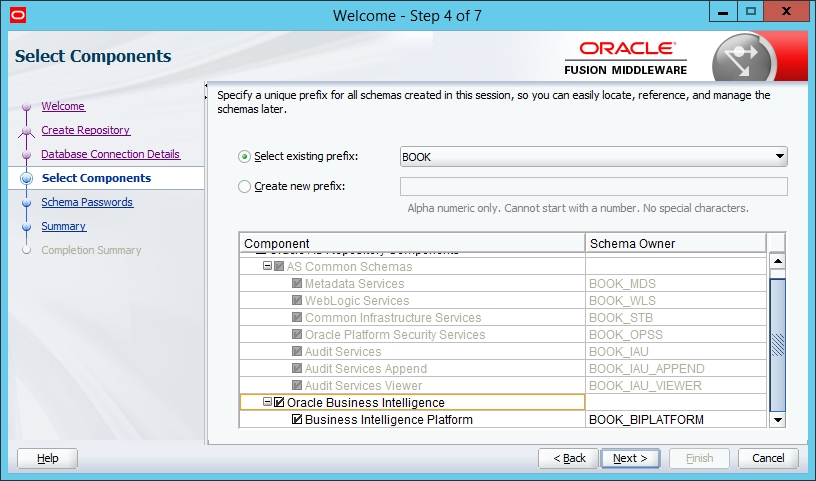
- On the Step 4 page, select the existing prefix that we created in the previous chapter-in our case, we called it BOOK.
- Make sure the Oracle Business Intelligence option is selected.
- Click on Next:
Another quick check for the prerequisites will pop up.
Tip
RCU Schema creationAt this point, it is worth pointing out that there is the option to install all of the schema at this time. You can select the Create new prefix option, then enter a value in the input box, for example, DEV. We ran the installation in the previous chapter to highlight that the
BI_PLATFORMis related to the OBIEE installation, whereas the other schema is related to the Fusion Middleware platform. - On the Step 5 page, enter a password for the schema:
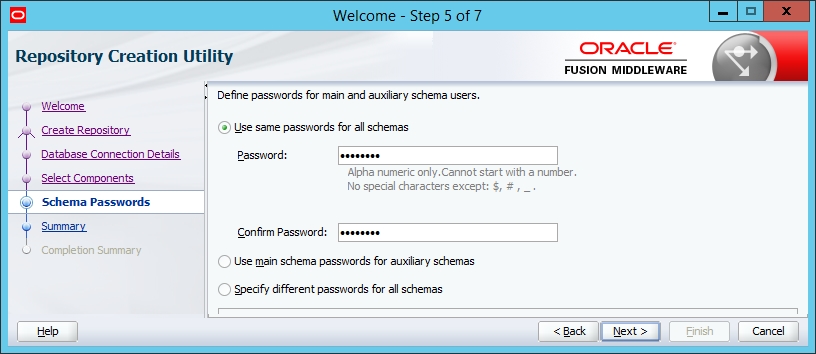
- On the Step 6 page, we can check our selected options and click on the Create button:

Once the create step has completed, you will have finished the installation of the schema that supports OBIEE.
OK, let's recap what we have done so far:
- We installed the Fusion Middleware software (in the previous chapter)
- We installed the OBIEE Server software into the Fusion Middleware home
- We installed a new schema in a database that supports the OBIEE Server
We installed OBIEE as a domain in the Fusion Middleware system, and now we are in a position to create the BI domain. The installer you need for this step has been installed as part of the OBIEE Server software:
- Open a cmd window.
- Change the directory to the path for the installation by typing
cd C:fmw_obieeOracle_homebibinand pressing Enter. - Type
config.cmdand press Enter. - The installer will fire up. Select all three options. Click on Next:

- The next screen is just a confirmation that the prerequisite checks have completed. Oracle likes its prerequisite checks! Included with the components will be the Enterprise Management (EM) application that controls the OBIEE domain.
- On the Step 3 page, we set the location and user for our new BI domain. The default of
C:fmw_obieeOracle_homeuser_projectsdomainsin theDomainsdirectory input field should not be changed. We also recommend leaving the domain name asbifor now. We have chosenweblogicas the username, but you can choose any name. We have seenbiadmin,bidomainowner, and many more. Enter the username and password, and click on Next:
- On the Step 4 page, we select the database where we created the
BI_PLATFORMschema:
- On the Step 5 page, we can change the default port numbers that are allocated to this domain. Port
9500is the default access port for the WebLogic Administration server. If you accept the defaults, the OBIEE components will use the following ports:9500: Administration Server9501: Administration Server (using SSL)9502: Managed Server9503: Managed Server (using SSL)9507: Presentation Services9508: OBIEE Servers Cluster Controller9510: JavaHost9511: BI Scheduler9514: BI Server

- On the Step 6 page, we choose the application that we would like to install along with the domain. We will choose the Oracle sample application option, because this is a development installation:
Tip
For a production installation, you would not include an application (choose the clean-state option). We have chosen to install a sample application, supplied by Oracle, to show you the features available, and it also means you can prove your system is working before moving to subsequent chapters. A production environment will use your own application, which you will upload.

- The Step 7 page is useful to show what ports are being used, which could come in handy if you use non-default port-range settings. Note that you can save the responses made so far in a file, which could be used for a silent installation script.
- At this point, you can click on the Configure button:

The configuration process may take a few minutes to complete. Be patient!
- When it has completed all the tasks, a browser window with a login page should appear:

When you get this page, you can sign in with the credentials you set in Step 3.
Congratulations! Your environment has been built.
Let's recap what we have got so far. To begin with, we had a Windows 2012 server with a SQL Server database.
Then we installed Java version 8, so that we could then install the Fusion Middleware platform, that is, WebLogic.
After the Fusion platform, we installed the OBIEE software in the Fusion Middleware folders. Next, we ran the configuration tool, which put the BI applications into the server folders. The configuration tool also put the OBIEE client software in place.
This means that we now have a working OBIEE system ready to use and develop with, except that there are no connections in place for the client admin tool. If we had installed on a Linux system, then we would need to install the client tools separately on a Windows machine. We will cover how to install the client software and create the connections in Chapter 6 , Understanding the Systems Management Tools.
Before we go into the details of the components, let us see what folders we have created for the OBIEE software.
After the Fusion platform installation, we had C:fmw_obieeoracle_home. Remind yourself by looking back at the folders screenshot in
Chapter 4
, Reviewing the Features of the Reporting Repository. There are many new folders installed as part of the OBIEE software, including the following:
bi: The main folder for the OBIEE software.bifoundation: Found inside thebifolder, this folder contains the main executables for OBIEE; for example, inside theserverbinfolder, you will find thenqserver.exefile.user_projects: In a standard Fusion Middleware build, this folder is created when needed, to host the domain and any application that is installed by a particular product. In the case of OBIEE, there is a version of the Enterprise Manager application (em.ear) that is specifically for managing the business-intelligence domain. The BI domain we created in the preceding steps is placed in this folder.
Most of the internal files will use pointers (or variables) to the folders in our build. This is because there is no set place to put the root folder, or set name for the BI domain. In our installation, these variables are pointing to the following locations:
|
Variable |
Location |
|
|
|
|
|
|
|
|
|
|
|
|
|
|
|
|
|
|
There is no requirement to set these variables on your machine, because each script will set the value when it needs it. However, there is no known downside of having environment variables in place with these values, if you prefer to set them.
Take a look and familiarize yourself with the folders.