
Another alternative is to implement the Multiuser Development Environment (MUDE). This enables us to split the RPD into self-contained areas or projects. The master RPD is put in a shared area, and then projects are worked on by an individual developer and merged back into the master.
This is slightly more complex and convoluted compared to online development. Rather than accessing one central environment, developers must have their own full development environment. They will need a local BI and web server in order to test changes locally, in addition to a local Administration tool. However, due to the possibility of proper segmentation of the RPD, it is arguably safer.
So let's step through an example. Firstly, create the project subsets. Navigate through Manage | Projects ... within our master RPD that has been opened in the Administration tool:

Then you will enter the Project Manager screen where you can define your subsets. Navigate to Action | New Project...:

Now you can choose the objects that our project will contain. You can choose whole business models or subject areas down to tables. You can also choose other objects, such as initialization blocks:

Let's create two projects: one for the main AdventureWorks Finance fact and another for the Internet Sales fact model. Once this is done, we can place the master RPD in a shared location of our choosing.
The master RPD has now been set, so we will now access it as one of the developers on the project in their local environment. Firstly, open a new local OBIEE Administration tool instance, without opening an RPD. Now we want to define where our master RPD is, so that our local Administration tool will know where it can access the master. We do this by navigating to Tools | Options:

Under the Multiuser tab, stipulate the location of the master RPD and your (the developer's) name. This would normally be on a network share that is easily accessible by all users.
The Full name: field is used for recording change control, as any changes and comments will be recorded with this name attached to them. Once this has been done, we are ready to locally access one of the projects that we have previously set up in the master RPD.
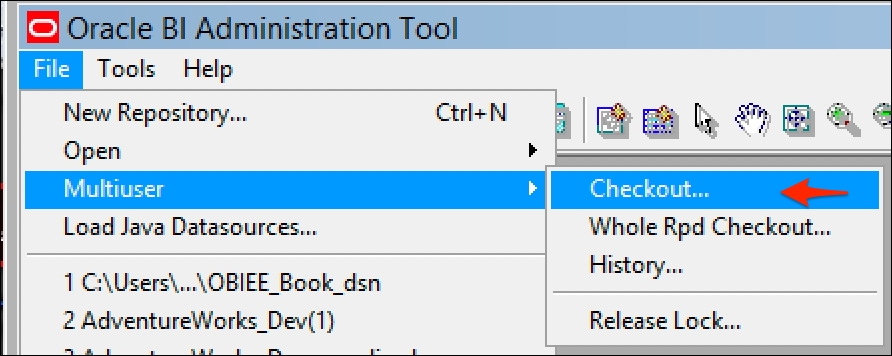
Click on OK. Then navigate to File | Multiuser | Checkout...:
We are then prompted to choose an RPD in that directory and its password:

We are then prompted to choose one or more of the projects in the master RPD. Let's go ahead and choose the one that covers the main finance fact:

Once we have chosen the project and clicked on OK, a subset RPD containing only this project will be copied to our local development machine. Then we are prompted to name this new subset RPD and save it in our local repository directory:

Once this is completed, we are now ready to make changes in our local environment. As a simple example, let's change the logical column Month
by renaming it to Months.After our changes have been made, and before we merge them with the master, we can compare our subset RPD with the original. We do this by navigating to File| Multiuser | Compare with Original... (by the way, don't confuse this with File | Compare...
, which you can use to compare one RPD to any other):

You select the original RPD and at this point, you will be presented with a screen showing the summary of all the changes that we have made. If you do not recognize a change or a difference, and wish to investigate it further, you can mark an individual change. Let's do that now by choosing the change and clicking on the Mark button:

Once you have done this and have returned to the main repository, you can see that the change has been highlighted. Note the subtle icon in the following screenshot that highlights our change:

If you are happy with the change, let's go ahead and merge our local changes back with the master. After doing the normal sanity check, such as checking the global consistency, we can merge our local changes with the master by choosing File | Multiuser | Publish to Network...:

At this point, the master RPD needs to be saved and locked by the system to ensure that no one else is making changes to the RPD at the same time.
The records on the Lock Information screen show the following:

- Login Name: This field should be filled in with the username that we logged into the RPD
- Full Name: This contains the name that we input when we set up our local Administration tool for multiuser development
- Computer Name: This field should be completed with your local development environment computer name
- Lock Time : This field contains the time at which the lock and change will be recorded
- Comment : This contains the reason why we are locking the RPD. This will be stored in a history that is accessible by all developers. So it is worth spending a bit of time to make salient and descriptive comments about the set of changes that have been made. Once we click on OK, the three-way merge process (that we have described at the beginning of this chapter) takes place on your local machine. Once you have stepped through the process, and dealt with any conflicts, the merged master is copied back to the central server
At anytime, we can access the master to look at the development history. This is done from the Multiuser menu, as shown in the following screenshot:

If we do this now, we can see that our change has been recorded in the historylist. Through the Action option on this screen, we can also view or rollback the last set of changes and revert to the previous RPD version:

The main disadvantages are:
- The definition of projects can be cumbersome and very time consuming to set up correctly
- Each developer needs their own complete development environment including licensing
- The overhead of the previous two points can make the development process slow
- Regression and whole system testing needs to be carried out on the whole master RPD after merging is completed. This is in addition to developers unit testing in their own environments
The main advantages are:
- There is version and change control of objects within the RPD
- The developer who made a change is recorded, and they can make comments
- Rollback of changes is theoretically possible