
Once the users and groups have been created and properly associated with one another based on the matrix provided in the previous section, you have completed LDAP assignment only. This in effect emulates the LDAP directory relationship that would already be established in an organization's LDAP directory, such as Microsoft Active Directory. You've simply leveraged what is already built into WLS in order to showcase that using the embedded LDAP is a solution for managing a small number (really, up to 1,000 it is still quite functional) of users and assigning them to groups. Next, you'll associate groups you've created to the Oracle BI Application Roles used to delegate privileges for the Oracle BI system. This is done using Fusion Middleware Control Enterprise Manager as follows:
- Navigate to Fusion Middleware Control and log in with the WebLogic administrator user's credentials.
- Click on the WebLogic Domain drop-down icon under the bi label to the right of the navigation menu icon to expand the menu options.
- Select Security > Application Roles from the menu.
- On the Application Roles page, if no roles are shown in the table grid:
- Select obi from the Application Stripe drop-down
- Click the Play image button to the right of the Role Name field to search for application roles within EM
- The default OBI application roles should appear.
- Click the row for BIConsumer to select it, and it should highlight the row.
- Click the Create Like... button above the Application Role table.
This will technically duplicate the application role so the same properties and system privileges associated with the BIConsumer role will be given to the new application role you'll create in the next step.
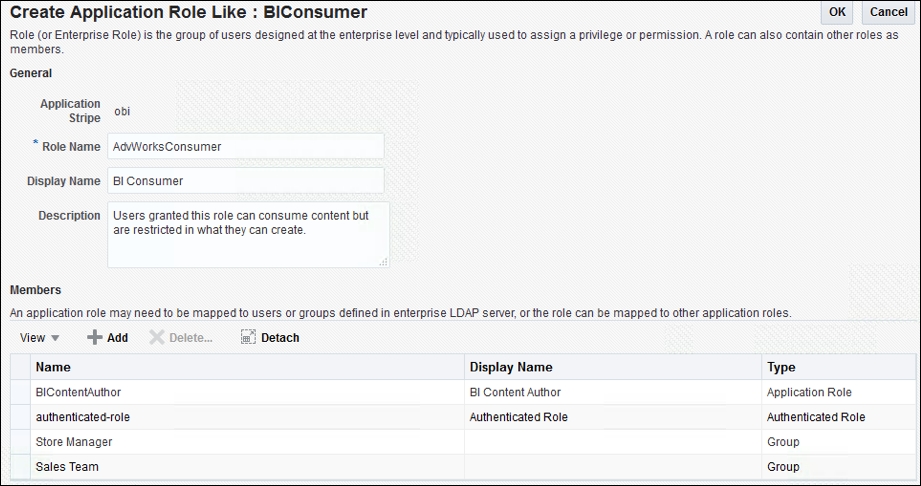
- On the Create Application Role Like : BIConsumer page:
- Enter AdvWorksConsumer in the Role Name field.
- Edit the Display Name and Description fields, making them unique to the AdvWorkConsumer purpose:
- Enter AdvWorks Consumer for the Display Name
- Leave the Description field as-is
- Below the General section, locate the Members section.
- Click the Add button to begin adding a new member to this application role.
- Change the Type drop-down value to Group.
- Leave the Principal Name and Display Name fields blank.
- Click the play/submit button showing to the right of the Display Name field.
- This will reveal all groups from the WLS identity provider(s).
- Click on the row for Sales Manager and then click the OK button.
- Click on the row for Sales Team and then click the OK button.
- Repeat the preceding steps, clicking the Add button, adjusting the Type drop-down to Group, and searching for the groups. This time, click Sales Team as the group to add, and click the OK button.
- Review the two new groups added to the application role you are creating.
- Click on the row for BIContentAuthor and then click the Delete... button above the table to remove that entry from the Members table.
- Repeat the preceding step for the authenticated-role member to remove it from the members list.
Tip
The authenticated-role member is an important role that is installed by default with Oracle BI. It basically means that any user that can log in successfully into the Oracle BI portal will be placed into this role once authenticated. Any application roles that have this role as a member will automatically give such an authenticated user any assigned privileges provided by that application role. So, one must be cautious about keeping this role in any of the custom-created application roles. Often, as a best practice, the authenticated-role is also removed from the BIConsumer application role before migrating the solution into production.
- Click the OK button in the upper-right corner of the Create Application Role Like : BIConsumer page to return to the main application role page again:
- Repeat Steps 4-12, but this time create two more application roles and only assign the users or groups (that is, principals) as described in the following matrix below:
Application Role
Group Name
AdvWorksSalesTeam
Sales Team
AdvWorksTechnician
Bicycle Technician
- The final Application Role list should look similar to the following screenshot:

That wraps up the security assignments we needed to create in order for users to access the reports and dashboard you'll create in a later chapter.
Now that we've completed the embedded LDAP identity-provider configuration of users and groups, created new application roles, and assigned WLS Embedded LDAP groups to them, let's read some more about the advanced security features available to you in Oracle BI.