Let's see how highlights for text, which look like the smudged strokes of a felt-tip marker or a paintbrush, can be created in a few simple steps.
Simple highlighting in iWork is not included in the toolbar as a separate option like in MS Word or Open Office. You may have noticed that Apple generally avoids bloating—putting too many features in toolbars and menus. To use simple highlighting, go to Text Inspector, click on the More tab, and use Background Fills for Character or the whole Paragraph.
To highlight a character, word, or phrase, check the respective checkbox and click on the Color tab to open the Colors window. From there, choose a color with which to highlight the text.
Let's try something more exciting. Here's how to change a simple line or a rectangular shape into a colored smudged highlight for text.
To create a highlight with a line, follow the next steps:
- Insert the shape—a line—from the Shapes drop-down menu in the toolbar. By default, the line is 2 points thick, the kind of thickness that may be required for column dividers or for separating images or text boxes.
- Switch to the Graphic Inspector and increase the thickness to about 2 points more than the font size of the text to be highlighted. If you use an 11-point font, set the thickness of the line to 13.
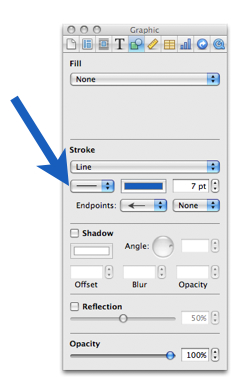
- Click on the styles tab under Stroke | Line, and choose a style from the drop-down menu, as shown in the following screenshot. Try different ones to see which style suits your project better.

- Click on the Color tab and choose a color from the Colors window.
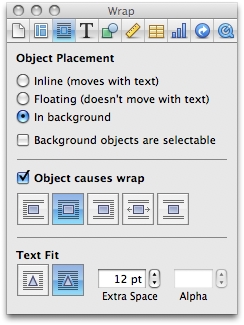
- Switch to the Wrap Inspector (shown in the following screenshot). Select In background and check the Background objects are selectable checkbox. These settings will make the shape go behind the text, but you will still be able to select it for moving and modifying.
- Drag the smudged highlight line behind the text that you want highlighted. Drag to extend and cover the entire text lengthwise. If needed, add thickness in the Graphic Inspector.
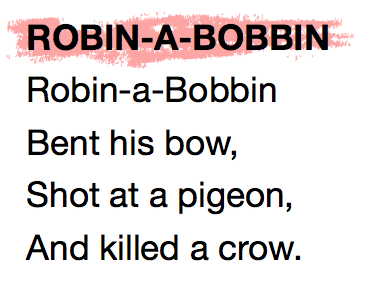
- Here is how the result might look with the nursery rhyme Robin-A-Bobbin. The heading is set to 28 points and the highlight is set to 50 points.
To create a highlight with a rectangle, follow the ensuing steps:
- Insert a shape—Rectangle. By default, the starting shape for a rectangle is a square, with a solid color fill and a 1-point black frame (Stroke).
- Drag the shape to the part of the text you want to highlight and resize to cover the text.
- Click on the Graphic Inspector. Choose color in the Color fill. Click in the color well to open the Colors window and click on a color in the crayon box or create a color by moving the sliders. In this example, the color is Lemon from the crayon box.
- Then, click on the bar under Stroke to open a drop-down menu, choose Line and click on the line styles tab below it to choose from a number of outlines (frames) to give the shape a smudged look—as though it's a stroke of a painter's brush. Click on the color bar next to the style chooser and select a color. The outside frame color should be darker than the color fill. In my example, it is Cantaloupe.
- Adjust the thickness of the smudged outline to create your desired effect by clicking on the arrows or setting the value in the Thickness window.
- As an option, add shadow to give a stronger contrasting effect to the new shape.
- Switch to the Wrap Inspector. Select In background and check the Background objects are selectable checkbox. These settings will make the shape go behind the text, but you will still be able to select it for moving and modifying.
- Drag the smudged highlight line behind the text that you want to highlight. Drag to extend and cover the entire text lengthwise. If desired, add thickness to the frame.
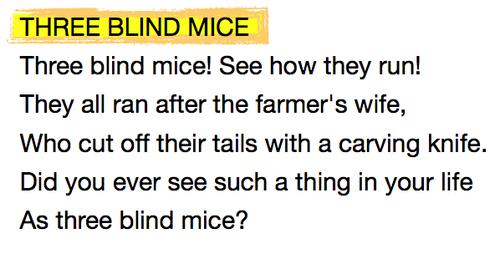
- Here is what the result looks like, with the nursery rhyme Three Blind Mice having the heading highlighted (shown in the following screenshot):
Try these additional features:
- Flip the highlight horizontally if you want to change the direction in which the thickness of the smudge recedes. In the Metrics Inspector, click on the Flip arrows in the bottom right corner.

- To curve the smudged line, select the shape, then go to Format | Shape | MakeEditable, and after that, navigate to Format | Shape | SmoothPath. The shape will show red editing points. When you click on one, it shows propellers—editing handles. Drag and rotate them to give the shape curving contours.
These highlights have more to do with graphic design than with text formatting. Their great advantage over simple highlights is not just the striking effect, but also their flexibility. We can store them separately to re-use and create our own unique styles. They can be used for branding and creating business logos.
However, compared to simple highlights, one disadvantage of using shapes is that they won't move with the text when you edit it.
But there is a way to work around this:
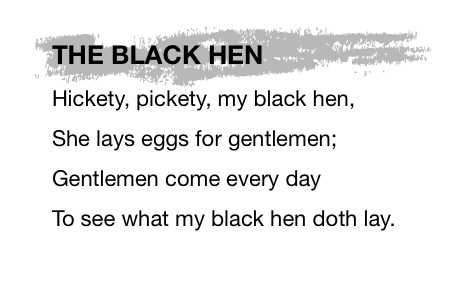
- Put the text into a Text Box. In the Wrap Inspector, uncheck Object causes wrap.
- Put the shape in another Text Box—simply cut and paste inside the box.
- Move the box with the text over the box with the highlight.
- Select both boxes. Click on them while pressing the Shift key.
- Under the Arrange menu, choose Group.
- The result will look as it does in the following screenshot with the The Black Hen nursery rhyme, but text and highlight will move together.