
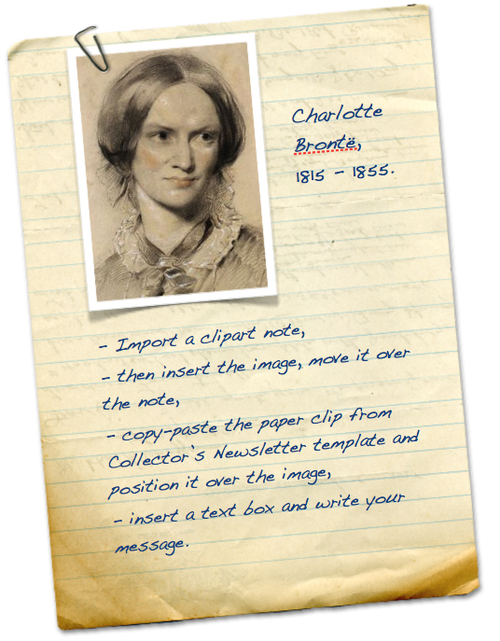
This recipe shows how to put together a project that uses elements of iWork templates as clip art. Here, we will make a hand-written note and clip an old picture to it.
For using elements of iWork templates as clip art, follow these steps:
- Open a blank document in Pages, and then open the Collector Newsletter template.
- Copy-paste the image of a sheet of old notepaper.
- Then import the photo.
Here, we will be using a portrait of the English writer Charlotte Brontë, the author of Jane Eyre.
- Go to the template again and copy the image of the paper clip. Paste it into your document.
Importing elements in this sequence puts them one on top of another in layers—the sheet of paper in the background, then the photo, and finally the clip.
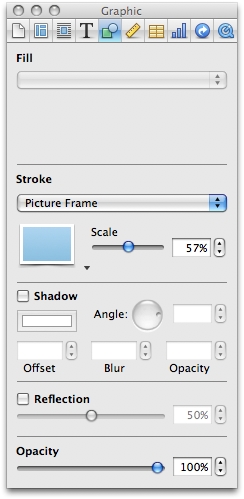
- Next, move the photo to a corner of the sheet of notepaper and give it a picture frame.
In the Graphics Inspector, under Stroke, click on the drop-down menu. Choose Picture Frame, and click on the icon that gives the image a white frame and an angled shadow that creates an effect of an old photo with slightly bent edges. The size of the frame and the shadow can be altered by dragging the scale slider. In this example, it is set at 57%:
- Click on the clip and move it over the photo so that it looks as if it has been clipped to the piece of paper.
- Then, click on the Text Box icon in the toolbar and type your text. Here, we have two Text Boxes—one next to the portrait and another one below it. Make sure that the boxes don't have frames, color fills, or shadows; we only want the writing to be seen.
If you add shadows, make sure they all go in the same direction. Rotate the shadow wheel in the Graphic Inspector to align shadows.
- To create a genuine handwriting effect, choose a font that mimics human handwriting.
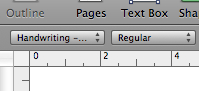
Here, we use Handwriting Dakota, but there are numerous other fonts that offer a handwriting effect. Click on the font family drop-down menu to the left in the Format bar and find one using font previews—the name of the font appears in the same way as it looks in the document. The Font menu only appears in the Format bar when you are inside the text box with the cursor blinking within the text. When a graphic image is selected, the Format bar only shows options for working with graphic objects, not text.
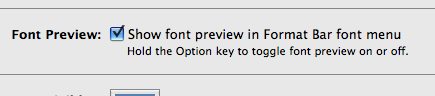
If the Font menu doesn't show previews, activate this function under Preferences. Under the application menu—Pages, Keynote, or Numbers—go to Preferences | General. In the General preferences check the box against Show font preview in Format Bar font menu. If you are in too much of a hurry to fiddle with preferences, just press the Option key while clicking on the Font menu—previews will be shown temporarily.
- Move the text box over the sheet of paper, so that it looks as though the writing is actually on the paper, not in the text box. Resize the box, align it with the photo above it, and change the size and color of the text. We can, for example, use a dark blue color to make it look like fountain pen ink.
- Select all elements and choose the Group option under the Arrange menu. The composition can now be moved, resized, and copy-pasted as a single object.
- To create the effect of it lying on a desk as though being examined by someone, rotate it slightly to the left: press Command and drag one of the handles.
Check out other templates in iWork to find clip art that suits your project. Think creatively; even though templates suggest particular fields of activity, their elements can be used for something completely different. A catering brochure, for example, has index cards that could also be used on a research paper for data boxes and squiggly lines that can serve as dividers in a collection of poetry or on a page with quizzes and puzzles.
Try modifying editable clip-art images from templates. In the catering brochure, the images of the knife, fork, and spoon are editable. Click on the image once, then click on it again and it will show red dots—editing points. Moving them with the mouse or keyboard arrows can turn them into something different—a tool or a human figure.
But do check clip art images for resolution. Some of them pixelate when enlarged.