
Headings of sections and columns can be designed as graphic images. Adding gradient color (flowing, changing from one to another) to such headings can make them very attractive. This recipe describes how to fill letters with flowing colors.
In this recipe, we will use the letters F and G to create the heading for a Financial Guide column in glowing, golden yellow colors.

The following steps describe the technique:
- Open a new iWork document. Choose a horizontal (landscape) page layout, when opening the document.
- Type
FGas usual—black letters on white background. - Highlight the text and choose a thick and bold font variation from the font drop-down menu in the Format bar. Here, it is Hoefler Text Black.
- Increase the size as much as possible, so that the two letters fill most of the page.
- Turn the text into an image—make a screenshot of the text by pressing Command + Shift + 4. The image should appear on your desktop as a PNG file. You can also navigate to File | Export | PDF. Leave the image where it is; we will need it in step 10.
- Create (import) a shape from the Shapes menu. Here, we will import a rectangle, but you could choose any shape.
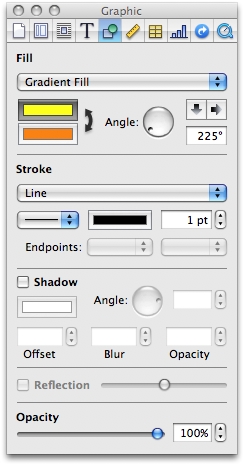
- In Graphic Inspector, under Fill, choose Gradient Fill.
- Now, we need to choose our colors. Click on the first color tab, and when the Colors Viewer opens, click on your first color choice. Click on the second tab and choose your second color. In our example, the colors are Tangerine and Banana, from the crayons box.
- Click and rotate the Angle wheel to change the direction of the flow.
- Import the graphic image of the text and slide it over the shape. The image, in PNG, PDF, or JPEG format, has black letters on a white background.
- Resize both the image and the shape with Gradient Color Fill. The shape should be larger than the graphic image of the text.
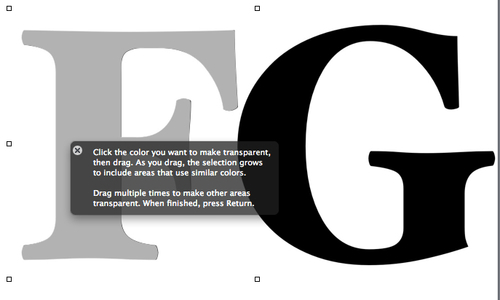
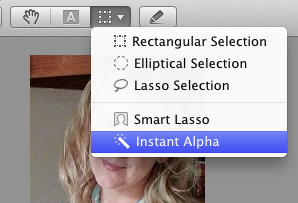
- Remove black text with Instant Alpha. The letters will now be transparent, and the flowing color of our shape will be visible through the letters, filling them.
- For a glowing effect, add a shadow to the image of the letters. To add a shadow, check the box against Shadow in Graphic Inspector and give it one of the colors of the gradient combination. In this example, it is Tangerine.

- When finished, group the screenshot and the shape behind it, export to PDF, PNG, or JPEG, and use it in your project or document (resize, crop, or mask as needed).
We have used a variety of techniques and tools in this recipe. This section gives a brief explanation of how each of them works.
When choosing the font, we go for one that has thick variations, such as Black or Condensed, because these fonts provide more space inside the letters, to be filled with color. This is why we've chosen Hoefler Text Black.
It may look better if we bring the two letters closer before turning them into an image. Select them, and in Text Inspector use the Spacing arrows to reduce the default distance between the letters. Here, it is set at -9 %. This technique is also called kerning.
We increase the size as much as possible, so that the two letters fill most of the page, because we want to work with a high resolution image (high resolution images can be scaled down later, whereas low resolution images cannot be scaled up). In our example, the font size is 470 points. To increase the text size, select it, press Command, and type (press) the + (plus) key continuously. Also, we can open Font Panel and type our desired size in the font size window.
Taking a screenshot is one of the easiest ways of making an image. We can also convert our iWork document to PDF. Open the print dialog (Command + P), click on the PDF tab, and choose Save as PDF. Which format to choose depends on how you intend to use the graphic image. PDFs are suitable for high-quality printing and PNG files are better for the Internet.
This option blends two colors inside a shape, giving the color a flowing effect—one changes into the other from side to side. The arrows to the right of the Angle wheel can be used to change the flow from horizontal to vertical.
The current version of iWork also has the Advanced Gradient Fill option, by which you can blend more than two colors. They can flow from side to side or in a circular way, like ripples on water.
As the letters of the heading are now a graphic image, we can use graphic tools on them. Click on Instant Alpha in the toolbar (or choose it from the Format menu) and rub out the black letters. Drag the cross that appears when you activate Instant Alpha several times, for cleaner removal. Hit Return when you are finished with Instant Alpha.
Because we've rubbed out the letters, they are now like holes in a piece of paper. They behave like edges of an object, and the shadow comes off these edges, that is, inside the letters. The colored shadow inside the graphic image gives the whole design an additional glowing effect. Experiment with different offset and blur settings for the shadow, and with its direction, by changing them under Shadow. In this example, the shadow is offset at 15 points and blurred to 22 points.
The background can be removed, if you prefer to use only the two letters as a heading. Crop it out from the graphic image in iPhoto or Preview. Preview also has the Alpha tool under the Select drop-down menu. If we remove the white background around the letters, we will be left with just the glowing letters for our design.
Before converting the final iWork document into a graphic image, consider stretching up the FG design.
To do this, select the image, uncheck the Constrain proportions checkbox in Metrics Inspector, click on the handle in the middle of the top of the image, and pull it upwards. Its width will remain the same, but it will become taller.
You may have used a widely available font, but changing the way it looks as a graphic image will give your image a unique look—just what is needed for a good design.

- The Putting images inside letters—filling letters with photos and other graphic images recipe in Chapter 6, Graphic Design—Working with Clip Art and Making Your Own