
Desktop publishing (DTP), started to develop in the early 1980s but really took off with the introduction of Apple's LaserWriter, in 1985. High-quality, large print-run publishing became accessible to small and home-based businesses and organizations.
Because computer operations replicated the techniques used in printing, the terminology adopted by DTP developers also came from the publishing industry.
These days, the competition is so fierce that many printers will themselves take on the final preparation of PDFs for print—so long as the files are of decent quality. Still, it makes good sense at least to understand the methods and terminologies used in printing.
This recipe will show a few basic techniques required when designing and preparing documents for professional print shops.
The following techniques and steps describe how to prepare your document for professional printing.
iWork documents have dozens of preset paper formats that are widely used in printing. What you need to take into account when preparing your project for professional printers is trim. When large sheets of paper are fed into printing presses, there is an extra area that remains empty or is used for technical information. At the final stage of printing, when the publication is folded, bound, and sorted into bundles, this extra paper is trimmed—cut off with heavy guillotines.
To take this process into account, add 3 mm (1/8 inch) all around your document. This means adding 6 mm (1/4 inch) to each of its dimensions.

To set dimensions in the Document Inspector:
- In Document Inspector, click on Page Setup.
- In the Page Setup dialog, click on the Paper Size drop-down menu and choose Manage Custom Sizes...:

- In the next window, click on the plus sign in the bottom-left corner and type the name of your project over the highlighted Untitled:
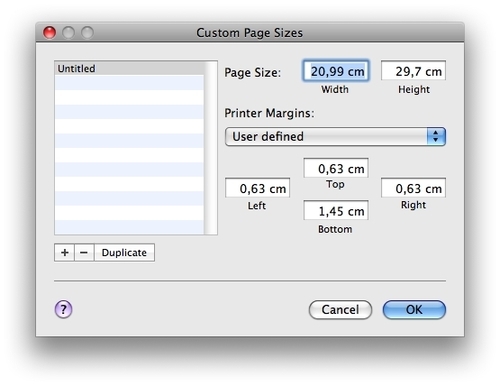
- Next, type the new dimensions in the Width and Height fields.
- Remember to save the new dimensions and set the document size to them.
An A4 document would now be 213 mm x 30 mm (8.38 inches x 11.8 inches).
In a multi-page document, make sure that there is at least one repeated design element against which all PDFs can be aligned by the printers. It must be a simple geometrical shape—a square, a triangle, or a line. It could be the small vertical stroke next to the page number like the one you see in the PDF version of iWork's User's Guides.
Set the coordinates in Metrics Inspector. Position this design element on a page and copy its co-ordinates from Metrics Inspector, or make a screenshot of the Metrics Inspector window with the co-ordinates and keep it as a reference. For opposite pages, the co-ordinates will be different horizontally, but the same vertically. When printers assemble the PDFs, they will be able to align all the pages exactly. If it isn't obvious from the design, remember to point out to the printers the element against which the pages should be aligned.
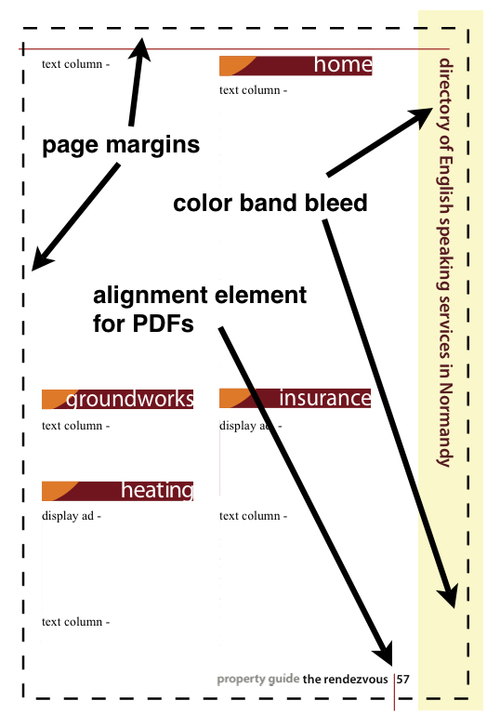
A bleed is a design feature that takes your printed image right up to—and beyond—the edges of the printed page so that there is no white margin around the text or image.
It can be the colored background of the page, an image in the background, colored boxes, or lines. Often, front or back covers of magazines and full-page advertisements are designed this way in order to fill the space right up to the edges of the page.
When using bleeds, make sure that no essential details fall into the dead zone of the trim.
It is worth avoiding vibrant or very dark colors when preparing documents for print. What looks bright and catchy on screen may look dull on paper. You can often notice this once you have converted your document to a CMYK PDF. Modern printing techniques allow us to add special effects, for example UV (ultra-violet) spotlights on coated paper that make text and images very shiny. Talk to your printers about what is available and how to achieve the desired effect.
All the elements discussed in this section can be added with Adobe Acrobat tools. However, you may find that these are no longer seen as necessary by many printers. Still, if your printer mentions them, you should at least understand what he/she is talking about. It also means you won't feel intimidated when you see these elements on artwork sent to you. And if you are not sure what your printer is talking about, ask! Rather than thinking that you are stupid, they are more likely to be flattered by being able to help.
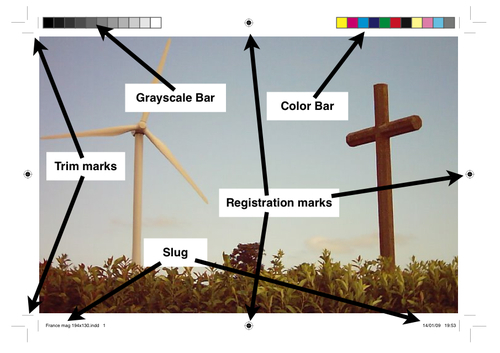
The fat dot with a crosshair through it is printed for each color in the CMYK sequence. If the process goes properly, the dots overlap precisely and the mark is black at the end. If any plates are offset, the colors are visible and the printer knows that something has gone awry. On modern presses, this is often controlled automatically, but operators still check the registration marks.
These are also called crop marks.
The thin angled lines in the corners show exactly where the finished page will be cut by the guillotine. They indicate the margins of the actual page or design element.
Sometimes you see the color bars on the edges of daily newspapers. They are cut off when producing higher quality publications, magazines, and brochures. These bars are used by the printer for quality control. The press operator looks at them to check color density and consistency. This is also automated on modern presses, but operators are there to watch over the process.
These are lines of information about the publication, with its title, client name, and date. They are cut off at the final stage. The word slug comes from the pieces of metal that were used to separate blocks of print in the pre-computer era.
iWork documents don't have tools to add all these elements to the final press-ready PDF. They can be added with Acrobat tools. But again, as long as the quality of the PDF is acceptable, printers may not even ask you to add them.
Finally, another general piece of advice. Avoid those who bombard you with scary technical terms that you don't understand—in business dealings or on Internet forums. Seek out those who are helpful and ready to explain what you don't know—and may not need to know anyway.