In this chapter we will cover:
- Editing a shape to create a graphic design element
- Drawing curved lines to enhance the graphic detail in a design
- Using flowing colors for graphic headings
- Using a color picker to create a custom color palette
- Fading an image from side to side with an overlapping object
- Setting custom document dimensions
- Using columns and Text Boxes to lay out text
- Designing repeating elements such as footer and object coordinates, and creating sections
Templates included with iWork applications provide instant design solutions. They have all the beauty and elegance we associate with Apple.
Nevertheless, no template can fit all our requirements, and there comes a point when we want to create our own distinct style and a design tailored specifically to our project.
This is when we have to start designing from scratch.
Recipes in this chapter describe the main elements of a publishing project. They will fit both print and electronic publications, such as a downloadable newsletter or physical magazine.
Use them as building blocks to assemble your unique design.
The first task in creating your own unique design will probably be drawing your title. Its style and colors are key to the rest of the project, where design of the title serves as the basis of other design features, such as headings, lines, backgrounds, boxes, and bullets.
This recipe describes how to create a simple edited shape that can serve as a graphic panel for placing the title.
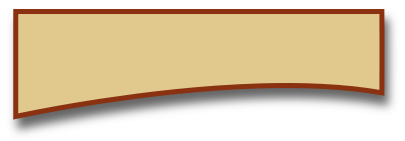
We need to have a clear idea of what sort of panel we want to design. Think this through and perhaps make a rough sketch on paper. Here, we will design a panel that is rectangular at the top and has a curved bottom edge.
Follow these steps to create your panel:
- Insert a rectangle from the Shapes drop-down menu.
- Resize it to a size that suits your title by dragging the handles or setting the dimensions in Metrics Inspector.
- In Graphic Inspector, under Fill, click on Color Fill and choose your color.
- Under Format, select Shape | Make Editable. The corners of the rectangle will show red dots—editing points.
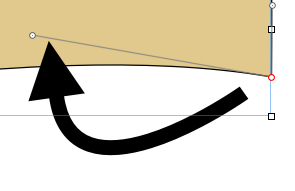
- Click on the bottom-right editing point and drag it slightly upwards.
- Double-click on this editing point to make the line curved. It will show two propellers—curving handles.
- Click on the right curving handle, press Command, and move it into a vertical position, flush with the right-hand side of the shape.
- Click on the other curving handle, press Command, and move it towards the center of the shape to give the bottom line an inward curve.
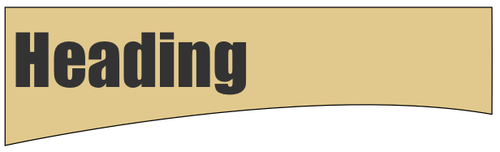
- Next, double-click inside the shape and type the title of your project. Depending on how we plan to use the created design, we can leave it in the iWork document or export to PDF or another graphic format and use it elsewhere, for example, on the Internet.
The size of the panel depends on your ideas for the project's design. It can be placed in the right-hand side corner, for example, or it can cover the full width of the document. Another common way of placing the heading is at the center with the borders of the graphic panel flush with the margins of the document—the text is aligned with them.
When the shape is made editable, its red editing points can be moved by dragging, but also by clicking on the keyboard arrows. If the Snap to Grid function (refer to the Alignment Guides) makes it difficult, press Command after you start dragging the editing points. This disables Snap to Grid.
Curved handles appear when we change an editing point from angled to curved. The handles move together, pointing in opposite directions—drag one, and the other one moves too. To move them independently of one another, press Command while dragging.
To extend a handle, click on it and pull out. To make it shorter, click on it and push in. This changes the way the line curves.
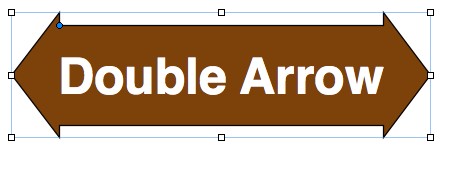
Some predesigned shapes already have editing tools. For example, the double arrow has a slider that changes the way the arrow looks. Resize the arrow by dragging its handles and reshape the points by dragging the slider. This allows you to turn it into a stretched shape, which can be used as graphic background for titles or headings.
Remember that different Line and Picture Frame styles in Graphic Inspector can give the shape an even more striking look. Here, the same shape has a colored outline and a dark gray shadow that lifts it off the page.
We can double-click inside the newly created shape to type the text in it. If you feel that there is not enough room inside it, create a Text Box, resize it as needed, give the required style and color to the text, and then move the Text Box over the shape. This way, you don't need to worry how much space the shape allows for text inside it.