
Some iWork users prefer Masking, while others prefer Image Fill. This depends on individual experience and habits. This recipe shows situations where Image Fill definitely has a design advantage over Masking.
In the iWork/Pages set of templates, under Brochures, find Catalog and take the photo of champagne glasses there. To get the photo as a separate file, copy it and paste as New from Clipboard in Preview, or open the Metrics Inspector, click on the file icon in the File Info window, and then drag it to the Desktop.

Image Fill is one of the ways we can import a photo into an iWork document. Here is how it works:
- Insert a shape from the Shapes menu. It could be a rectangle or any other shape.
- Open the Graphic Inspector, and in the Fill drop-down menu, choose Image Fill. Then, click on the Choose button and find the photo of champagne glasses on the Desktop. Click on Open.
- Next, click on the Scaling tab and choose Scale to fill from the drop-down menu. With this option, the photographic image will always fill all the space inside the shape no matter how you resize or change it.
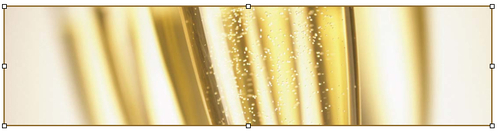
With Image Fill | Scale to Fill, parts of the photo will go outside the shape, but the inside will be completely filled with the image. Drag the handles of the shape to see how the image adjusts to the changing size and proportions of the space and until you find a result that satisfies you. Here, the glass sits within a rectangular shape stretched horizontally.
One big advantage of using Image Fill with the Scale to Fill option is that you can quickly fill the space that you have available in the grid of your layout. When you work on a magazine or a reference book with narrow columns where text items may be added or deleted at very short notice, for example small ads, you need to have adjustable fillers. If you have to fill empty space in a column, drag the handles of the shape to fill it and the photo will adjust automatically to new dimensions. If a last-minute ad arrives, you can slot it in the column and shrink your shape to compensate.

If you suddenly realize that there is too much empty space in your report, you can drag the handles to enlarge the shape; or shrink it and add a few lines in response to the reviewer's comments.
What has to be taken into account is that the photo must have elements that are easily recognizable even when they are severely clipped. In the first picture, champagne glasses are resized to banner proportions but the glass and the bubbles are clearly visible. In the second, the photo is stretched vertically to fill a narrow magazine column.
In situations like these, you may find Image Fill easier to work with than Masking. Build a library of photos that can be used with Image Fill and have them handy, perhaps in a dedicated folder or album in iPhoto.
Note that neither Mask nor Alpha tools work with photos that sit inside shapes. If you want to use Alpha to remove background, place photos in your project as objects in themselves, then apply Alpha or Mask.
Another useful feature you may want to try is filling different shapes with images. Any shape available in the Shapes menu can be filled with an image in the way described in this recipe. And any shape can be edited so that its contours are not predefined geometrical figures but free shapes suited to your project.