
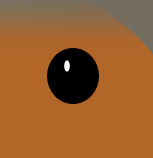
This is a photo of an English Robin, a bird often seen on Christmas decorations and cards, and next to it a logo created by tracing the photo in an iWork document.

When designing a logo based on a real life object, it is much easier to use the "tracing paper" technique. Tracing paper is what tailors and engineers used to use to make copies of paper patterns and blueprints. Thin, semi-transparent paper was put over an image, which showed through the paper. Contours of the image were then traced with pen and ink.
The same method can be used in iWork with the draw tool.
The following steps describe how to make the image.
- Choose the draw tool—last option in the Shapes menu.
- Trace the outline of the bird's body by clicking over the photo with the draw tool. Drag the mouse around slightly after each click, to make the line curve.
- After going round the full circle, click again on the first dot. The shape will close.
- Adjust the shape so that its editing points are positioned over the edges of the bird's body.
- Adjust the curves of the shape by rotating the curved handles of the editing points.
- In the Graphic Inspector, choose Fill|Gradient Fill.
- Click on the top color well and when the Colors Viewer opens, choose Iron for the top mixing color.
- Click on the bottom color well and choose Aluminum for the bottom mixing color.
- Rotate the gradient Angle wheel to around
220degrees. - Under Stroke|Line, click on the Line styles drop-down menu and choose the style that gives the shape a ruffled look.
- Set the thickness of the outline at 2 points in the width window under Stroke|Line.

- Click in the color well next to the lines menu, and choose Cayenne from the box of crayons in the Colors Viewer.
- Move the body shape aside and use the same tracing technique to recreate the shape of the robin's breast. Trace the contours of the patch with the clicks of the draw tool.
- When the shape is closed, adjust its curves, choose Gradient Color Fill, and pick its colors with the color picker. Move the photo of the robin aside and click in the color well of the first gradient color. When the Colors Viewer opens, click on the magnifying glass icon next to the color well and click on the top of the orange-colored patch on the bird. Repeat for the bottom of the patch. Rotate the gradient angle wheel in the Graphic Inspector.
- To give the patch a smudged effect, under Stroke, choose a Picture Frame with blurred edges.
- To create the bird's eye, import an oval from the Shapes menu. In the Graphic Inspector, give it a black color and reshape to a vertically stretched oval by dragging its handles.
- Duplicate the oval and give the new oval a white color. Press Shift to constrain proportions, and drag the handles to make it smaller. Move it over the black oval.
- Select both ovals and group them by using Arrange|Group or hitting Command + Option + G.
- Press Shift and drag a handle to make the oval smaller than the bird's eye.
- Move the main body shape, the breast, and the eye to form the shape of the bird.
- To create the robin's beak, wings, and tail, import triangles for the beak and wings and a rectangle for the tail, from the Shapes menu.
- Make these shapes editable under Format|Shape|Make Editable. Put the shapes over the photo of the bird and move the editing points to make the shapes look like parts of the bird's body.
- To draw the legs, choose the draw tool from the Shapes menu and click over the bird's legs in the photo. To finish the line, double-click on the second dot. Each leg consists of three lines.
- Give the lines a color—in the Graphic Inspector, click on the color well under Line and choose Mocha from the box of crayons.
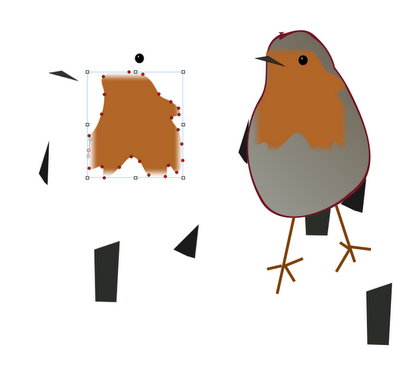
We can draw custom shapes with the draw tool by clicking in the document several times. Each click creates a dot that is connected to the previous one by a line.
The draw tool creates either an angular or a curved line. As the robin's body is rounded, we need a curved line. To draw a curved line, drag the mouse around slightly after each click—the line will curve.
We don't need too many dots to create an outline; just click on the edge of the body in the photo. To make our line follow the contours of the body, move the red dots—the editing points. They are moved by dragging the cursor or by using the keyboard arrows.
Each editing point, when selected, shows two propeller-like handles. Click on the tip of the propeller to rotate and extend it. This changes the curves of the shape. Make them follow the curves of the robin's body.
When resizing the bird's eye, if you find it difficult to make the shape very small by dragging, consider using dimension arrows in the Metrics Inspector. The second white oval is the real gem; without it, the robin's eye would look dull, but adding the white gives it the twinkle that makes the whole image come alive.
Make two shapes for the robin's tail—full and clipped. We may need a clipped tail to make it look as if it's hidden behind a tree stump. If the image is to be used without the stump, we can give it a full tail.
Creating an image like this can also be done with a mask that is made editable. Put a mask over the photo and go to Format | Shape | Make Editable. Then add more editing points and make them curved.
- The Making cutouts with edited masks recipe in Chapter 5, Working with Photos: Tips and Tricks