
What do we do in a situation where our document is created in iWork, but we have to work with someone else who uses a different software? First, remember that whatever other design programs people use, the result can be converted into one of the popular graphics file types, and Pages, Keynote, and Numbers can take most popular file formats. You can import graphics in the following formats:
- JPEG
- PNG
- PSD
- PICT
- EPS
- GIF
What this means is that you don't need to worry about compatibility. A whole page or only a small graphic element can be fitted into an iWork project.
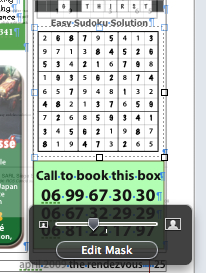
Here is one example: a co-worker designs crosswords and Sudokus and submits them in Word. They have to be fitted into a particular space in the magazine—the puzzles on one page with wide columns, and the solutions on another with very narrow columns. If you were to copy and paste the puzzle and solution grids, designed as tables, from Word and then make them sit in the layout grid, you would have to resize them, change the font size, and make a number of other adjustments.
Instead, we can use a different method, as follows:
- Print the whole Word document to PDF.
- Import the whole PDF document into the iWork document.
- Mask the PDF, leaving only the portion of the PDF that is needed on the page—puzzle on one, solution on the other.
This is much quicker and doesn't affect the final result.
With masking, we avoid cropping PDFs or other graphic images before importing them into our iWork document—masking works like cropping, but within the actual project you are working on.
A mask can be applied to a selected object from the Format menu, or with the keyboard shortcut Command + Shift + M, or by clicking on the Mask icon in the toolbar. If the icon is not displayed, you can add it through View | Customize Toolbar.
Many users shy away from masking, thinking that it is too much hassle. In fact, masking is a powerful tool and it is worth investing some time to get comfortable using it. After masking is activated, it works in the same way as when you resize any other object, except that you have a choice between several objects.
- To resize the mask itself, drag the handles of the mask. Click on Edit Mask when finished.
- To move the image within the mask, so that only the desired part is visible, just the puzzle grid, for example, click on the image visible inside the mask, and drag it around. Click on Edit Mask when finished.
- To resize the image that appears within the mask, drag the slider that appears in the Edit Mask window when masking is applied.
- When you finish editing the mask, the masked area of the image will not be visible. Move and resize the masked image like an ordinary, unmasked object.
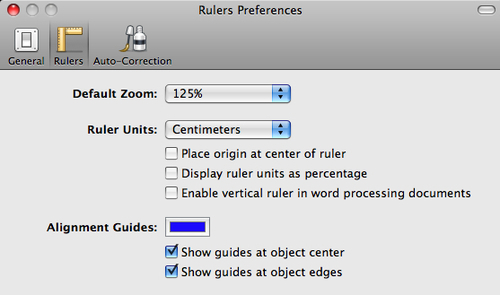
To activate the Alignment Guides function:
- Open Preferences under the menu for Pages, Keynote, or Numbers, and click on Rulers.
- Under Alignment Guides, tick the checkboxes against Show guides at object center or Show guides at object edges, or both.
In this recipe, we used unused PDF format as an example, but any other graphics file types compatible with iWork can be used in the same way—JPEG, PSD, PNG, and so on.
This is invaluable when you have to split a large project into chunks of work. Several design features for our magazine were created in Illustrator by an independent designer. We only had to put them in place as graphics. Several whole pages for graphics-rich sections of the publication were entirely laid out in InDesign, so that they only had to be slotted as PDFs into the magazine format.
It works the other way round, too. In a project where someone else puts separate chunks together for the final look, do your bits in iWork, transfer them to a file type that can be used as a jigsaw piece—and that's that. You can lay out pages for another magazine that can be then inserted into their format.
Tip
Masks can be rotated and even edited like any other shapes in iWork. By default, a mask is rectangular, but under the Format menu, there is the Mask with Shape option, which allows you to use other predesigned shapes as masks. The Draw tool cannot be used as a mask. To give the mask a free shape, make it editable. Navigate to Format | Shape | Make Editable, and then modify it with editing points. This technique can be used to make cutouts from photos.