
In this recipe, we learn how to edit basic shapes to create unique logos.
There is a Shapes drop-down menu in iWork's toolbar. Click on it to get a selection of predrawn shapes. Each can easily be made into an original logo with just a few changes. Knowing how to edit these standard shapes is the first step towards creating original logos. We only need a few customizations to make them our own.
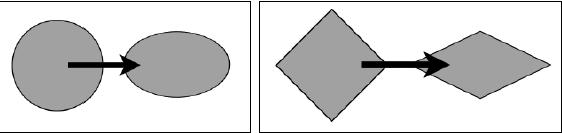
Firstly, resizing, simple as it is, gives the shape a one-off, branded look.
- To resize a shape, select it and drag the handles—the small white squares in the corners and in the middle of each side of the shape—until you get your required look.
- If the shape refuses to be stretched or squashed, this means that it has its proportions constrained. Go to Metrics Inspector and uncheck the Constrain Proportions box. In the following image, an oval and a diamond from the Shapes menu are squashed into a more horizontal shape.

- Double-click in the shape and type your initials or the name of your organization to get a basic logo.
Changing the color fill, the thickness of the shape's outline (borders) and the color of the outline can be done in Graphic Inspector or with the options in the Format Bar under the main iWork document Toolbar. This image shows a triangle, from the Shapes menu, that has been stretched upwards. Follow these steps to work on the triangle through the Graphic Inspector:
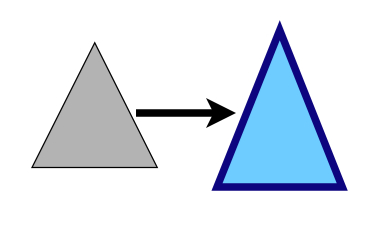
- To change the color, click on the drop-down menu under Fill, and choose Color Fill.
- Click on the color well to open the Colors Viewer and choose a light blue color called Sky, in the box of crayons.
- Under Stroke|Line, click in the color well, and in the Colors Viewer choose the dark blue color called Midnight.
- Click on the up arrow next to the line width window and set it at 5 points.
- Next, we can double-click inside the shape and type a large letter—your initial or a letter that represents your organization—to get a simple logo.
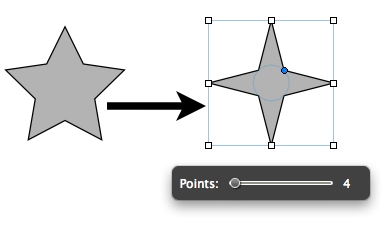
Some of the pre-drawn shapes in the Shapes menu have additional editing features. Besides resizing and changing colors and thickness, you can change the way the shape looks by dragging the blue editing handles. The rounded rectangle, arrow, double arrow, quote bubbles, and the star have editing handles. The star and the polygon have control panels with sliders that change the number of points in the star and the number of sides in the polygon. Follow these steps to change the look of the star:
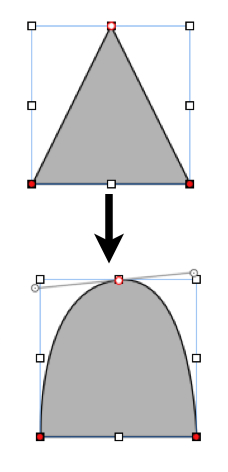
Making shapes editable is another powerful editing feature. Use the following steps to see how to edit a triangle.
- Insert a triangle from the Shapes drop-down menu in the Toolbar of your document or from Insert
|Shapes|Triangle. - Make the triangle editable, thus: Format
|Shape|Make Editable. - Double-click on the upper editing point on the triangle to curve it.
- When the top becomes curved, it shows "propellers"—curved handles. Click on the tips of the propeller blades and hold, drag up and down, left or right, and extend or push in to adjust the curves, making them more or less rounded.
- Now that we have a shape that looks like a shelter or a tent, double-click inside it and type the name of your camp site or refuge, and get a logo!
Shapes with corners retain their angular shape after being made editable. Rounded shapes like the oval and the rounded quote bubble, when made editable, show curved handles when you select an editing point—they are like two-blade propellers. When you rotate the propeller it changes the flow of the curve, allowing us to create shapes with unusual contours.
For shapes that have already been made editable, Format | Shape Path has two more options: Smooth Path and Sharpen Path. Go to Format | Shape | Smooth Path, and an angular shape will become rounded. Go to Format | Shape | Sharpen Path, and a rounded shape will become angular. For example, if we insert an oval from the Shapes menu, make it editable and then choose Sharpen Path; it will turn into a square.
This is not all. Each editing point can be turned separately from angular to rounded, and vice versa. Double-click on a red editing point and a curved line will become angular, with the red dot showing the top of the angle.
The same editing technique can be used for more complex designs where several shapes are combined to create an image.

The eyes in this image are triangles that have been made editable and have had one angle rounded.
Tip
You don't need to draw the second eye from scratch. Just duplicate the shape—Command + D—and change it slightly for symmetry or to give the face more expression. This applies not just to the two eyes, but to the heart shape as well. The cloud of little "dreamy hearts" are duplicates of the main heart shape.