
There are thousands of websites offering downloadable clip art. One of the popular items is the thought bubble, which is used in comics, photos, and other graphic images. Quote and thought bubbles are also widely used in advertising and logos.
iWork has an oval and a rectangular quote bubble. In an open document, click on the Shapes menu in the toolbar and select one of those.
But what about the thought bubble? In this recipe, we will see how to make a thought bubble out of a star shape, which is also available in the Shapes menu. Furthermore, we will give it our own original style.
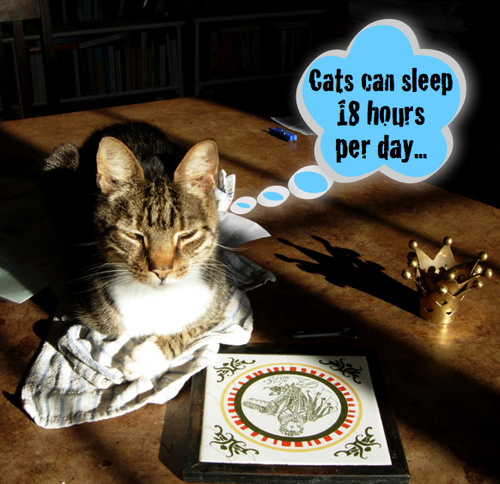
Here is the finished picture of my cat Vaska lying half-asleep on the dining table.
Follow these steps to make a thought bubble:
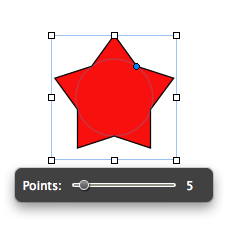
- Insert a star shape from the Shapes toolbar menu.
The star appears with a small control panel that allows us to increase or decrease the number of points. Here, we leave the star with five points.
There is also one editing point in the star. Drag it to change the star to either spiky with sharper and thinner points, or chunky with a fuller body and less protruding points. Let's choose a chunky shape, which is closer to our target.
- Under Format, choose Shape | Make Editable.
The shape will show little red dots—editing points.
- Next, again under Format | Shape, choose Smooth Path.
- Change Color.
At this point, you may want to change the default color of the shape to the one that you want to give to the thought bubble. Here, we will use a light shade of blue.
- Curve the points of the star.
When we make the shape smooth, its contours become curvy and when we select a red editing point, it shows propellers—two handles with small circles at the end. Click on one and hold, then drag it around, and pull out or push inside to change the curve. With the star shape, one advantage is that we need very little curving.
But only curve the outer points!
If you want, add editing points to give the future bubble more curves. To add, press the Option key and move the cursor to hover over the outline of the shape. When it turns into a little pen with a plus sign, click on it. The shape must be selected and must show editing points.
If you accidentally deselect the star, click on it once, pause, and click again—the editing points will reappear.
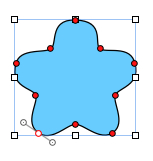
- Double-click on the editing points that are closer to the center of the star, one by one.
This removes the smoothness from the curve. The lines coming out of the editing points that we have clicked now form an angle, not a rounded curve. The shape begins to look like a five-petal flower.
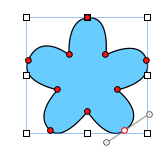
- Next, move the inner, angled points slightly outward, so that the shape looks like a cloud rather than a flower.
To move an editing point, click on it to select and drag or hit the keyboard arrows. When we drag an editing point, it may suddenly jump and align itself with other dots. This means that the Alignment Guides snap to grid function is active. To disable it while working on the design, press Command when you start dragging.
- Leave the bubble and add a few oval shapes.
Give them the same color as the bubble, resize them so that they are progressively smaller than the bubble, and form a train of thought going to the thinking character in your design.
- Double click in the main shape and type in your text.

If your text is too long to fit inside the shape, you may find it easier to put it in a Text Box and format and resize it separately from the bubble.
- If you don't like the train of thought bubbles but want a spike-shaped callout going to the thinking character, add two editing points to the left and to the right of one of the angled points.
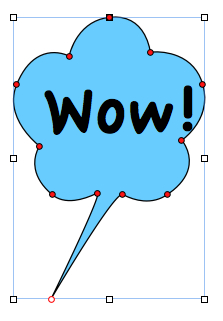
- Then, click on the editing point in between the two new ones and drag it outside, towards the character in your picture. It will become a spike pointing at the thinker. Use the propellers to make the spike curving.
- We can design the thought bubble right over the photo, or do it separately in another document and then select all the elements and copy-paste them into the project where the bubble is to be used. Then, we can also make a few final adjustments.
Note
Remember that for the outer contours of the bubble, you can use different line styles and add shadows. Both lines and shadows can have different colors. In the Graphic Inspector, add the line that looks like a ribbon and give it a light gray color and a shadow of the same color—the thinking effect becomes stunning as you can see in the picture at the beginning of this recipe.
iWork has predrawn quote bubbles in the Shapes toolbar menu, and oval and rounded rectangle shapes are available under Insert | Shape. Both already have editing points to change the width and direction of the spike and also the corners of the rectangle.
Using the same technique as we've used with the star, we can turn these quote bubbles into thought bubbles. However, because the star shape already has a number of points that can easily be curved into a cloud, you may find it easier to transform a star into a thought bubble.