
In this recipe, we will create a set of curved lines and put them together in a bundle. This technique has many purposes in design—it brightens a page and makes headings, photographs, and other graphic details in our design stand out.
To see how this technique works, we will pick up from where we left off in the previous recipe—we will add curved lines to the panel with a curved bottom line.
Create a panel similar to the one described in the Editing a shape to create a graphic design element recipe discussed earlier in this chapter, and place it in your iWork document as a floating object.
Follow these steps to create a bundle of colorful curving lines and add them to the panel:
- Click on Shapes in the toolbar to open the drop-down menu and slide down to choose the Draw tool.
- When the Draw tool is selected, the cursor turns into a small pen tip. Click to create the starting point of the line.
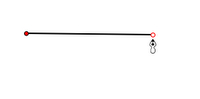
- Move away and click again to create the second point of the line.
- At this point the line is straight. To make it curve, click on the second point again and drag the mouse around slightly—the line curves.
- Two gray handles that look like a propeller appear, extending from the second point as we drag the mouse. Click on the tip of one and drag it around, in a rotating movement, to change the curve.
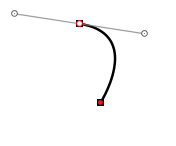
- When you are satisfied with the curve, either press Escape or double-click on the second point.
- Go to Graphic Inspector, and under Fill, choose None.
- Under Stroke, click in the color well, and when the Colors Viewer (Inspector) opens, choose a color for the line that is similar to, but slightly darker than, the color of the panel. Again, under Stroke, set the width (thickness) of the line by clicking on the up and down arrows or by typing the size.
- Duplicate the line twice—press Command + D and then press it again. In Graphic Inspector, choose a color that is darker than the first one, and for the third line, another color, which is still darker.
- Move the lines to position them one under another to create a bundle.
- Select all three. Click on each one while pressing Shift. Move the bundle under the curving bottom edge of the panel, so that together they form one design.
- Press Shift and click on the panel to select all four elements. Then, choose Arrange | Group. Now, the resulting design can be moved around the document or copied and pasted into another project.
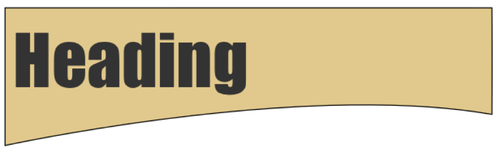
The result should look something like this:

Shapes created by the Draw tool take the default styles—line thickness and color fill—of the template we are using. If we start with the Blank template, the Color Fill field shows a green color and the Stroke field shows a black line with 1 point thickness (width). We can change both parameters in Graphic Inspector. To remove the color fill and leave just the line itself, we set Color Fill to None and change the thickness and color of the curved line to fit our design.
If the curved lines you design are too short or have not curved the way you want them to, don't worry. Under the Arrange menu, select Ungroup, select the line you want to edit further, and change its length and the curve. It usually takes several adjustments before the design is finished.
Colors Viewer is like an additional Inspector. Whenever you click in a color well, Colors Viewer opens as a separate palette, offering a range of tools for selecting and designing colors. When creating an original design, use co-ordinated colors, picking and copying them off templates provided with your iWork installation or from a photograph you are using in your project. The colors should complement, not clash with, one another. You can even use the same color for different design purposes, but make it look different by reducing its opacity. This option is at the bottom of Graphic Inspector. Select a shape or an object and drag the Opacity slider to make it less opaque. The same color will look different but will remain in harmony with your project, as you have only adjusted its transparency.
Curving handles look like a propeller sticking out of an editing point on a curved line. They appear when we double-click on an editing point to make the line curved. Click on the tip of the propeller blade and drag it as though you were starting up the Wright brothers' airplane. This rotating movement changes the curves of the line.
The Draw tool can also be used to create your own clip art—letters and numbers—as described in the Writing letters of the logo with the Draw tool—principles of a good logo recipe in Chapter 7, Graphic Design: Making Your Own Logo.