
Keynote has a wide selection of attractive themes. Having chosen one, we add master slides—predesigned slides with Text Boxes and image placeholders. When you add your own image to the placeholder, Keynote automatically adjusts its size to the size of the placeholder. Frame style and color are also retained.
However, the preset design of slides is only the starting point. We can easily change the way our photos are displayed in the Keynote slideshow. This recipe describes how to add photos to placeholders and further edit them—resize, crop, and move them around.
Prepare a photo to place in your project. It could be in iPhoto or on the desktop. To get a better idea of how Keynote works, we will see an example of a photo with a vertical (portrait) composition and a horizontal (landscape) image placeholder in the slide.
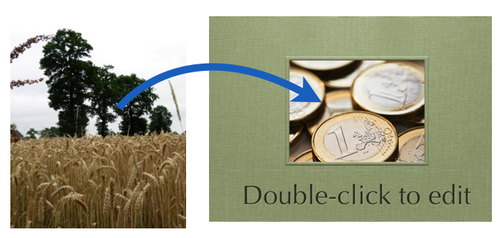
In Keynote, open a new document by selecting New from Theme Chooser under the File menu. Choose the Linen Book theme, and from the Masters drop-down menu, choose the Photo-Horizontal master slide to add to your document. It has an image of euro coins that is set as a media placeholder. In iWork, media placeholders allow for adding and replacing new images and other media files without having to do additional work on style, size, or position in the document—that is, the imported image takes all the settings of the placeholder.
To place a photo into a Keynote slide, perform the following steps:
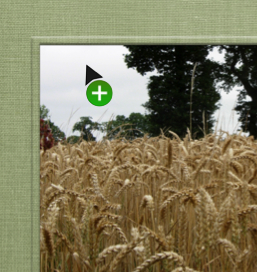
- Click on the photo you want to add to your project, and drag it to the Keynote slide. As you drag, the icon of the photo file will show as though hanging on the tip of the cursor.
- When you reach the Keynote slide, the cursor will change into a green button with a white plus sign and black arrow. Move the cursor over the placeholder in the slide. Its border will change color to blue. Let go and your photo will replace the placeholder image. Because the photo is vertical, parts of it will automatically be masked inside the horizontally composed placeholder.
- To change which parts of the photo should be shown in the document, click on the black Edit Mask tab. Hidden parts of the photo will be shown as a semi-transparent image.
- Move the cursor to the photo. It will turn into a small white hand. Click and hold—the hand will make a grabbing movement. Now, we can move the photo around within the mask to show the details that we want displayed.
- To show just a small detail of the original photo, we can enlarge it by dragging its handles, which show after we've clicked on the Edit Mask tab. As we enlarge the photo, a smaller section of it remains visible inside the mask and the rest is hidden. If the detail you want displayed also disappears, click on the photo again. The grabbing hand will be shown; move it so that the detail you want displayed is within the mask.
- When finished, click on the Edit Mask tab again to hide the masked part of the image.
- If you want to resize the masked image, click on any of the white square handles and drag. If you want to move the image within the slide, click on it and drag to the desired position.
Keynote takes the most popular graphic file formats, including JPEG, PDF, PNG, TIFF, and EPS. Note, however, that when the photo is larger than the slide in which you place it, Keynote is set automatically to reduce the image to fit the slide, which means it will have fewer pixels than the original photo. This may affect the quality of the image when the slideshow is shown on larger screens.
This image reduction is a default setting. You can change it in Keynote preferences. In your screen-top menu, go to Keynote | Preferences | General and uncheck the Reduce place images to fit on the slides option.
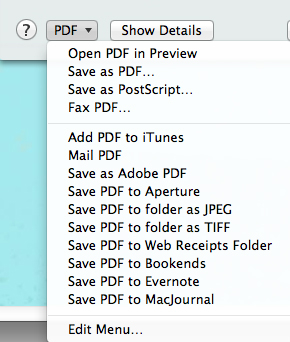
If you know that you will be changing the size of your images, you may want to convert them to PDFs so that they don't lose their quality when resized. Graphic files can be converted to PDF format in Preview. Open your file in Preview, type Command + P, and click on the PDF button at the bottom left of the Print dialog. Choose Save as PDF from the drop-down menu. If you have Adobe Acrobat installed on your computer, you will have more options, including Save as an Adobe PDF. Adobe Acrobat also gives additional options on the quality level the PDF can be saved at—straight from the menu.
In our example, the photo looks as though it is mounted within the linen fabric. In fact, the slightly bulging edges of the photo are the visual effect of iWork graphics. If you want to change the look of the photo, go to Graphic Inspector, and under Stroke, click on the Picture Frame tab to open frame style options and choose a different frame.