
An ongoing project, such as a periodic publication, should have recognizable design elements on every page. Headers and footers are typically used to include information that identifies the publication and guides the user through it.
In this recipe, we will look at how to create a footer that contains a graphic object, a page number, and information about the publication—its name, issue number, and date.
We will be using a standard A4 format with 210 mm × 297 mm (8.27 inches × 11.69 inches) dimensions.
For style, we will take the title example from Chapter 9, Planning Large, Long-term Projects. The font that we will use here is Optima Bold.

Follow these steps to create a repeating footer:
- Import a simple line from the Shapes menu. We don't have to set its dimensions at this point.

- In Wrap Inspector, uncheck the Object causes wrap checkbox to disable wrapping.
- In Graphic Inspector, navigate to Stroke | Line and set the line width at 3 points.
- Click on the color well next to the width window and the Colors Viewer opens. Click on the color picker and copy the color of the R in the title.
- Rotate the line to a vertical position. Press Command + Shift, and drag the right point to 270 degrees. Pressing Shift in addition to Command rotates objects by exactly 45 degrees.
- Move the line to the bottom-left corner of the page, so that the lower part of the line goes beyond the edges of the page.
- Note the line's starting point co-ordinates in Line under Metrics Inspector. In our example, they are 0,77 in for X and 10,92 in for Y. We only need coordinates for the top point of the line (Start). The End of the line also has X and Y co-ordinates.
- Under Arrange, choose Lock to fix the vertical line in its position, so that it won't move accidentally as the work progresses.
- Click in the footer of the document and navigate to Insert | Page Number. Page numbers will change automatically as you add more pages to the document.

- The vertical line and the page number may be too close to one another. To set the page number further away, go to Text Inspector and select Tabs. Set First Line at 0.2 in. The number will be set away from the line.
- Highlight the page number and change the default font to the one you've chosen as the house font for your project. In our example, it is Optima Bold. Set the size of the font; here it is 14 points.
- Next, type in the title of your project, issue number, and date. Don't overload the footer with information—it shouldn't distract from the contents of the page.
- Select all (Command + A) and change the color to one of the colors that you've chosen for your house style. Here, we will change it to black.
- Select the title in the footer, and change the color to another house color. Here, it is the gray for "the" in the title:
- Select just the "R" from the title, which you can also use as the logo of your project, and give it the same red color as in the title. To copy colors, you can use the color picker in Colors Viewer, or click on the house color in the colors palette, if you have stored it there while preparing the project design. (see the Using the color picker to create a custom color palette recipe discussed earlier in this chapter).
- Save the document.
In a multi-page project, especially if it is going to be printed and bound, you may want to have left- and right-hand pages. In this case, the right-hand pages will need the footer on the right side. These steps describe what to do:
- Go to the page that has to be on the right-hand side. Then, go to Layout Inspector.
- Click on the Section tab.
- Under Configuration, put a check mark next to Left and right pages are different.
- Uncheck Use previous headers & footers.
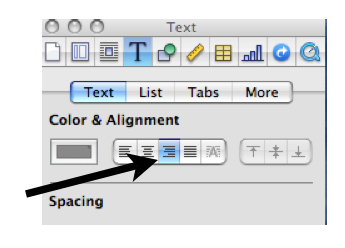
- On a right-hand side page, click in the footer, go to Text Inspector, click on the Text tab, and under Color & Alignment, click on the icon for aligning text to the right. All the text in the footer will move to the right:
- While still in Text Inspector, click on Tabs, and under Paragraph Indents, in the Right window, set the value at 0.2 inches. The text in the footer will be set off the right margin at the same distance as it is set off the left margin on the left-hand side pages.
- Highlight and cut the page number and paste it to the right of the rest of the text. Now, it will sit closer to the outer edge of the page.

- Move the red vertical line to the right margin of the page, making sure that its Y co-ordinate stays exactly the same as on the left-hand side page.
- Save the right-hand page as a section—navigate to Format | Advanced | Capture Pages. When the dialog opens, type in the page description, noting that it is a right-hand page, and click on OK.
Each new object, including Text Boxes and lines, has a default wrap count when we insert them into our document. It is set at 12 points. Wrap pushes text away from the object, making words flow around it. As the line at the bottom of the page is a repeating graphic element of our design, we remove the wrap so that it won't distort text placed on the page.
In Metrics Inspector, the position of lines is described with co-ordinates X and Y. The X co-ordinate gives the position measured from the left edge and the Y co-ordinate gives the position measured from the top. The starting and finishing points of a line both have X and Y co-ordinates. So, the two sets of X and Y co-ordinates give the exact position of the line in the document. Make a note of the co-ordinates of the line when you need to place it in a new document. Note that copying and pasting it into another document may not necessarily put it in exactly the same position.
The position of other floating graphic objects, not just lines, can be described with co-ordinates.
The vertical red stroke at the bottom of the page is a simple design element. But, it may also be used as a guide for commercial printers to align PDFs of the pages in your document, especially if you are not using other typographical guides.
If you want more flexibility on where you put the repeating elements on a page, you can put the page number, title, and other information into a Text Box and group them with the vertical line, by navigating to Arrange | Group. But you will have to enter each page number manually.
We can save the document with the finished footer as a template. Navigate to File | Save as Template. It will be saved in the My Templates folder and available to use from File | New from Template Chooser | My Templates.
A number of pages and sections in your project will have a distinct composition that will be repeated from issue to issue, for example the contents page. At this point, consider using Format | Advanced | Capture Pages. When the dialog opens, type in a description of the section and click on OK to save it with the new name.
This option adds new pages to your template. Next time you want to add a particular page to your project when you update it, click on Sections in the toolbar and choose the saved (captured) page. It will be added as a new section to your document. Use the Format | Advanced | Manage Pages option to rename or delete your template sections.
Use Format | Advanced options only when you are completely satisfied with the design and want to re-use it as it is in new projects.
- The Designing the title in print or electronic format recipe in Chapter 9, Planning Large, Long-term Projects
- The Using the color picker to create a custom color palette recipe