
iWork has dozens of templates. Choose one when opening a new document by pressing Command + Shift + N or navigate to File | New from Template Chooser.
Each template has finished pages, which we can adapt for our own publishing projects. We just have to add new images and text to replace the ones in the template, to create our own customized version. This allows us to create beautiful documents with astonishing speed. We can add just a few elements of our own—a photo or a logo—or create a completely different look by modifying the template.
Even when we design our project from scratch, that is, from a blank document, we can make selected elements of our document behave like templates.
This recipe shows how to set a graphic object in an iWork document as a media placeholder. It's called media because it can be used not only for photos, but also for sound and video clips.
The following steps describe how to create a media placeholder in your publication:
- Import an image as a floating object (refer Chapter 5, Working with Photos: Tips and Tricks for more information):
- Mask it. Navigate to Format | Mask (or use the keyboard shortcut Command + Shift + M). Mask function can also be activated via the toolbar—or the Format bar under the main iWork toolbar—by selecting the image and clicking on the Mask icon:

- Give the mask your desired dimensions by dragging its handles or setting dimensions in Metrics Inspector. Uncheck Constrain proportions in the Metrics Inspector if you want to set width and height separately.
- To move the image around inside the mask, click on the Edit Mask button and move the cursor over the image. When the cursor turns into a small white hand, click on the image and hold. The small white hand will make a grabbing movement. Drag the image around inside the mask. This allows us to focus on a detail of the image, and hide the rest with the mask.
- To change the size of the image within the mask, click on Edit Mask and click on the image. The part of the image that is hidden by the mask will be shown as a grayed area. The image will show small white squares—editing handles. Drag them to increase the size of the image. As you do this, smaller details will be shown inside the mask. Alternatively, drag the slider in the Edit Mask control panel:
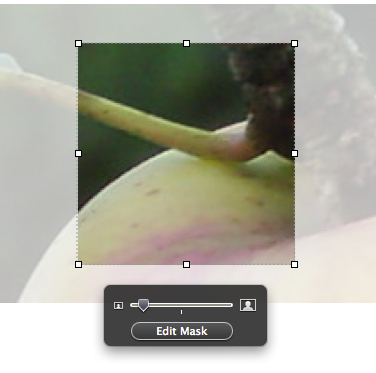
- To save the result, click on the Edit Mask button when you have finished with the image. Move or additionally resize the masked image as you would do with an ordinary object.
- Define this image as a media placeholder by navigating to Format | Advanced | Define as Media Placeholder, or by using a keyboard shortcut—Command + Option + Control + I.
In addition to defining an object as a media placeholder, adding a mask allows us to keep the dimensions and the position of the image exactly as we first defined them.
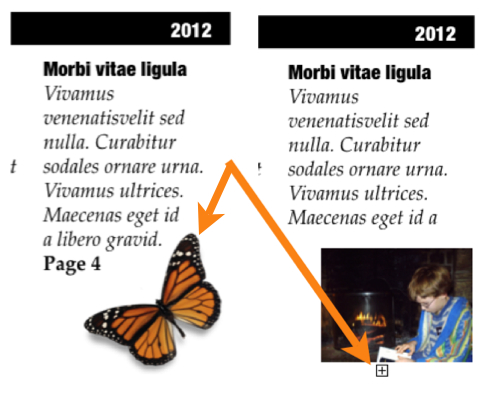
We can simply apply the Define as Media Placeholder function to an image. However, this is not enough if you want to keep the same dimensions and position of a graphic object from one document to the next, for example, in a periodic publication. If you put a landscape (horizontal) photo onto a media placeholder with a portrait (vertical) composition, it may push surrounding text off the page or out of the layout margins. The following screenshot shows what happens when we put a horizontal photo above a media placeholder, which is the butterfly in the Redwood Newsletter template in iWork Pages. The plus sign below the photo in the following screenshot shows that part of the text, including the page number, has been pushed off the page:
With mask added, the new image will always fit inside the set dimensions.
Having a media placeholder in your document is only one element of a template. Once we have finished one design, we can re-use it by creating copies of it, by duplicating or creating new versions.
If you are particularly proud of your design, you can turn it into a template of your own. To save a document as a template, choose Save as Template under the File menu. Give it a name and save it.
Next time you open a new document, Template Chooser will have a new folder called My Templates with the document you saved. It keeps all design attributes and opens just as you left it when saving—invisible characters and layout grid will be shown or hidden, page thumbnails will be shown or hidden, and the same for other elements of the document.
On the computer, templates are stored in your home folder (click on the small house icon in the side panel of any open folder) in Library/Application Support/iWork/Keynote-Pages-Numbers/Templates/My Templates.
We don't have to follow templates exactly as defined, they are included with iWork to give us ideas for our own designs. Preset elements of iWork templates include page layout and section formatting, margins, page numbering, backgrounds and watermarks, text and paragraph styles, bullets and numbering styles, and color fills and line styles for objects. Graphic objects in templates can be used as clip art and many of them are editable.
- The Placing, cropping, editing, moving, and resizing photos recipe in Chapter 5, Working with Photos: Tips and Tricks