
Capturing packets with Wireshark consists of selecting the correct network interface to capture packets from, applying any capture filters that may be appropriate, and applying the correct options to accomplish the capture in the desired manner. We'll cover these three topics in the following sections.
As discussed in Chapter 1, Getting Acquainted with Wireshark, if you have multiple network interfaces on your machine, you need to determine and select the correct interface to capture packets. In Wireshark's Capture menu, click on Interface or click on the first icon on the icon bar.
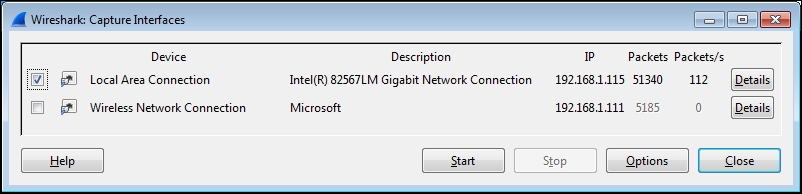
The Wireshark Capture Interfaces window provides a list and description of the network interfaces on your machine, the IP addresses assigned, and the total packets and packets per second counters for each interface. If an interface has an IPv6 address assigned and this is being displayed, you can click on the address to toggle and display the IPv4 address.
The following screenshot illustrates a typical Capture Interfaces window listing a LAN and wireless interface along with their IP addresses and packet counters:
The Capture Interfaces window provides the following two options:
- Clicking on the Details button for any of the listed interfaces opens an Interface Details window that provides a wide range of information that can be useful to verify the interface's operation. The status of the Link and Link Speed information is displayed in the Characteristics tab, and the MAC address of the selected NIC is displayed in the 802.3 (Ethernet) tab.
- The rest of the capture options are configured in the Capture Options window, which is opened by clicking on the Options button in the Capture Interfaces window, or by selecting Options from the Capture menu, or by clicking on the second icon in the icon bar.
The following screenshot illustrates a typical Capture Options window with a number of options specified. You can refer to it for examples of the topics on Capture Options.
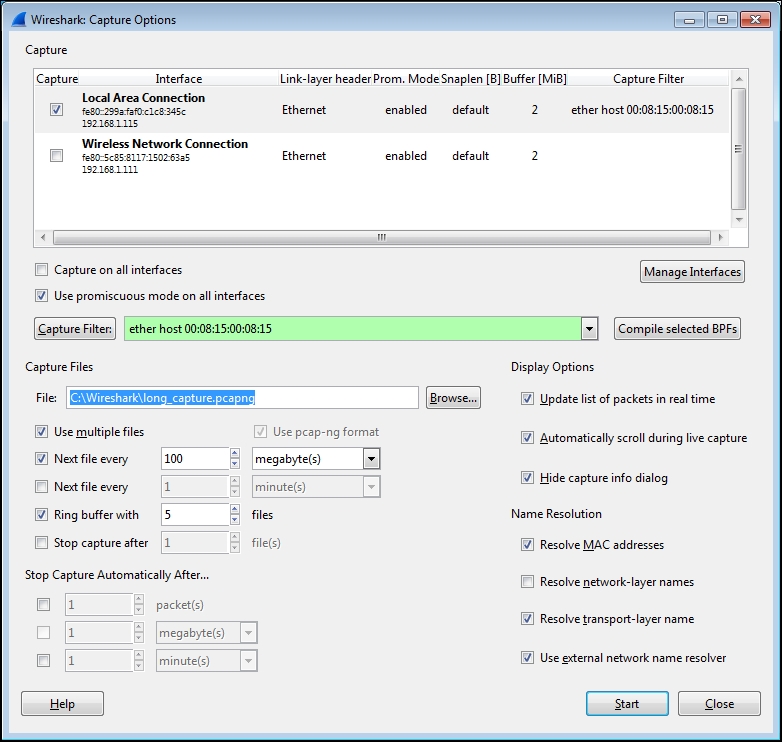
As seen in the preceding screenshot, the Capture Options window displays the available interfaces and their IP addresses and allows you to select one or more of these interfaces to perform the capture. Wireshark can capture from multiple interfaces simultaneously, as well as from virtual interfaces. The primary advantage of starting with the Capture Interfaces window is the availability of the packet counters to aid in identifying active interfaces, a feature not available in the Capture Options window. Otherwise, if you know which interface you'll want to use, you can skip using the Capture Interfaces window and start here.
Clicking on the Manage Interfaces button in the Capture Options window brings up an Interface Management window. From the Local Interfaces tab, you can select to hide interfaces that you do not wish to see displayed in the Capture Interfaces and Capture Options windows.
There is an option to quickly enable Capture on all interfaces and a Use promiscuous mode on all interfaces option that is enabled by default. In most cases, this option should be left enabled so that the chosen interface(s) can capture and save all the packets seen. Otherwise, only the packets that are being sent to the Wireshark workstation's MAC address, broadcast, and/or multicast packets will be seen and captured, which basically negates its usefulness as a capture device. The Compile selected BPFs button provides a machine language display of the compiled capture filter, but has no other functional purpose.
Capture filters are used to reduce the amount of traffic saved during a packet capture. In practice, capture filters should be used sparingly, if used at all, to help make sure that no packets that are important for an analysis are inadvertently missed because they fall outside the capture filter parameters. Remember that you can always filter out unwanted traffic from a capture, but you can't do anything about missed packets once the capture is finished. If you're unsure about a capture, perform the capture again with a more generous capture filter or none at all.
One scenario where a capture filter is appropriate is when you want to let a capture run for a long period of time. Then, you should filter out as much extraneous traffic as possible to keep capture file sizes under control. However, take care to make sure the capture filter you apply doesn't exclude any traffic that may be useful for the analysis.
It's usually a good idea to do some trial captures when using capture filters to verify that the filter is working as desired before doing the official capture that you want to keep.
Wireshark provides a Capture Filter window that makes it easy to select a preconfigured capture filter, or you can configure your own based on your needs.
Click on the Capture Filter button in the Capture Options window to open the Capture Filters window. From this window, you can select from a number of useful preconfigured capture filters, create a new and unique capture filter for your purposes, or delete unwanted or erroneous filters. Creating a new filter only involves giving the filter a name, entering the capture filter syntax, clicking on New to save the filter, and then finally clicking on OK. Alternatively, you can click on an existing filter and then click on New, which will create a copy of that filter at the bottom of the list that can then be modified for your purposes.
The following screenshot illustrates a typical Capture Filter window. In this case, a capture filter that will only allow traffic to and from a specific Ethernet MAC address has been selected:

Wireshark's capture filters use a syntax that is known as the Berkley Packet Filter (BPF) format, which has legacy roots in the Unix world and is still in use today with packet-level drivers. Note that the syntax used to capture filters in Wireshark differs significantly from the syntax used for display filters.
The default selection of capture filters from the Capture Filter window is helpful in providing examples of capture filter syntax. Some additional examples of capture filter syntax and examples of that syntax are outlined in the following table:
|
Description |
Syntax |
Examples |
|---|---|---|
|
Filter on an Ethernet MAC address Filter to capture just the traffic from or to a MAC address |
ether host ether |
ether host ether |
|
Filter on an IP address or hostname Filter to capture just the traffic between two IP addresses Filter traffic in one direction only between two hosts |
host
|
|
|
Filter based on a port number Filter for DNS packets Filter for DHCP packets |
|
|
|
Filter based on a protocol Filter for HTTP traffic only |
|
|
|
Capture filter logical operators Filter to exclude ARP and DNS packets |
|
|
More information and examples of capture filters can be found on the Wireshark wiki at http://wiki.wireshark.org/CaptureFilters and the protocol-specific capture filter syntax is included in the reference information found at http://wiki.wireshark.org/ProtocolReference.
The Wireshark Capture Options window offers a variety of controls to configure captures to suit a particular need.
Clicking on the Browse button on the File option allows you to navigate to a chosen directory in which you can store the capture files and enter a filename for the capture files.
When the
File option is used, Wireshark will append a file number and date-time stamp to the filename you specify and will not provide a file extension. You should specify a .pcapng extension in the filename. This is better illustrated with an example.
The user provided directory and filename is C:Wiresharklong_capture.pcapng, and Wireshark will create and save packets to files in the format C:Wiresharklong_capture_00001_20140724132952.pcapng.
If Wireshark is configured to capture to more than one file (this will be discussed later), the file numbers and date-time stamps will be incremented accordingly as the capture progresses, for example, long_capture_00002_20140724133343.pcapng and long_capture_00003_20140724133612.pcapng.
Wireshark can be configured to save packets to multiple files to allow long-term captures, and offers a number of options to control how this is accomplished.
Selecting the Use multiple files option causes the appropriate underlying controls to become active as specific options are enabled. You can choose to start a new (next) file when each file reaches a given size and/or after a configurable period.
The Ring buffer option works in conjunction with the Next File every option to cause Wireshark to fill the specified number of files, and as the capture continues to progress, it deletes the oldest files.
This feature is useful to keep a capture running while waiting for some intermittent problem or an event to occur, after which the capture is manually stopped. The ring buffer files provide historical capture data for a period just prior to stopping the capture, without filling a hard drive with an excessive number of large capture files.
Wireshark has options to automatically stop a capture after a specified number of packets, file size, or time period. If the Use multiple files option is enabled, an option to stop the capture after a specified number of files can be employed. Otherwise, the capture can be stopped after a specified number of packets, file size, or time period has elapsed.
The Update list of packets in real time option specifies that Wireshark is to periodically read the capture file as it is being written during the capture and update the Packet List contents accordingly. Otherwise, the Wireshark user interface will be grayed out during the capture.
The Automatically scroll during live capture option specifies that Wireshark updates and displays the latest captured packets in the Packet List pane such that the packets seem to scroll up as the list is updated. The Update list of packets in real time option must be enabled for this option to function.
Both of these options have a processing time cost that could result in lost packets and/or a sluggish display and should be disabled if capturing on a very busy link. However, the ability to view and confirm that the expected packet flows are occurring during the capture will be lost.
The Hide capture info dialog option (which is enabled by default) controls whether a simple window is displayed during the capture that displays the packet counts and percentages by protocol. Unless specifically needed, it is best to leave this window hidden.
If the
Resolve MAC addresses option is enabled, it causes Wireshark to display MAC addresses with an assigned manufacturer code in place of the first three octets. For example, Wireshark will display CiscoCon_21:b7:ec instead of c8:d7:19:21:b7:ec. The list of manufacturer's codes is kept in the manuf file of the Wireshark installation directory.
The Resolve network-layer names option works in conjunction with Use external network name resolver to determine if or how captured IP addresses are resolved into their hostnames, as follows:
- The Resolve network-layer names option specifies that Wireshark should attempt to resolve IP addresses into hostnames. If the Use external network name resolver option is enabled, Wireshark will perform reverse DNS lookups for each unique IP address. This causes Wireshark to generate traffic of its own.
- If the Use external network name resolver option is disabled, Wireshark will attempt to resolve the IP addresses using a
hoststext file provided by a user (which uses typical IP address<tab>hostname syntax) located in the Wireshark installation directory when using a default profile or in the appropriate profile directory when using a custom profile.
During a capture, it is better to leave the Resolve network-layer names option disabled so that Wireshark isn't creating additional network traffic while trying to resolve IP addresses during a capture. This feature can always be temporarily enabled (by navigating to View | Name Resolution | Enable for network layer from the menu) after the capture is finished.
If the Resolve transport-layer name option is enabled, it causes Wireshark to display the human-readable, port- and protocol-specific services' names instead of the port numbers in the Info display field in the Packet List pane. For example, TCP port 80 will be displayed as HTTP. The list of port number services is kept in the services file in the Wireshark installation directory.
The screenshot at the beginning of this section illustrates a Capture Option window set to use the LAN interface, a filter to capture traffic only to and from a specific Ethernet MAC address, to save up to five files of 100 MB each in a ring buffer scenario, and to save those files in a provided directory with a specific leading filename and extension. The Display Options and Name Resolution options have been left in their default settings.
Once all the desired Capture Options have been selected, clicking on the Start button will start the capture.
Having covered all the most useful Capture Options features, now is probably the right time to tell you that for many of your captures, especially from a relatively low traffic volume location such as from a user workstation, you don't want or need to set any capture options (except the appropriate interface to capture from) and can simply jump into starting a capture using all the defaults by clicking on the third (green shark-fin shaped) icon on the icon bar or selecting Start from the Capture menu. Not using a capture filter allows you to capture all the relevant packets—without missing anything—and filter any unwanted traffic out using display filters after the capture is done.