In order to configure display filters, you can choose one of the several options:
- Choosing from the filters menus
- Writing the syntax directly into the display filter window (while working with Wireshark; after a while this will become your favorite)
- Choosing a parameter in the packet pane and defining it as a filter
- Using
tsharkorwiresharkwith command line ; this will be discussed in Appendix
This chapter discusses the first three options.
In general, a display filter string takes the form of a series of primitive expressions connected by conjunctions (and, or, or something else) and optionally preceded by not:
[not] Expression [and|or] [not] Expression...
While Expression can be any filter expression, such as ip.src==192.168.1.1 for the source address, tcp.flags.syn==1 for TCP SYN flag presence, and tcp.analysis.retransmission for TCP retransmissions, and|or are conjunctions that can be used in any combinations of expression, including brackets, multiple brackets, and any lengths of strings.
There are several conditions to these. They can be one of the following:
You can insert a space character between parameters and operators or leave it without spaces.
Wireshark colorizes the display filter area in yellow whenever you use the != operator for combined expressions such as eth.addr, ip.addr, tcp.port, and udp.port, but this will not work due to the following reason.
When you type a filter expression such as ip.addr != 192.168.1.100, you will see The packet contains the field ip.addr with a value different from 192.168.1.100. Because an IP datagram contains both a source and a destination address, the expression will evaluate to true whenever at least one of the two addresses differs from 192.168.1.100. For this reason you should write !(ip.addr == 192.168.1.100); this will display Show me all the packets for which it is not true that a field ip.addr have the value of 1.2.3.4.
There are several operators. They can be as follows:
To configure display filters, you can choose any one of the methods mentioned earlier.
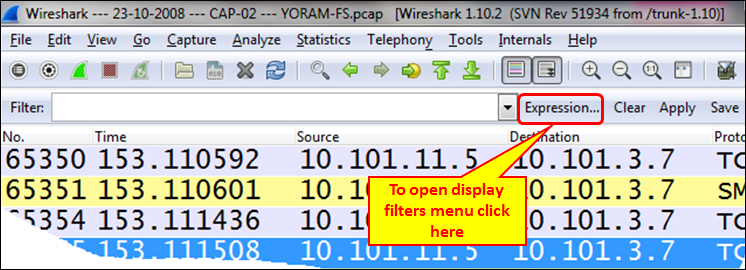
For choosing from the filters menu, navigate to the display filter pane on the upper side of the window and click on the Expression... button as you see in the following screenshot:
When you click on the Expression... button, the following window will open:
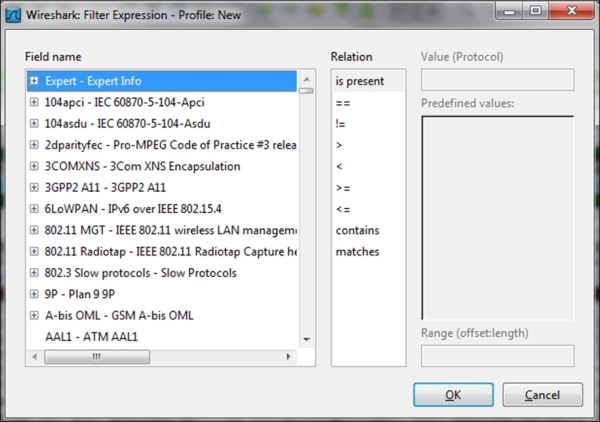
There are five important panes in the filters menu:
- Field name: In this pane you configure the filter parameter. You can go to the protocol by typing its name, and get to the protocol parameter by clicking on the + sign to the left of the list.
One example for this would be: type
ipv4to get to the IPv4 protocol, click on the + sign to expand the protocol parameters (or press Enter twice) and choose ip.addr to filter a specific IP address.Another example would be to type
tcpto get to the TCP protocol, click on the + sign to the left of the protocol parameter and choose tcp.port for the source or destination port number. - Relation: This is the pane from where you choose the operator. You can choose
==for equal,!=for not equal, and so on.An example for this would be: type
sipto get to the SIP protocol, choose sip.Method, and choose == from the Relation pane. Typeinvitein the Value (Protocol) pane. This will filter all the SIP INVITE methods. - Value: Here you enter the value of the field that you have chosen before.
An example for this would be: type
tcpto get to the TCP protocol, click on the + sign to go to the protocol parameter, choose tcp.flags.syn for the TCP SYN flag, and enter1in the Value field. - Predefined values: When the value of the field you chose is not Boolean, there might be a list of options in this field.
An example for this would be: under TCP, there is an option named tcp.option_kind. This option is related to TCP options (for more details, refer to Chapter 9, UDP/TCP Analysis). You will get a list of values that are possible.
- Range (offset: length): This field provides you the length of the string in the
offset:lengthformat.
After you get used to the display filters syntax, you may find it easier to type the filter string directly into the filter window:

In this case, when you write a filter string into the window, the window will light up in one of the following three colors:
- Green: This is when the filter is correct and you can apply it.
- Red: This indicates a wrong string. Fix the string before you apply it.
- Yellow: Whenever you use the
!=operator, the display filter area will turn yellow. It doesn't mean your filter will not work, it is just a warning that it may not work.
This is a very convenient option. You can choose any field from the packet detail pane in the captured file; right-click on it and you will get a few options, as illustrated in the following screenshot:
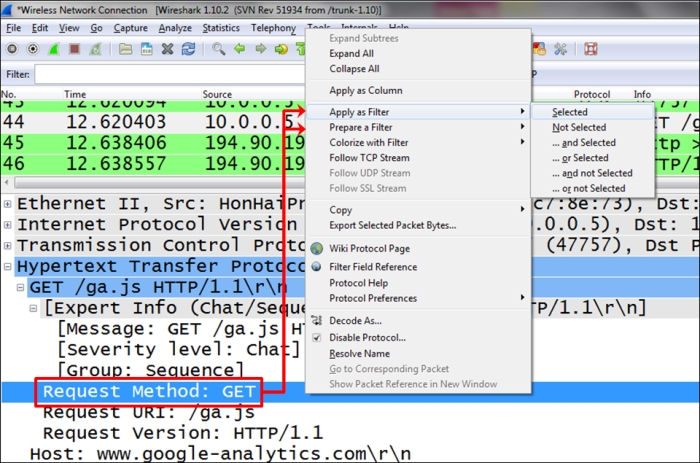
A couple of options are as follows:
- Apply as Filter: This will set a filter according to the field you choose and apply it to the captured data.
- Prepare a Filter: This will prepare a filter but not apply it. It will be applied when you click on the Apply button on the right-hand side of the filter window.
In both the options, you can choose to configure a filter:
- Selected: This will choose the selected field and parameter
- Not Selected: This will choose the the field and parameter that are not selected
For example, right-clicking on the field http.request.method and choosing Selected will come with the filter string http.request.method == GET; while, choosing Not Selected will come with the string !(http.request.method == "GET").
You can also choose the options ... and selected, ... or selected, ... and not selected, or ... or not selected for structured filters.
The display filter is a proprietary Wireshark language. There are many places where display filters can be used that will be discussed in the later chapters. Additional filters will be introduced in the upcoming recipes of this chapter.
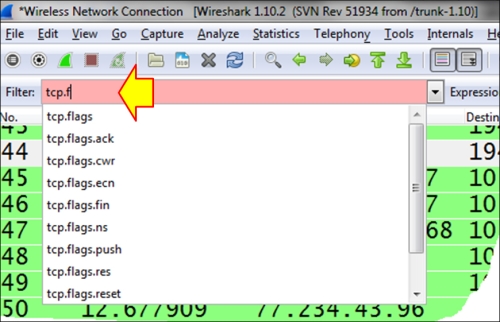
You can always use the autocomplete feature to complete filter strings. For example, if you type in tcp.f, as shown in the following screenshot, the autocomplete feature lists possible display filter values that can be created beginning with tcp.f, that is, TCP flags (SYN, FIN, RST, and so on).
Now we will cover some additional helpful features.
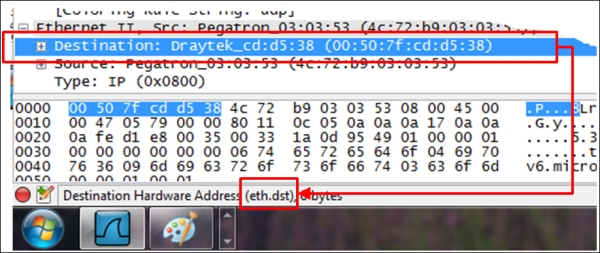
Anytime you mark a specific field in the packet details pane, you will see the correlating filter string in the status bar at the bottom-left corner of the Wireshark window.
You can also right-click on a parameter in the packet pane and choose Apply as Column. This will add a column with the specific parameter. For example, you can choose the parameter tcp.window_size_value and add it as a column to the packet list pane, so you will be able to watch the TCP window size online. This influences TCP performance, as we will learn in Chapter 9, UDP/TCP Analysis.