
Most of you must be aware of the popularity of brute force attacks. The chances of success are not high. Yet, many security professionals and malicious users implement their password-guessing ability with the help of modern tools. Brute force attack is just a way in which you try to log on to a particular service/application using the password dictionary that might have been created on the basis of the target's profile. Tools such as Cewl, Crunch, and John let you create dictionary files. Even you can salt the passwords. Discussing how to create one for yourself is out of the scope of this book, but I would recommend that you have a look at these tools (all of them come preinstalled with Kali Linux).
To analyze these common and malicious attacks, I will attempt to brute force two important services: Telnet and FTP. You might be aware of these two services and how much they are being used in corporate networking infrastructure. Telnet is used to perform administration of devices such as routers, switches, and different kinds of web servers remotely. FTP is used to transfer files efficiently with the assurance of integrity and confirmed delivery of the data.
First, take a look at most widely used protocol for remote administration that is often overlooked from a security standpoint. Using simple brute force techniques, any script kiddie can gain access to your network, and the consequences of such acts can be really destructive in terms of money and availability of the service. If dealing with consumers, then their records that might be worth millions, leading to full remote code execution of the administrative systems.
For this illustration, I have a Windows server machine running at 192.168.1.109 and an attacker at 192.168.1.106. The attacker will first prepare its dictionary file and then will proceed to use an automated tool to attack over the Telnet administration service running under the Windows server machine. The traffic generated for such activities will be logged in through our wonderful sniffer for our analysis. I tried connecting to the Telnet service like a normal user using these steps:
- Using the Telnet command followed by the IP address, I was able to get connected to the service. In return, it printed a banner for me:
Welcome to Microsoft Telnet service. - Then, I supplied the wrong user credentials, which was not accepted by the server. Hence, it showed a login error, which stated
bad username or password. - Then, I supplied a legitimate set of credentials, which were identified and accepted by the service.
- Once the user is authorized, the Windows command prompt with certain authorization is presented along with a banner.
Welcome to Microsoft Telnet Server. - After I got connected, I was able to issue remote commands (Windows) from my machine itself.
- Then, at the end, to terminate the connection gracefully and to free up all resources that were allocated to use for smooth functioning, I issued the
exitcommand that gave a messageconnection closed by foreign host.
Here is the screenshot illustrates the normal functioning of a Microsoft Telnet server:

Figure 7.11: Telnet normal session
The traffic generated was also captured by Wireshark. Instead of showing the traffic, I decided to show you the whole communication in plain text format that you can achieve by assembling the TCP stream by right-clicking on the list pane and choosing show TCP stream (the Telnet server is configured with an echo option, so there is a chance we might see some characters echoed back from the server to the client). Refer to the following screenshot:
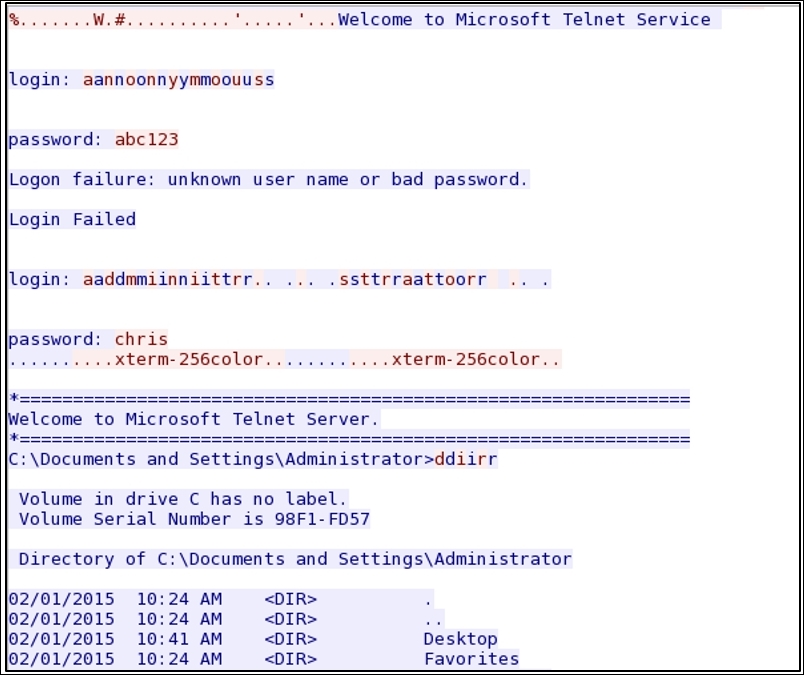
Figure 7.12: Telnet follow TCP stream
Everything we typed and received in response from the server is being shown in simple plain text readable form by just following the TCP stream.
Now, after seeing how a normal session looks, if you want to learn how to perform a brute force attack, follow these steps:
- Create a virtual pen-testing lab that consists of at least two machines: one will be an attacker (Kali) and the other machine can be of your choice (make sure you can install Telnet on it).
- Try pinging the target to test the connectivity. Issue the Telnet command to create a normal session and test whether everything is working fine.
- Now, open Kali and issue the
medusa –h <target ip> -U <usernames file> -P <password file> -M telnetcommand. Refer to the following screenshot:
Figure 7.13: Brute force—Telnet
At last, using a different set of combinations, we were able to brute force the server. The traffic generated because of all these attempts made one after another is of special interest to us.
- There is a lot of TCP and TELNET traffic generated in the file, which include traffic patterns such as the three-way handshake and transfer of data between the server and client through Telnet. However, not everything is of interest to us. Refer to the following screenshot:

Figure 7.14: Telnet and TCP traffic between the server and our client
- To view only the malicious traffic, I applied another display filter that will show only the various connection attempts between the two hosts. Refer to the following screenshot:
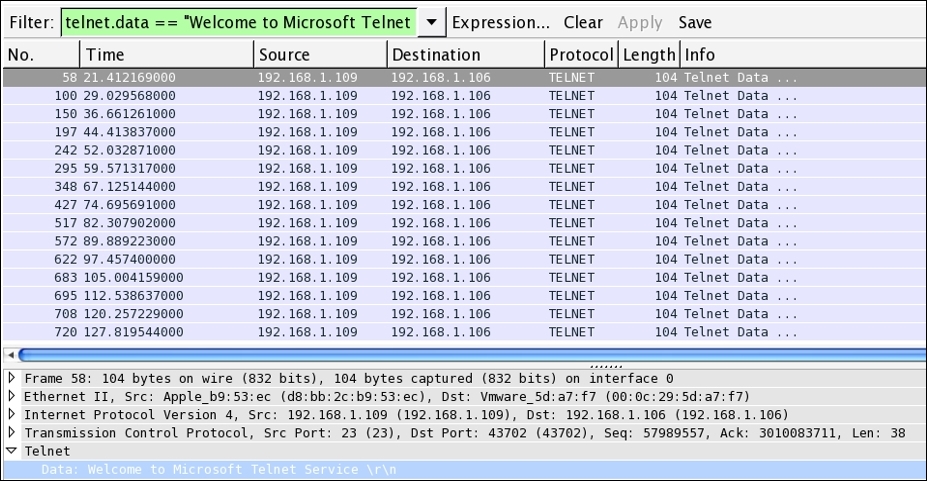
- Now, observe the display filter
telnet.data==Welcome to Microsoft Telnet Servicealong with the Time column. The string I applied in as the filter is the same as the one we received as a banner while connecting to the service. The banner is printed approximately 15 times in a span of 100 seconds (less than a minute). - Does this now seem suspicious to you now? If it is, then you can take preventive measures to protect your infrastructure by creating useful signatures for the same traffic pattern that will help you in getting alarmed.
Next, it's time to look at another popular service, FTP, that we discussed in earlier chapters in detail. Let's look at how a brute force attack would look like against the FTP service. FTP is a very crucial service. If attacked by any means, the service will crash or become unusable for the legitimate users. It can cause big trouble to the network admins with serious downtime. To deal with such activity that happens in day-to-day operations, you need to be prepared by being aware of the malicious traffic patterns that you can compare with the baseline traffic pattern we created earlier.
For testing and analysis purpose, I configured one FTP server at 192.168.1.108 over a Windows 7 machine and the attacker is at the same place over IP 192.168.1.106. I used a Kali Linux operating system to duplicate the attack and normal traffic pattern scenario. Follow these steps if you want to duplicate it for educational purpose only:
- Configure the client and the server using whatever platform suits your needs best and make sure the connection between the FTP server and the client works freely without a single glitch.
- Now, first, we will try to visit the server using a legitimate user and will record the traffic. Later, we will use the Follow TCP stream option in Wireshark to view the traffic details in easy to understand plain text format.
- Refer to the following screenshot where I initiated the connection between the server and the client using the netcat client available over the Kali platform. I then logged in using the wrong credentials in the first attempt, and then used the correct ones in the second attempt:
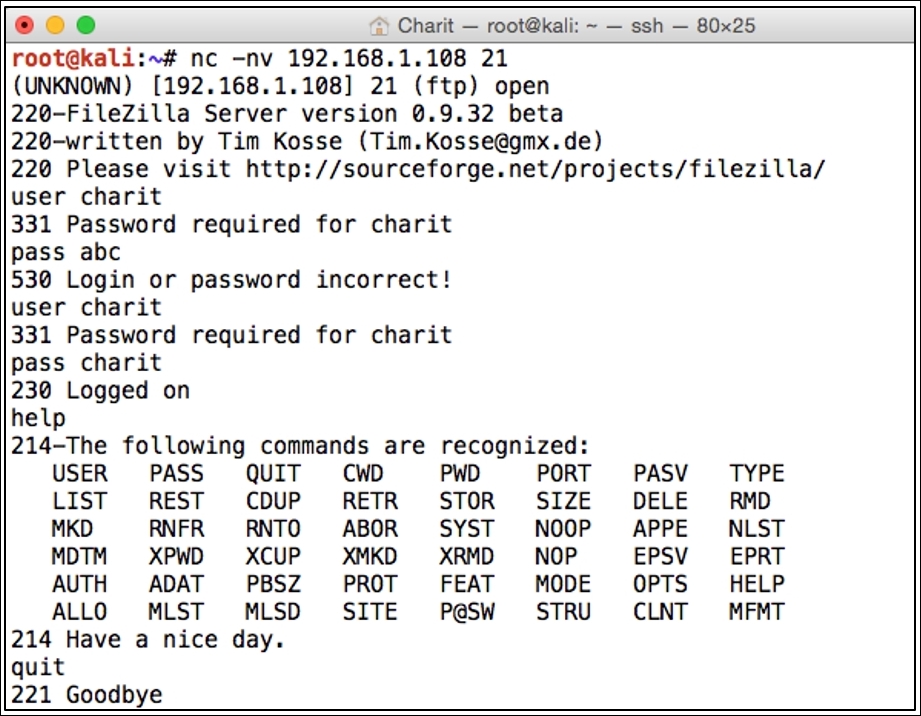
- After I successfully logged in, I issued the
helpcommand to view the commands available for execution. Then, I issued thequitcommand to terminate the connection gracefully. Refer to the preceding screenshot. - Our sniffer captured the whole conversation. Instead of viewing the traffic in the list pane, we are again seeing the assembled TCP stream. Refer to the following screenshot:

Figure 7.15: FTP assembled stream
- Now, as we have seen the normal traffic patterns that you would witness in every day operations, it's time to look at something malicious, such as the brute force attack attempts executed against your FTP servers. I used a different brute force tool that is it also popular among the category
THC-hydra. - Before you issue the command, make sure you have you own custom-made dictionary file that suits you well for your target (refer to the openwall website at http://www.openwall.com/wordlists/ to get the best dictionary files available).
- Once you have the dictionary file and the target up and running, issue the
hydra –l <username> –P <password file> ftp://<you target's IP address>command. Refer to the following screenshot: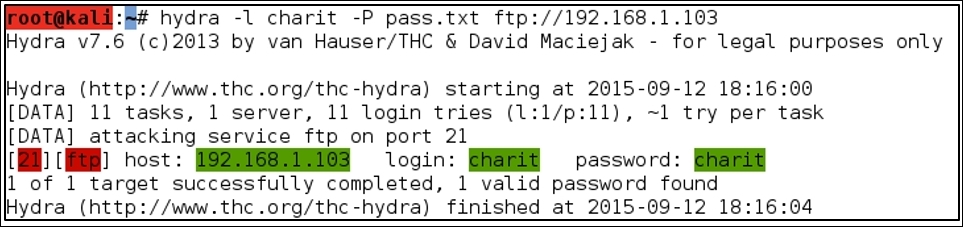
- The traffic generated was also captured by our sniffer. Instead of displaying all the traffic, I used a display filter
ftp.request.command==PASSin order to view only traffic that might be malicious. The following screenshot shows what display filter I used to query malicious repetitive packets.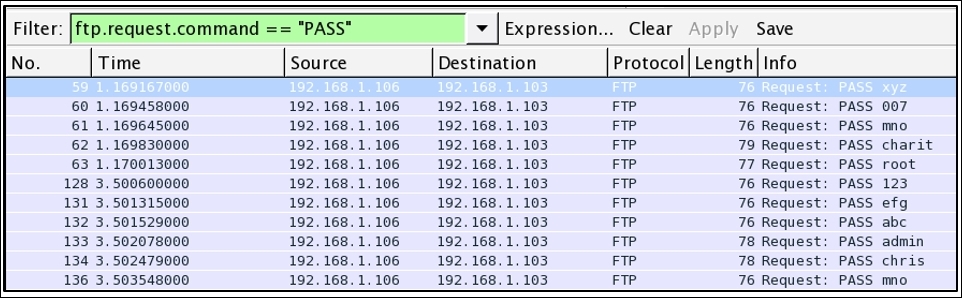
Figure 7.16: FTP Brute Force attack traffic pattern
- It is easily identifiable that the traffic is malicious because, in a span of maximum 85 seconds (calculated using the time column), there were approximately 10 password attempts made. This does look dangerous, and activities of such kind should be monitored closely in order to protect your resources facing the Internet.
There is one more way through which you can point out such traffic patterns. The best advisable option using Wireshark is to create a different coloring scheme using the same display filter expression that we used in order to point out the malicious traffic even faster. Refer to the following screenshot where I did the same and created a different coloring scheme for both TELNET and FTP traffic:

Figure 7.17: Coloring scheme for malicious traffic
There are various other application layer protocols (HTTP, SSH, SMTP, and so on) that fall prey to these brute forcing techniques and might result in heavy losses for corporate infrastructures. In order to make these services secure, you can force encryption over the service that you are configuring and use strong password policies, such as an alphanumeric password with minimum length. You can also enforce a password change policy at a regular intervals, such as 30 days or something. Last but not least, you can make the employees aware of such activities. Any form of social engineering attacks executed against an employee can leverage the attacker to gain access to the infrastructure more easily.
In some previously mentioned topics, we have witnessed a few scenarios that generated malicious traffic. Some of the common protocols, such as HTTP, DNS, ARP, IRC, that are seen in the list pane can carry malicious traffic. So, knowing about the malware traffic analysis is definitely an important skill every network and security professional should be well versed with. In today's digital world, various advance have been made. Yet, threats including malware infection persist. Every organization should consider threats of such nature to be critical. For illustrating the threats that are caused due to various malicious traffic, I have configured a few things in my virtual lab. The traffic generated because of the activities between the client and the server would be captured in parallel, which we will use to analyze later. Refer to the following screenshot:

Malwares are supposed to perform a couple of tasks once installed on the victim's machine, such as passing on the secret content to the person in command, receiving commands from the server, and infecting and corrupting systems. Even if you have the best security solutions installed in your infrastructure, you are still open to wide attack vectors, including malware infections.
Now, we have understood the basics of how malicious traffic is being generated, and we also have a clear image of the infrastructure that we will work with. So, without wasting even a second more, let's go ahead and start the process. Follow these steps if you want to replicate the scenario in your own virtual lab:
- You require three machines connected to the same LAN. Make sure they are able to talk to each other, that is, verify the connectivity.
- On the IP address
192.168.1.106stays a legitimate website, which the client is habituated to visit. However, this time, the client is not aware of the infection that causes redirection to another webserver. Refer to the following screenshot of the legitimate server:
Figure 7.18: Legitimate website
- To simulate the redirection, I have configured my Apache server running on 106 to redirect every request coming to IP
192.168.1.100and download theefg.exemalware from there. - So, next time the client visits the website running at
192.168.1.106, it gets redirected to a new webserver address, which directly asks the client to run a file namedefg.exe. Refer to the following screenshot: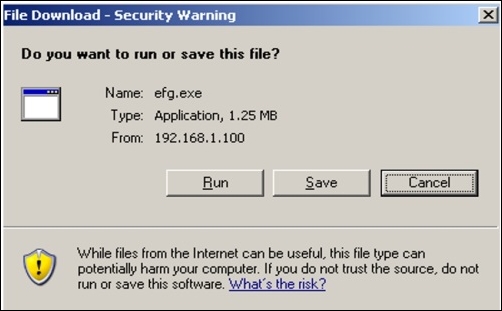
Figure 7.19: Client gets redirected to IP 192.168.1.100 and is asked to run the application.
- If the client clicks on Run they might not be aware of the dangerous effects the malware can pose to the client's machine and the network client is a part of. The publisher of the application is not verified, so the browser is not able to verify it. This results in giving an unknown publisher error. If the client still proceeds and clicks on Run, the malware will be installed. Refer to the following screenshot:
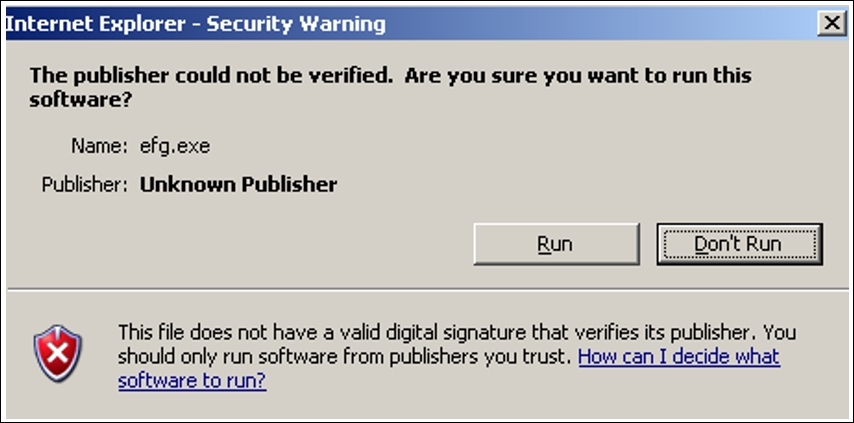
Figure 7.20: Unknown publisher error
- Now, let's suppose that, if the client hits run, then the malware will be downloaded to the client's machine. It will be executed later on, thus creating a connection back to the command and control center.
- If the connection back to the attacker was successful, then without the knowledge of the client, the attacker can copy files, delete files, take screenshots, take webcam snaps, record voice through the mic, corrupt system files, and so on. You might have heard of various malwares such as ransom wares, spywares, and adwares.
- The whole traffic generated because of all these activities is being captured. Let's take a look at it. Instead of showing you the traffic, I assembled the TCP stream first between the client and the legitimate server.
- To understand the way our malware works, we need to look at more details, which can be presented to us by Wireshark. Refer to the following screenshot that shows the assembled TCP stream:

Figure 7.21: TCP stream between the client and real (compromised) server
As you can clearly see, the client is trying to visit the webserver, and the request is being forwarded with HTTP redirection to the new address
192.168.1.100, trying to download the malicious file. - Once the client gets a redirection response, the client again initiates a three-way handshake with the new server and tries to download the file. After a couple of packets were exchanged between the hosts in the later frames, the clients received a
200 OKstatus message, suggesting successful download of the malware.
In the following screenshot, you can see that the malware signature can be easily recognized by any IDS/IPS in place:

Figure 7.22: Malware signature
The GET request was initiated by the client in search of efg.exe, to which the server responded with a 200 OK status message. Later, you can see the known malware signature starting with the characters MZ followed by some random character. A quick Google search regarding the same will reveal its behavior and pattern. Our search also reveals that it is an executable file, as Wikipedia states 16/32 bit DOS executable files can be identified by the letters MZ at the beginning of the file in ASCII. Refer to the following screenshot:

Until this point, its clear that the is a Windows executable file is clear which might be malicious.
Moving on with our investigation regarding the malicious file, I would like to export the efg.exe file using Wireshark.
- Go to File | Export Objects | HTTP. You will see a dialog similar to the one shown here:

Figure 7.23: Exporting HTTP objects
- Now, to export the file, you need to select the conversation that states the name of the file along with it. Then click on Save As and save the file at a location of your choice.
- The best option would be to upload this file to websites such as http://www.virustotal.com, which will cross examine the PE-executable file with numerous antivirus software online and will show you a detailed analytical report. Refer to the following screenshot:

Figure 7.24: Uploading
efg.exeto virustotal.com - Now, click on Scan it! to let the website examine the file and wait for the results:

Figure 7.25:
efg.exeexamination completed31 out of 56 antivirus software detected the executable file as malicious, which is quite alarming.
- Further, I manually examine the conversation between the infected machine and the command and control center by looking at the hex dump in the following TCP stream window. I observe something. Refer to the following screenshot:

Figure 7.26: Hexdump in TCP stream dialog
It seems that the server machine that has taken the control of the victim issues some command to gather quick information regarding the machine. The highlighted content on the right-hand side of the window states strings such as Get File Information, Get full PC name, Get Current directory, Adjust token Privileges, and so on.
As per my analysis, the file that got installed to the windows box is definitely malicious. It might have caused some serious damage to the individual machine as well as the network. The best advisable solution is to isolate the machine from the network, unless it is being disinfected using specialized tools.
To conclude this section, I have one more thing to depict using the list pane in Wireshark. Refer to the following screenshot:
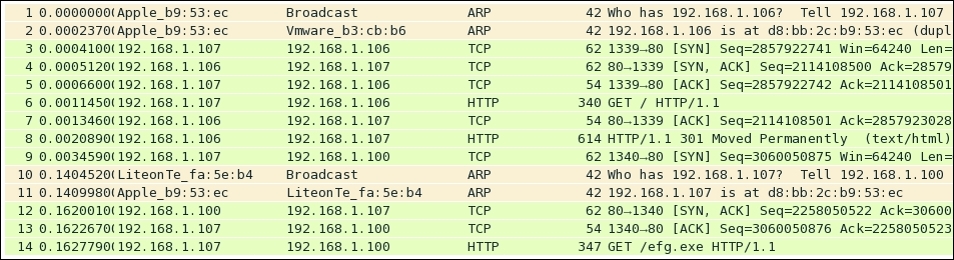
Figure 7.27: Unusual behavior noticed in list pane
Observe the behavior of the packets from the beginning, as it started with the ARP request sent by the Windows machine because it was trying to look for a legitimate web server locally configured. Followed by the three-way handshake, the client initiates a GET request in frame 6, which the server acknowledged in the following packet. Then, the server states that the resource the client is looking for has been moved to another location, and the client is required to go there. After this, the client generates an SYN request in frame 9. Then, the command and control center generates the ARP packets asking for the client's physical address in order to get in touch with it and to transfer the file. Then, at last, in frames 12 and 13, the three-way handshake is completed, which ends in generating a GET request from the victim's machine in order to start the transfer of the exploit as seen in frame 13. The consequences of such traffic patterns can be highly devastating. A good network/security admin should be aware of such traffic patterns and can use such traffic behavior to create firewall/IDS-IPS signatures that can generate quick alerts. They can help in avoiding and making their infrastructures ready to fight with these malicious traffic.
Capturing the flag events is the most common thing that happens in security conferences. The objective is to learn and play with the challenges based on real-world scenarios that can assist you quite well in learning the methodology. Popular conferences such as DEF Con, PlaidCTF, CSAW, and Codegate can be searched for if you are interested in cracking flags. Basic programming, networking, forensics, and common sense are the skills required to take part in these challenges.
I have made a couple of challenges for you and we will be solving them as well in a step-by-step approach. I have made all of them pretty simple in order to give you an idea of how the CTF thing works and definitely the approach you are supposed to follow. So, let's begin and capture some flags.
First CTF: Leverage the weakness in remote administration services

Figure 7.28: CTF1 trace file
- Solution: We have a
telnet-flag.pcapfile that lists multiple packets in the list pane. The question is asking us to take advantage of remote administration services. How many services do we know which are used for remote administration RDP, Telnet, and SSH? To better understand the scenario, let's open our trace file in Wireshark first. Refer to the following screenshot:
As you can see, there are more than two thousand packets in our trace file. It would be practically impossible to scroll to the bottom to see each packet. The best option would be to look into the protocol hierarchy window, which will give us a brief regarding all protocols involved in the whole trace file. From here, it would be easy for us to identify the remote administration services. The protocol hierarchy window can be accessed from the Statistics menu. Refer to the following screenshot:
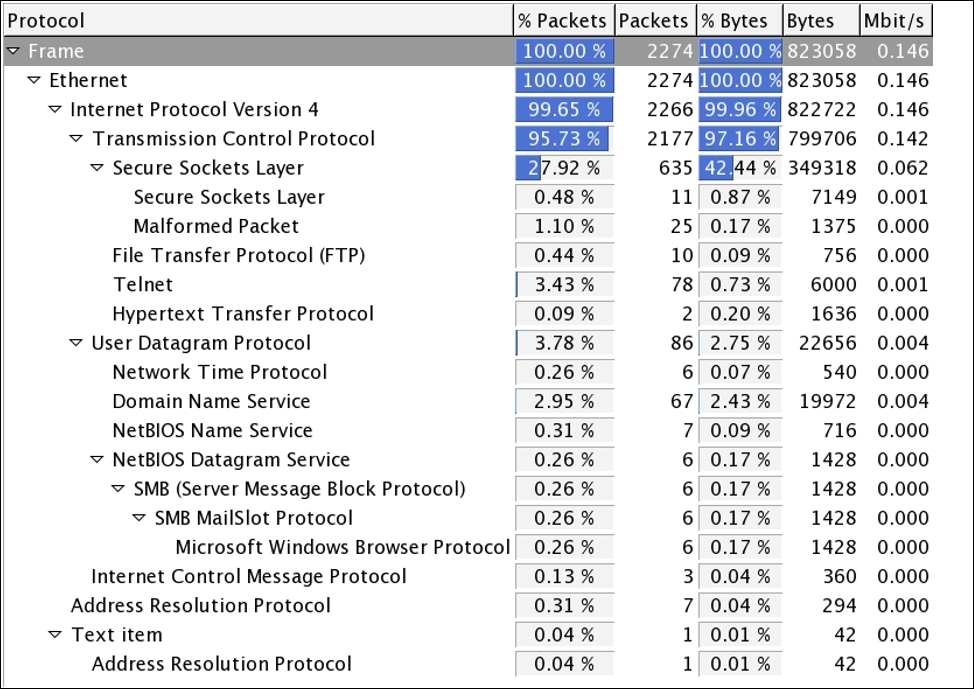
Figure 7.29: Protocol hierarchy CTF1
Among all the protocols listed, I can see only one that is used for remote administration, and we can use it to move on with our CTF process. So, I applied the display filter telnet in order to see only relevant traffic. Refer to the following screenshot:
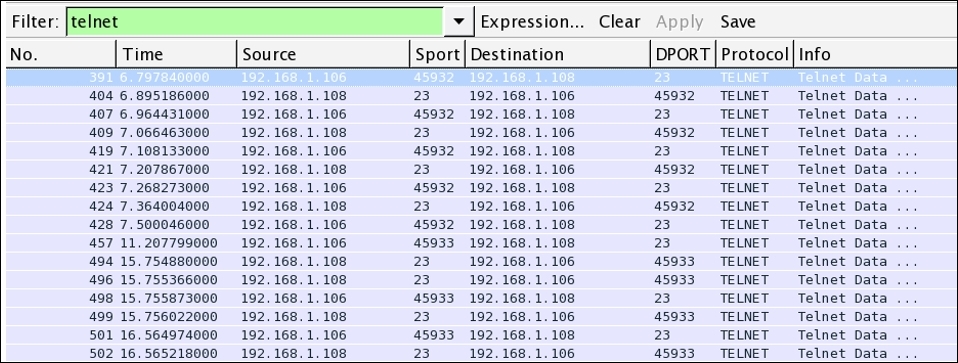
Figure 7.30: Telnet traffic CTF1
Now, the next step would be to follow the TCP stream of these packets, which will reveal more information regarding the Telnet session.
This is what the question was about: leveraging the weakness in a remote administration service. Telnet sessions can be viewed in plain text format, and we finally leveraged the weakness to take advantage of viewing the session's information in plain text format. The flag is the password used by the user to log in to the Windows machine to perform maintenance activities.
FLAG : Sup3rs3cr3t
The following screenshot illustrates how the TCP stream windows will look after the packets are assembled. Also, the Telnet session's password can be seen clearly.

Figure 7.31: TCP stream dialog CTF1
I hope you have understood the basic approach of CTF solving. We would follow similar approach in solving further CTF challenges.
This time I have designed a CTF that utilizes another common protocol and will let you learn the basics of the CTF challenge approach.
Second CTF: Image magic
Solution is in the title of this CTF and it is pretty small and attractive, though we have no idea what we are looking for, but for sure there is something related to images. Wireshark performs magic every time; this is what my perspective tells me about the challenge.
Following an approach similar to the one we talked about first, we would open the trace file in order to learn basic stats related to the traffic capture that will give us an overview of the protocols used during the session. Refer to the following screenshot:
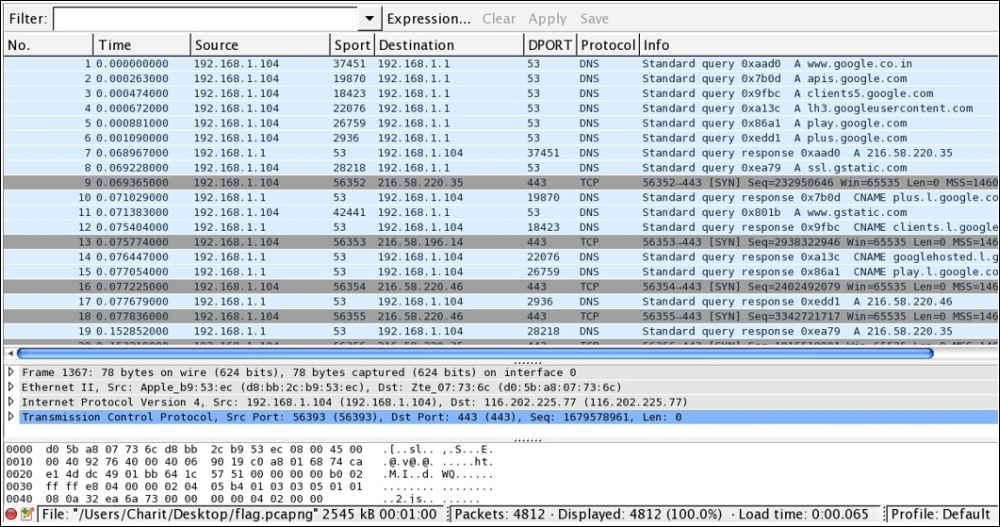
Figure 7.32: Trace file CTF2
The trace file starts with a lot of DNS packets, which don't look very useful for our analysis. Looking at the following status bar in Wireshark, we can say that there are around 4,800 frames definitely captured. This one is not something that we can inspect element by element, so we need the help of our best guy: protocol hierarchy dialog (now I hope, without any specific instruction, that you can open the dialog):
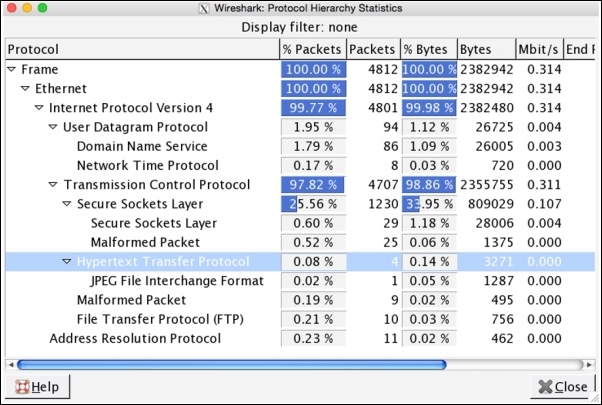
Figure 7.33: Protocol hierarchy CTF2
In the list of various protocols, I spotted JPEG, which is an image extension, and is listed under the HTTP section in the dialog. We can conclude from this that there is some relation between these two ,so our display filter could become HTTP, which will keep us moving in the right direction.
As soon as I type HTTP in the display filter box and press enter, I am presented with just four packets. One of those listed is a .jpg file with the name flag. Refer to the following screenshot:

Figure 7.34: Display filter HTTP—CTF2
Frame number 4,696 lists a GET request for a alg.jpg file. Investigating, further by looking at the TCP stream of this packet, confirms that there was a .jpg file requested by the client at 192.168.1.108. Refer to the following screenshot:

Figure 7.35: TCP stream—CTF2
The request made by the client is now confirmed and verified. The next step would be to export this object from the stream. Go to File | Export Objets | HTTP.
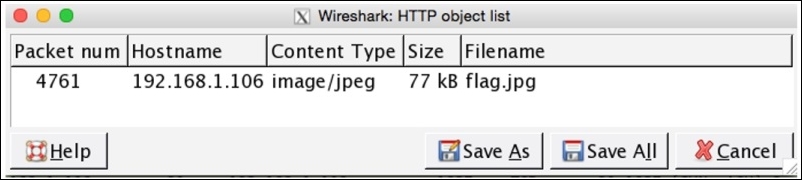
The window just lists one flag.jpg file. Follow the mentioned steps in order to export the image object. First select the row one showing the images object then click on save as and save the file at any desired location. When finished, open the file to view the flag content. Refer to the following screenshot to see the content of the exported object.
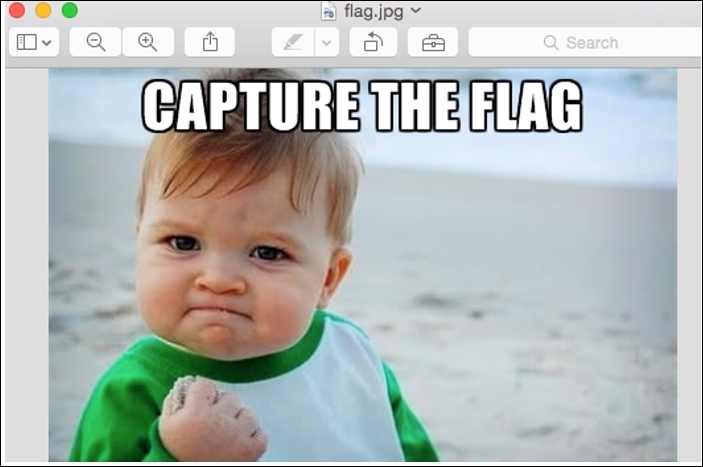
Figure 7.36: CTF2
This challenge was pretty interesting, because you learned about a different idea behind CTF challenges.
Our final challenge also introduces us to a new idea behind CTF's.
Third CTF: Are you Pro Enough!!
Title of the challenge is pretty challenging in itself. However, we will solve this together. So, let's open the trace file first.
At first glance, it looks like other trace files we have seen with numerous useless packets filled in. Without getting ourselves confused with the overwhelming amount of information there, let's follow the approach that we have been following so far. Refer to the following screenshot:
Figure 7.37: Packet list pane—CTF3
Look at the protocol hierarchy window that can help us in revealing more about the CTF challenge we are dealing with. Refer to the following screenshot:
Figure 7.38: Protocol hierarchy—CTF3
As expected, we get a new insight about the trace file, and we can observe that the UDP traffic percentage is about 89 percent, which is quite a big number. It lists Real Time Protocol under it. So, let's go ahead and create a display filter for RTP traffic, which can take us to the next step in solving the riddle. Refer to the following screenshot:
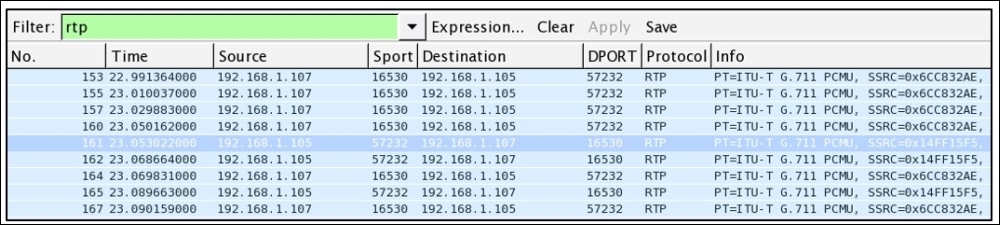
Figure 7.39: RTP display filter—CTF3
It seems like a call session is in progress between the two hosts at 192.168.1.107 and 192.168.1.105. Next, using the playback feature in Wireshark, I will reassemble the stream and will try to play back. Go to Telephony menu | VoIP Calls and select the SIP call in row 1 and click on Player. Refer to the following screenshot:

Figure 7.40: VoIP calls dialog—CTF3
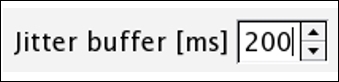
Once the call session is visible, select it and click on the player where you will be asked to give the jitter value. Specify 200 as the value and click on Decode:
Now, you should be able to see the assembled VoIP stream available for playback. Select the first part of the communication and click on Play. The person communicating from Side A side says, Start the transfer of the rabbit and playing Side B's part we can observe that it is just an echo of Side's A message. Refer to the following screenshot:
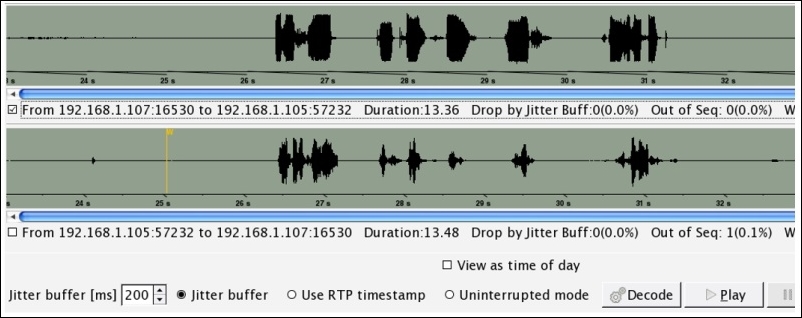
Figure 7.41: Reassembled VoIP call for playback—CTF3
We did not get many clues from this message. Let's look at the protocol hierarchy dialog once again and see what we have in the TCP section. Other than the HTTP protocol, there isn't much useful information. Under the HTTP tree, there is a media type, which means something got transferred between the hosts on the network (as the person on VOIP call said start the transfer). We applied HTTP as a display filter, we got the following screenshot:

As is clearly visible, a flag.rar file got transferred. Let's export this to a .rar file for extraction. Go to File | Export Objects | HTTP, select the first row, and click on Save as to save the .rar file. The file got successfully saved, but when we tried opening the file, it asked for a password, which we don't know have:

Figure 7.42: Flag.rar ask password
Did you notice what the person said over the call "start the transfer of the rabbit", so why don't we check therabbit as password to this archive file.
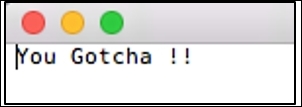
Luckily, our first guess worked. This might not happen every time we solve CTF challenges. There is a file inside it called flag.txt that reads You Gotcha!! Refer to the following screenshot:
This section was particularly real fun! I enjoyed solving it for you. I hope the approach and flow we followed would prove useful for other CTFs that you might start solving after reading this chapter. Best of luck to you for your independent analysis, and remember that using out-of-the-box thinking and a bit of common sense is also required.