
If you want to find a packet for a particular criterion, you can use the Find dialog. It has a couple of useful search techniques that can be applied easily and effectively on an already captured file or on a live running capture. You can access the Find utility by navigating to Edit | Find packets or using the shortcut Ctrl + F.
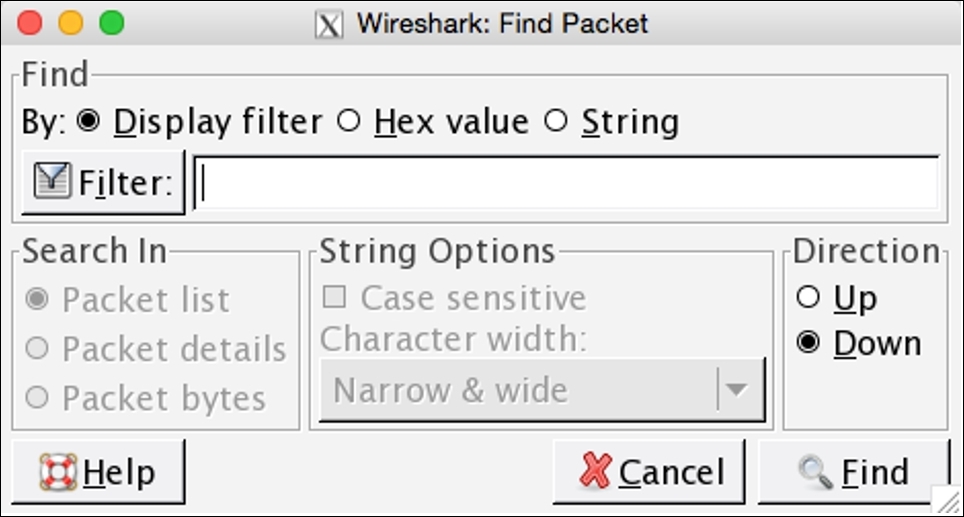
Figure 2.15: The Find Packet dialog
Let's see some more configurable options in it:
- The display filter: After capturing the traffic, while analyzing whether you just want to see some specific packets based on a certain IP /Port/ Protocol, those packets that meet a certain criteria will be displayed in the list pane, for example:
- The
ip.addr == 192.168.1.1(based on an IP address) - The
port 8080(based on a port number) http(based on a protocol)
- The
- The Hex value: If you have the hex value for a certain packet that you are looking for, then this option can be selected. Just write the physical address separated by colons, for example:
0A:C4:22:90:45:00AA:BB:CC
- String: The next and last option is a text-string-based search where you can enter the name of the DNS server, name of the machine, and any resolved name that you know about (enter any string or word), for example:
- Cisco
- An administrator
- A web server
- Search In: This feature gives us the ability to search in a specific pane. For instance, if you are looking for a packet in the bytes pane, which matches the value Google (the ASCII value in the packet bytes pane will be matched), then we can go ahead and first choose the String option and then check the Search In box and choose Packet Bytes.
- String Options: To use this, first select the String option and then select Case-Sensitive and then if you want, choose the character width as well (but I would suggest not changing this unless until you have a specific reason to do so).
- Direction: This last option changes the direction of a search; you can change it to upward or downwards.
Once you have customized the options, enter the text and click on Find. This will give you the first exact capture that matches your criterion. To move back and forth between the matched packets, you can use Ctrl + N (next) and Ctrl + B (previous).
For better and convenient viewing experience, Wireshark gives us a feature where we can colorize a certain type of traffic that we want to highlight. Colorization of traffic is done in order to distinguish between different sets of traffic. Coloring a specific set of traffic with a different rule other than the default one will be like finding a needle in a haystack.
The default profile for most protocols is already created because of which we are able to see traffic in the packet list pane in different colors. You can access it by navigating to View | Edit coloring rules or clicking on the Edit coloring rules button from the main toolbar to open a window as shown in the following screenshot:

Figure 2.16: Coloring rules
All rules that are currently saved as part of your global configuration file to colorize traffic with certain foreground and background colors are listed in this dialog. Every packet listed in the packet list pane follows a certain rule, which gives them a unique and distinguished look and feel.
Let's use this feature and color the http error packets with a color of our choice. Say, for instance, I've a web server running on my machine that is used by the clients connected for file accessing purpose. Now, one of the clients in my network is trying directory listing and gets HTTP 404 error messages. These error messages will pop up in my packet list pane but will be colored using the same http coloring rule that makes these errors less visible to me. To make this more visible, I want to colorize the HTTP 404 error messages with a black background and with a cyan foreground. Follow the steps shown here that will achieve the same:
- I have configured a Linux box running on
172.16.136.129, and my Mac OS is running on172.16.136.1that serves as a web server for Linux, as Shown in the following screenshot:
Figure 2.17: The web server running on 172.16.136.1
Normal traffic from a Linux-accessing web server looks something like the screenshot here:

- Now that everything is up and running, we will try to do some directory listing manually from Linux, which will give eventually
HTTP 404error messages.
The traffic generated through this request is captured, which can be seen in the following screenshot:

We can see, in the preceding captured traffic, that the client requested the abc.jpg resource, which was not available; thus, the client received a 404 Not found error.
- We figured out easily because there is just one client requesting a single resource. Consider a production environment where thousands of clients are present and they might do the same. In such cases, coloring a specific set of packets with a different rule is a game changer.
- Navigate to Edit Coloring Rules | New. Type HTTP 404 in the Name box. Type
http.response.code==404in the String box. Choose the Foreground Color option as Cyan, and choose the Background Color option as Black. Then, click on OK and navigate to Apply | OK.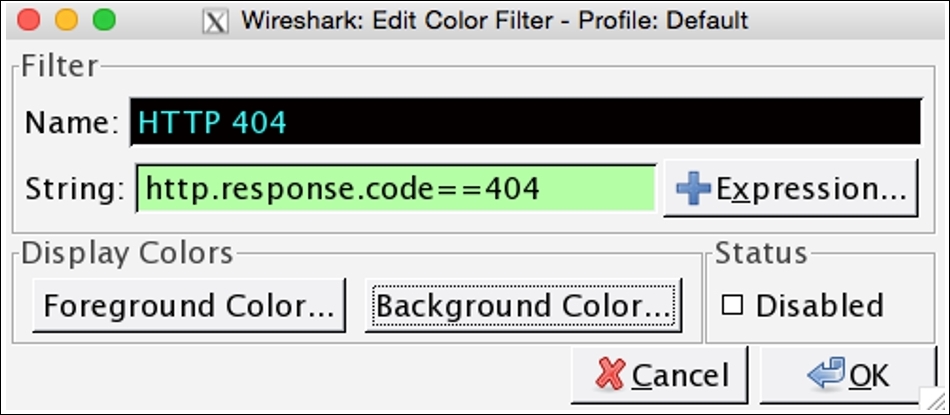
- Once you click on Apply, you will see that only the
HTTP 404error packets will be colored according to your new coloring rule.
Figure 2.19: After applying the new coloring rule
Try the same using a virtual environment to give yourself more insight into the topic.
Coloring rules listed in the Edit Coloring Rules dialog will be checked in a top-to-bottom manner. With every packet, there is coloring rule information attached that can be listed from the Packet Details Pane under the Frame section. Consider the following screenshot illustrating the same:
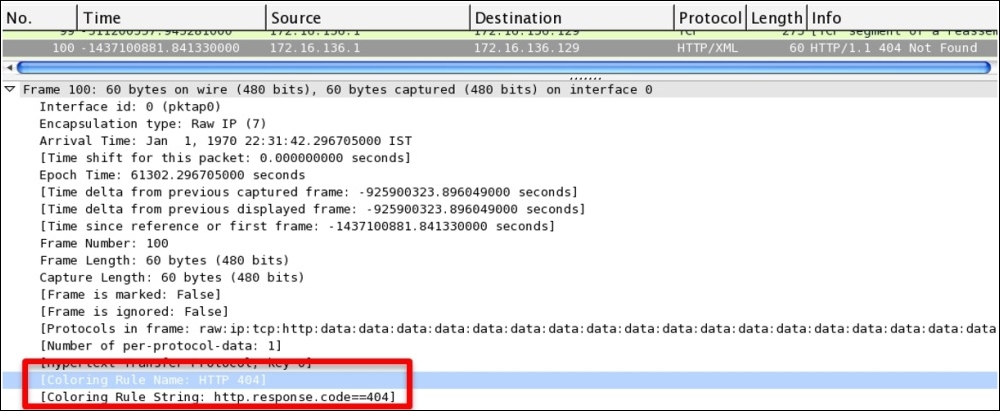
Figure 2.20: Coloring info in a frame header