
As the project server administrator, you have the authority to define customizations needed by your organization and then propagate those customizations to all enterprise projects as the accepted project management standards.
To create and disseminate custom project elements, you use the enterprise global template, also simply known as the enterprise global. You check out the enterprise global and then customize any number of Microsoft Project elements as necessary. You can define views, tables, filters, toolbars, macros, custom fields, and more. When you check in the enterprise global with your changes, your changed elements become part of all projects throughout the enterprise.
When a project manager or other authorized user checks out an enterprise project, the latest update of the enterprise global is automatically attached. The enterprise global is akin to a global template, or the "global global" over the standard project global template. The enterprise global dictates standards being enforced and customizations made available to Microsoft Project interface elements in projects throughout the enterprise. These standards provide for customization and consistency across all projects in an organization. The standards propagated through the enterprise global template also make it possible for project information throughout the enterprise to be compared and analyzed in meaningful ways.
The following list contains examples of tailoring and standardizing you might do for projects in your enterprise:
Define custom views.
Design reports.
Build and apply macros to enterprise data.
Set up custom calendars.
Define and customize information tables.
Table 21-1 shows all the Microsoft Project elements that can be modified in the enterprise global and integrated with all enterprise projects. The table also provides cross-references to places on the Internet and sections in this book where you can find more information about customizing these interface elements.
Table 21-1. Customizable Microsoft Project Elements
Project element | For more information |
|---|---|
Filters | |
Forms | |
Groups | |
Import and export maps | |
Macros | |
Reports | Revising a Built-In Report and Building a Custom Report in Chapter 12 |
Tables | |
Toolbars | |
VBA modules | Project 2007 Software Developer Kit (SDK) Documentation at http://msdn2.microsoft.com/en-us/library/bb244260.aspx |
Views |
By default, only the project server administrator and portfolio manager have permission to update the enterprise global. They do this through the Save Enterprise Global permission.
To use Project Professional 2007 to check out and change the enterprise global, follow these steps:
Be sure you’re logged in to the project server through Project Professional 2007.
In Project Professional, click Tools, Enterprise Options, Open Enterprise Global.
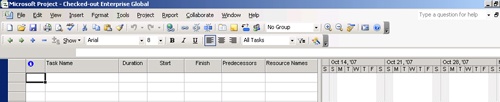
The enterprise global opens as a special project plan called Checked-Out Enterprise Global (see Figure 21-13)
Define and customize the Microsoft Office Project 2007 elements for the enterprise as needed.
Refer to Table 21-1 to find specific instructions for customizing a specific element.
When you’re finished working with the enterprise global and you want to check it back in to the project server, click File, Close.
In the prompt that appears, click Yes to save your changes.
The updated enterprise global is checked in to the project server and is now available to all project managers.
Note
You can also check out the enterprise global from within Project Web Access. On the Server Settings page, under Enterprise Data, click Enterprise Global. Click the Configure Project Professional button. The enterprise global is checked out to you and appears in Project Professional. You can now make the changes you need. When finished, save your changes and check the enterprise global back into the project server.
Note
For more information about working with the project global template, see Chapter 28.
You might find it a great idea to experiment with certain customized changes by using a regular enterprise project or even a local project before checking out the enterprise global and making the changes there. But you don’t have to make the change twice. You can simply copy the custom change from the regular project to the enterprise global using the Organizer.
To copy custom elements from a regular project to the enterprise global, follow these steps:
Log in to the project server through Project Professional 2007.
Open the regular enterprise or nonenterprise project that contains the element you want to copy to the enterprise global.
In Project Professional 2007, click Tools, Enterprise Options, Open Enterprise Global.
The enterprise global opens as Checked-Out Enterprise Global.
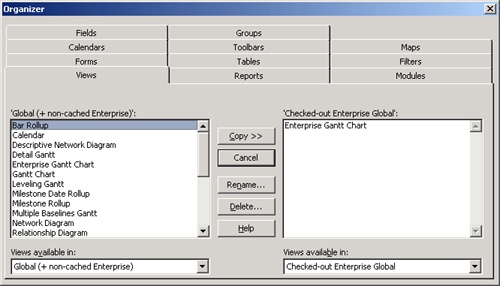
Click Tools, Organizer to open the Organizer dialog box (see Figure 21-14).
Click the tab for the type of element you want to copy, for example, Views or Toolbars.
In the <Element> Available In box in the lower-right corner of the dialog box, click the project that contains the element you want to copy, if necessary. (<Element> stands for the name of the current tab.)
The name of the project from which you want to copy the element might already be showing in the box.
Make sure the box in the lower left of the dialog box is labeled Global (+Non-Cached Enterprise).
If it is not currently showing, select Global (+Non-Cached Enterprise) from the <Element> Available In box. This is the name of the enterprise global template.
From the list of elements on the right side of the dialog box, click the name of the element you want to copy.
Click Copy.
If an element with the same name already exists in the enterprise global, a confirmation message asks you to confirm that you want to replace the element in the enterprise global. Click Yes to replace the element in the enterprise global with the one from the source project.
To copy the element with a different name, click Rename and then type a new name.
Check the enterprise global to make sure that your new element is present.
When finished working with the enterprise global, click File, Close.
In the prompt that appears, click Yes to save your changes and check the enterprise global in to the project server.
Another responsibility of the project server administrator is to set up any custom fields for enterprise projects as a whole as well as individual enterprise tasks, resources, and assignments. You can define these custom fields to hold special information—such as a specific category of costs, dates, or text that is not provided by built-in Microsoft Project fields. You can also create lookup tables for all custom fields except for the Yes/No field.
You can create a custom field in any enterprise project in Project Professional. You then give a command to add the field to the enterprise, and it becomes a part of the project global template. However, note that you cannot create fields in the checked-out global template itself.
Although local projects impose a limit on the number of custom fields you can create, new in Project Server 2007 is the ability to create an unlimited number of custom fields for enterprise projects. You might use Duration1 to create an enterprise task field, but as soon as you add the field to the project server, Duration1 becomes available again.
You can define the following custom field types for projects as a whole, tasks, resources, and assignments:
Cost
Date
Duration
Finish
Flag
Number
Start
Text
For enterprise projects, you can create a wide range of custom fields. There are different sets of custom fields for the different types of project database information, as follows:
Project fields. Store summary project information. Custom project fields can be viewed as part of the project summary row in an individual project plan. They can also be viewed in conjunction with other projects by users of the Data Analysis cube reporting features.
Task fields. Store information about the tasks in a project. Similar to the other types of fields, this information can include, for example, cost, date, text, and number information.
Resource fields. Store information about the resources in a project.
Custom fields can be defined in Project Web Access or Project Professional.
To use Project Web Access to define a custom enterprise field, follow these steps:
On the Server Settings page, under Enterprise Data, click Enterprise Custom Field Definition.
To create a single-value custom field, click New Field under Enterprise Custom Fields. Enter your specifications for the new custom field and then click Save.
If you want to create a custom field with a lookup table of multiple values, click New Lookup Table under Lookup Tables For Custom Fields. Enter your specifications for the lookup table and then click Save.
To use Project Professional 2007 to define a custom field for enterprise projects, follow these steps:
With Project Professional 2007 logged on to your project server, click Tools, Customize, Fields.
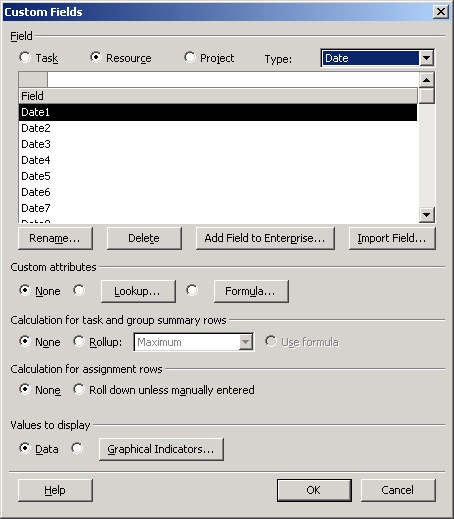
Under Field, click the Task, Resource, or Project option.
In the Type box, click the type of custom field you want to create, for example, Text, Cost, or Date.
In the Field box, click the next available custom text field, for example, Date1 (see Figure 21-15).
Click the Rename button and then type a descriptive name for your new custom resource field. Click OK.
If you want to specify a formula or graphical indicator for the custom field, use the sections in the lower half of the dialog box.
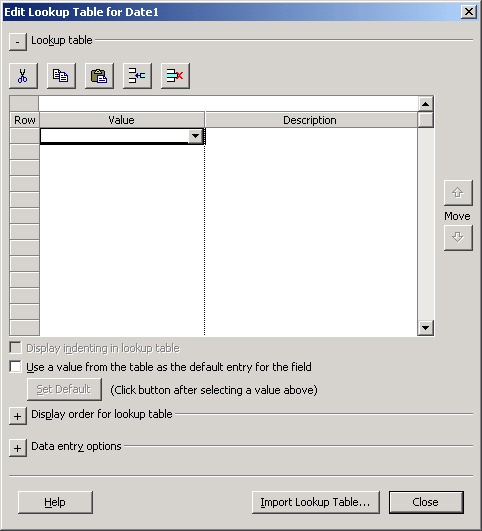
If you want this custom field to include a lookup table, that is, a drop-down list of preset values, click the Lookup button under Custom Attributes. In the Value column of the table, enter the items that are to comprise the drop-down list (see Figure 21-16).
Make any other changes you want to the definition of the lookup table for the new custom field, including a default value or the display order. When finished, click Close.
In the Custom Fields dialog box, click the Add Field To Enterprise button.
In the Field Name box, enter the name of the custom field as you want it to appear in a table in Project Professional 2007 or a custom view in Project Web Access. In the Lookup Table Name box, enter the name of the custom field as you want it to appear in a drop-down list of custom enterprise fields. Click OK.
In the alert that indicates that the field has been added to your project server, click OK.
The new field does not appear in Project Professional 2007 until you restart the application. However, it does become available in Project Web Access immediately.
Click OK in the Custom Fields dialog box.
Restart Project Professional 2007 to see and use the new field.
Note
For more information about defining custom fields and outline codes, including lookup tables, formulas, and graphical indicators, see the section titled Customizing Fields in Chapter 25.
After you have defined an enterprise resource custom field, associate the field and their values with enterprise resources by following these steps:
In the Resource Center of Project Web Access, select the check boxes next to the names of the resources for whom you want to enter resource custom fields and values.
Click Edit Details.
In the Resource Custom Fields section, enter the appropriate value in the custom resource field. If you had created a lookup table for the field, click the arrow in the field and then click an entry in the drop-down list. If there is no lookup table, simply type the value in the field.
Click the Save And Continue button.
Enter the value in the custom resource field for the next resource. Repeat steps 3–4 until you’ve entered the values in the custom resource fields for all selected resources.
Note
If you’re making the same change to custom resource fields for multiple resources, you can select the resources and click Bulk Edit. Your custom fields appear in the Resource Custom Fields section. Enter the value in the custom resource field that applies to all selected resources. Select the Apply Changes check box next to the custom resource field and then click Save. The change is applied for all selected resources at once.
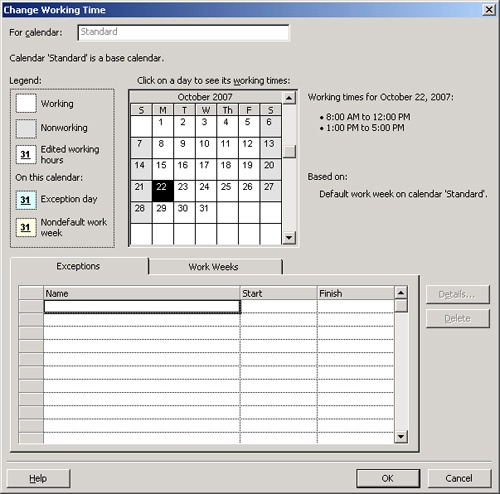
In addition to standardizing elements such as views, toolbars, and fields to reflect the operations of your organization, you can also create enterprise-level working times calendars that dictate how projects and resources are scheduled. By default, resources are assigned to the Standard working times base calendar, which reflects a schedule of Monday through Friday, 8:00 A.M. to 5:00 P.M. with an hour off for lunch. You can customize the Standard calendar to reflect your organization’s holidays, company meetings, offsite conferences, and other events to make sure that project tasks are not scheduled for work during those times.
You can create other base calendars as needed to reflect a different working times schedule for a project or for individual resources. In enterprise project management, only those with the Manage Enterprise Calendars privilege may create or modify base calendars because the calendar settings become part of the enterprise global. Users identified as the administrator or portfolio manager have the Manage Enterprise Calendars privilege by default. Project managers can view the working times calendars, but they cannot change them.
To change the Standard base calendar that is the starting point for working and nonworking times for all projects in your organization, follow these steps:
In the Quick Launch task bar, click Server Settings. Under Enterprise Data, click Enterprise Calendars.
Click Standard in the Enterprise Calendars table and then click Edit Calendar.
The Change Working Time dialog box opens in Project Professional (see Figure 21-17).
Change the Standard working time calendar the way you need, either by entering exceptions or by creating alternative workweeks.
Note
For detailed information about changing a working time calendar, see the section titled Modifying a Base Calendar in Chapter 3.
When you’ve made all the changes you want, click OK.
The Standard working time calendar is applied and will be applied to projects the next time project managers check out any enterprise project that uses the Standard calendar.
You can create a new base calendar that uses an existing calendar as its starting point. In the table on the Enterprise Calendars page, click the name of the calendar that you want to copy. Click Copy Calendar. Enter the name for the new calendar and then click OK. The copied calendar appears in the list. Select it, click Edit Calendar, and make the changes you want.
You can also create a new base calendar from scratch, that is, with no exceptions or alternative workweeks defined other than the defaults. The new base calendar is essentially the built-in Standard base calendar, with working times of Monday through Friday, 8:00 A.M. to 5:00 P.M., with an hour off for lunch. To create a new calendar, on the Enterprise Calendars page, click New Calendar. In the For Calendar box in the Change Working Time dialog box, enter a name for your new calendar. Make the changes you want and then click OK.
To assign a base calendar to a resource, follow these steps: