
First, let's see what tools are provided by Wireshark for monitoring voice, video, and multimedia.
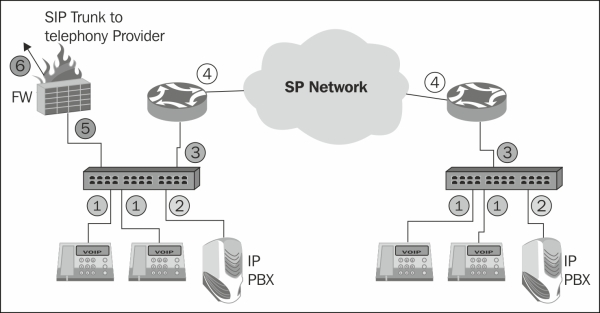
While facing problems with voice calls, video-conference calls, or other multimedia sessions, connect your laptop with Wireshark and port mirror one of the following devices as shown in the following diagram:
Follow these steps to use Wireshark's features for telephony and multimedia analysis:
- Monitor the local or remote clients (1) in cases where you suspect a specific client problem.
- Monitor the local or remote IP PBX system (2) when you suspect a central problem that influences the entire IP Telephony network.
- Monitor the connections to the router (3 and 4) while suspecting an interoffice connectivity problem.
- Monitor the firewall on the LAN port (5) or on the connection to the service provider (6). This connection will usually be over the Internet, but can also be on a direct line to the provider.
In the Wireshark window, open the Telephony menu, as shown in the following screenshot:
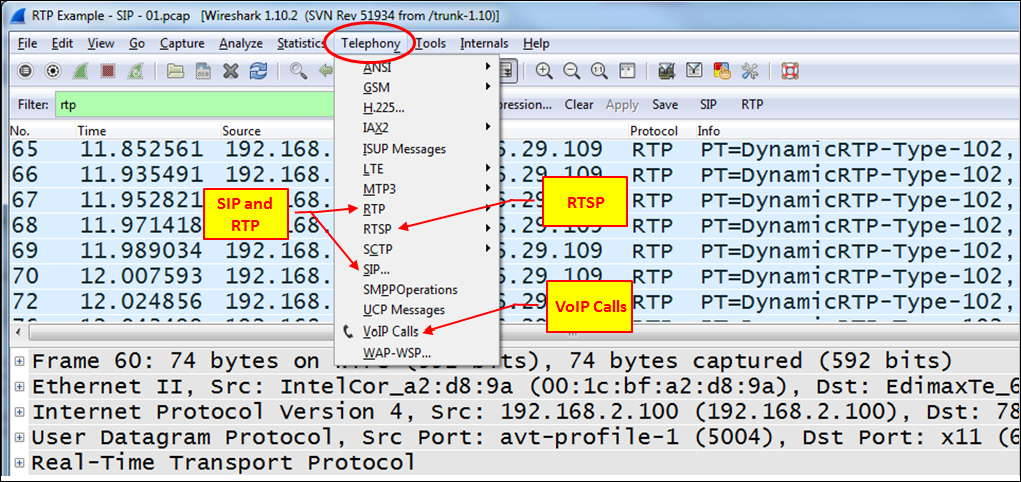
For telephony networks, use the following menus:
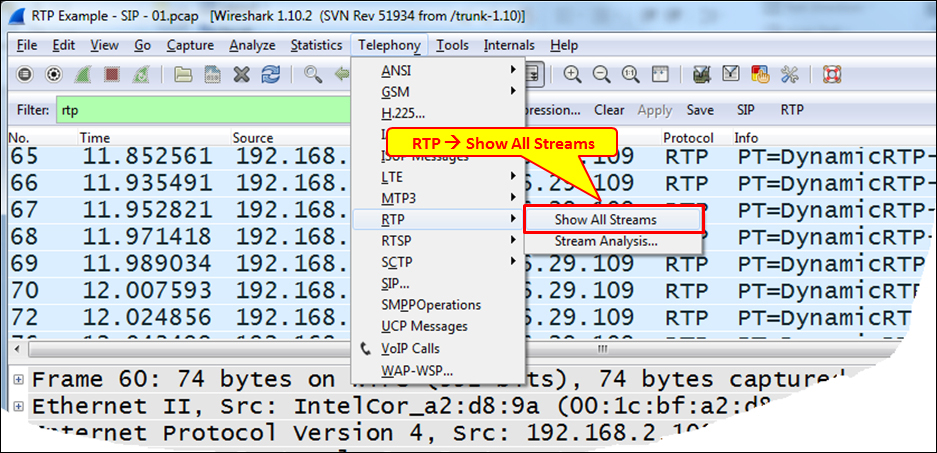
- To view RTP information, navigate to RTP | Show All Streams as shown in the following screenshot:
- The following window will open:
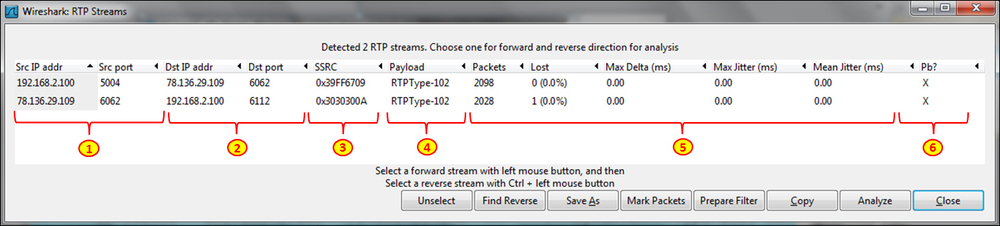
- In the RTP Streams window, you will see the following details:
- The source IP address and UDP port
- The destination IP address and UDP port
- Synchronization Source (SSRC), which is an RTP stream identifier
- RTP payload type (usually codec type)
- Stream data, which is the total amount of captured packets, packet loss, maximum time between packets, maximum, and mean jitter
- Pb? that indicates a general problem in the stream
In the lower part of the window, you have the following buttons:
- Unselect: When you select a stream by clicking on its line, the Unselect button will cancel the selection.
- Find reverse: On a voice or multimedia call, a reverse stream is the stream in the opposite direction (which will be highlighted in light gray).
- Save as: This button can be used to save a stream in the
rtpdumpformat. For information about the format, go to http://www.cs.columbia.edu/irt/software/rtptools/. - Mark packets: not functioning.
- Prepare filter: This prepares a display filter in the display filter window.
- Copy: This option copies the RTP streams to a text file. For doing so, click on Copy, open a text editor, and paste the content to the text file.
- Analyze: When you click on a stream, and then click on the Analyze button, it opens the RTP Stream Analyze window. The same window can be opened by clicking on an RTP packet and navigating to Telephony | RTP | Stream Analysis from the menu.
- Close: Clicking on this button closes the window.
- To view SIP information, navigate to Telephony | SIP. Enter
ip(orudporsip) in the SIP Packet Counter window that opens, and the window SIP statistics with filter: ip will open as shown in the following screenshot: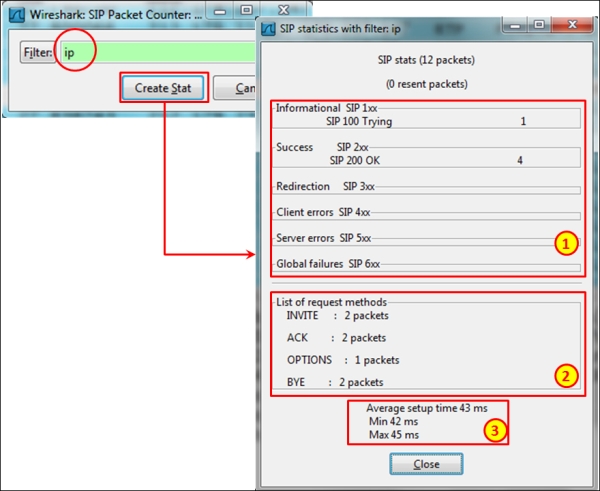
- In the window, you will get the following SIP statistics:
- Number of packets sent with SIP response codes (numbered as 1 in the preceding screenshot)
- Total number of each one of the SIP methods (these are SIP commands) that were sent (numbered as 2 in the preceding screenshot)
- Minimum, maximum, and average session setup times (numbered as 3 in the preceding screenshot)
- For RTSP statistics, navigate to Telephony | RTSP | Packet Counter, write
ip,rtsp, or just leave it blank in the pop up that comes up, and then click on Create Stat that opens a window as shown in the following screenshot: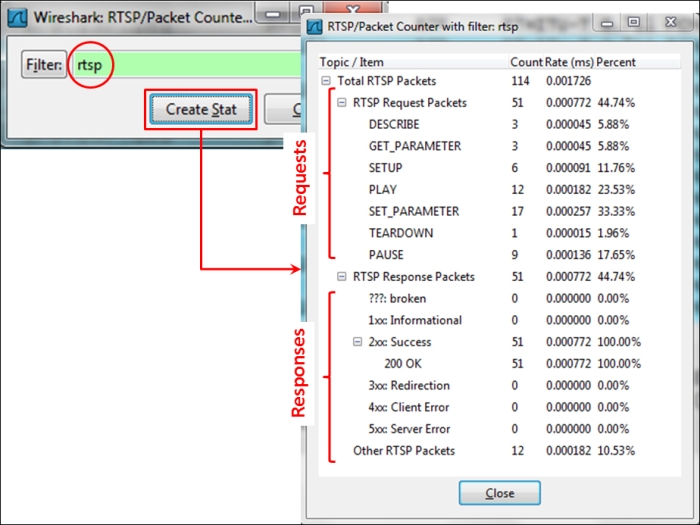
- For watching which telephone calls were captured, navigate to Telephony | VoIP Calls. A window as shown in the following screenshot will open:

- In the VoIP calls, you see the following parameters:
- The start and end time that give the duration of the call (numbered as 1 in the preceding screenshot)
- The IP address from where the session had started (numbered as 2 in the preceding screenshot)
- The SIP address from where the session started (numbered as 3 in the preceding screenshot)
- The SIP address for whom the session was intended (numbered as 4 in the preceding screenshot)
- The protocol of the session (usually SIP), the number of protocol packets, and the session status (numbered as 5 in the preceding screenshot)
For transferring voice, video, or multimedia, we need two functions to be performed. The first one is to carry the media stream, which is mostly voice or video, and the second one is the signaling, which is to establish and terminate the call, to invite participants to the call, and so on. Two protocol suites were proposed over the years for the signaling:
- The ITU-T suite of protocols, including H.323 as an umbrella protocol for the suite, H.225 for registration and address resolution, H.245 for control, and some others.
- The IETF suite of protocols including SIP as a signaling protocol (RFC 3261 with later updates) and Session Description Protocol (SDP) that describes the session parameters (RFC 4566).
The ITU-T set of protocols phased out in the last few years, and the majority of the applications today are using the IETF set of protocols, on which we will focus in this chapter. In the following diagram you see the structure of the IETF protocol suite.
For the stream transfer, both suites use RTP and RTCP (RFC 3550 with later updates). RTP is used for the media transfer, and RTCP for controlling the quality of the stream.
There are several protocols for transferring multimedia sessions over an IP-based network, as shown in the following diagram:
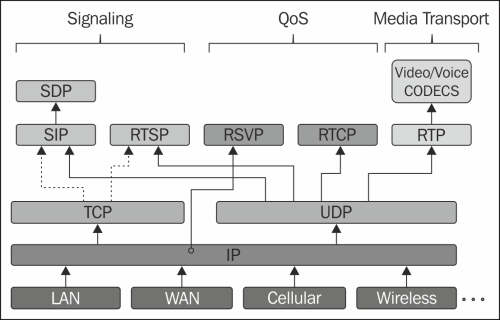
SIP is used for signaling the structured packets that are sent between end clients. SDP data is carried by SIP messages for the description of the session. RTSP is used for controlling streams, usually video transmissions (typically IPTV streams).
RTP is used for carrying the media. Above RTP, we have various types of codec for voice and video compression.
RTCP is used for controlling the quality of the stream, and RSVP is a protocol for establishing the quality of service through the network.
All these protocols are carried by the TCP/IP protocol suite, as shown in the preceding diagram. Later, you will find in this chapter a detailed description for most of them.
SIP uses fixed port numbers; therefore, Wireshark will always refer to these ports as an SIP session—port 5060 for SIP and port 5061 for SIP over TLS (which is SIP secured with TLS). The standard allows using SIP over TCP or UDP, but in the majority of the cases, it will be used over UDP.
RTP and RTCP, on the other hand, do not use standard fixed ports. RTP uses even port numbers, and the corresponding RTCP stream uses the next higher odd port numbers. For example, if RTP uses port 5004 on one end, and port 2006 on the other, RTCP will use ports 5005 and 2007 respectively. This is why Wireshark, by default, will not resolve RTP, RTCP, and such others, but it will show you UDP traffic instead.
To resolve it, you can do the following:
- Right-click on a packet in the RTP stream (which currently looks like UDP) and click on Decode as. In the window that opens, select RTP.
- You can go to Edit | Preferences, and from the protocol list, choose RTP. In the RTP window, select Try to decode RTP outside of conversations, and in most cases, RTP will be decoded automatically in this manner. You can do the same for RTCP.