
Since you have learned how to create and install a Splunk application and Splunk add-on, we will now move on to how to manage apps and add-ons on Splunk Enterprise.
The following settings can be managed from the Manage Apps console of Splunk Web:
- Permission management of Splunk apps and add-ons: Splunk apps and add-ons can be applied with specific roles and permissions, and we can also decide whether the app or add-on should be shared with other applications on Splunk. From the permission section, the object created in the application or add-on can also be shared in other apps by choosing Sharing for config file only object to all apps.
- Enabled and disable applications and add-ons: All the applications and add-ons installed on Splunk Enterprise will be listed in the menu, and applications and add-ons can be enabled and disabled from this section.
- Properties: The name of the Splunk application or add-on can be updated from this section. Other options such as making the application visible or not and uploading customs scripts, CSS, and JavaScript can be chosen from this menu.
- View objects: All the objects, regex, and field extractions that are stored in the application or add-on configuration will be visible from the option. The object's permission can be modified and objects can be enabled or disabled from this option.
The application or add-on can also have other configuration options that can be enabled or disabled and configured via Splunk Web.
For example, suppose there is an add-on that fetches data from any web source and uploads to Splunk. Once the add-on is installed, since there is a data upload script defined in the Scripts section of Data Upload, the settings can be configured from the Splunk Web console.
From the Splunk Web console, go to Settings | Data inputs | Scripts.
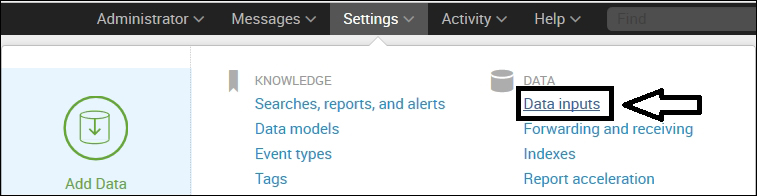
In the Scripts section, there will be an entry of the data upload configured in the Splunk add-on. From this menu, we can enable/disable the data input script, and from this menu, we can modify the run interval of the script and define or change the source type of the data to be uploaded on Splunk.
Depending on the types of configuration defined in the Splunk app or technology add-on, different sections of Splunk settings can be configured after the installation of the application or add-on.
You must have noted that there is an option to enable and disable the application, but there is no option to uninstall the Splunk application or Splunk add-on from the web console. To uninstall, the following command needs to be run on Command Prompt or the terminal in Windows and Linux, respectively:
- Windows users:
splunk remove app [appname] -auth <username>:<password> - Linux users:
./splunk remove app [appname] -auth <username>:<password>
Another easy and clean way of uninstalling a Splunk application or add-on is to remove the application or add-on directory from $SPLUNK_HOMEetcapps and restart the Splunk Enterprise server.