
The fields subset of commands on Splunk is used to add, extract, and modify fields and field values. These commands help users enrich the data, do mathematical and string operations on the fields, and derive insight from the data.
The eval command of Splunk is very useful and powerful. It can be used to evaluate Boolean, mathematical, or string expressions. It can also be used to create custom (new) fields using existing fields or arbitrary expressions. This command can be used to create new fields, which is the result of some calculations, or use conditional operators such as if, case, match, and so on to apply some expression and evaluate the result.
The
eval command can also be used to coalesce fields from different sources or indexes to create a transaction of events. The command can be used to extract information to create multiple fields from an event(s).
The syntax for the eval command is as follows:
eval fieldname = expression/Functions
The parameter description of the eval command is as follows:
- Expressions can be either arithmetic (
+,-,*,/,%), Boolean (AND,OR,NOT,XOR,LIKE), comparison (<,>,<=,>=,=,==,!=), and concatenation operator (.) - There is a large number of functions that can be used in the
evalexpression. Some of them areabs,if,lower,min,max,pi,power,random,split, and so on.
Refer to the following examples for better clarity:
… | eval Expression1 = (Field1 +Field2)/Field3… | eval Result = min(field1, field2)… | evalComplete_Address = Address_Line1." ".Address_Line2." ".Pincode… | evalAndroid_Ver_Name = case(Version == 4.4, "KITKAT", Version == 5.0, "LOLLIPOP", Version == 6.0, "MARSHMALLOW")index=kitkat OR index=lollipop | evalcache_errors=coalesce(dalvic_cache,art_cache)
Refer to the following list for an insight on the above examples:
- In the first example, the
evalcommand is used to do a mathematical calculation where an addition ofField1andField2is divided byField3and the result is stored inExpression1. - In the second example, the
evalcommand will store the minimum value fromfield1andfield2and store it in theResultvariable. - In the third example, a concatenation operator (
.) is used to concatenateAddress_Line1,Address_Line2, andpincodeto getComplete_Address. - In the fourth example,
casecondition is used to get the name of the Android version, that is, if theVersionis4.4, then theAndroid_ver_namefield will get assigned asKITKAT. If theVersionis5.0, thenLOLLIPOPwill get assigned and so on. - In the fifth example,
coalceseis used along with theevalcommand to fetch information from different sources and indexes where field values are the same but field names are different. For example, forindex=kitkat,cache_erroris available under thedalvic_cachefield, and forindex=Lollipop,cache_erroris available underart_cache. So, basically, depending on the index, the cache field name is changing, but the field information is the same. Hence, thecoalcesecommand can be used to combine and get the result into a new field. In our example, the new field name iscache_errors.
This command is used when the data is in the XML format to exact the key-value pairs form the XML data. Using xmlkv automatically creates fields of the XML tags and makes them available for use on Splunk for analytics.
The syntax for the xmlkv command is as follows:
… |xmlkv
Refer to the following example of the xmlkv command:
sourcetype="xmltest" | xmlkv
The following screenshot describes the xmlkv command:
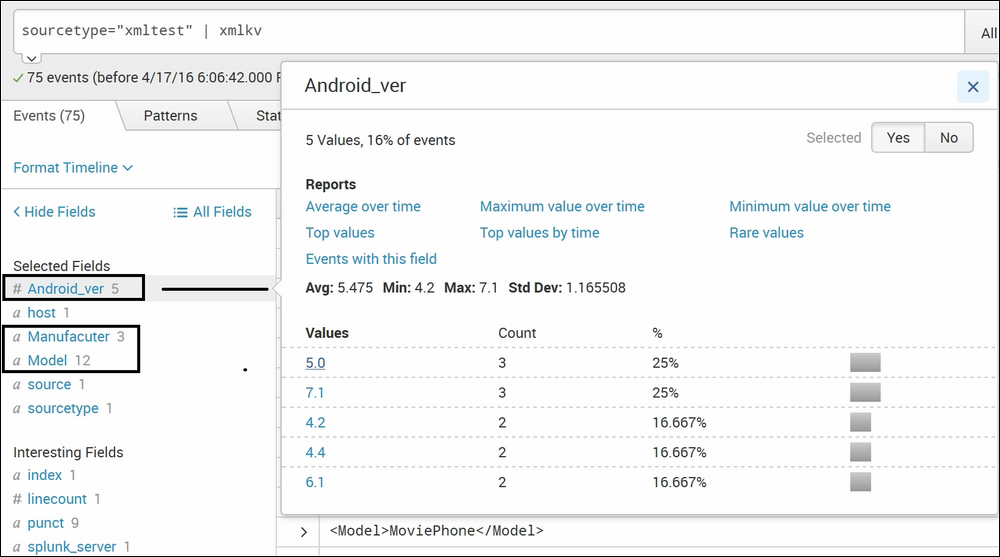
The test XML file uploaded on Splunk looks like this:
<phone id="phone101">
  <Manufacuter>TestPhone1</Manufacuter>
  <Model>C2123</Model>
  <Android_ver>4.2</Android_ver>
  <price>44.95</price>
</phone>
After running the xmlkv command, fields from the XML file, such as Manufacturer, Model, Android_ver, and price automatically get extracted from the file and are available as fields that can be used to create analytics and visualizations. This xmlkv command makes it easier to do to analysis on XML files.
This command is similar to the xmlkv command, but unlike xmlkv, which can be used only for XML files, spath can be used on any structured data, such as JSON and XML files, to extract the tags from the structured data into fields. spath commands can be used to extract multivalued fields from JSON and XML events or to extract a subset of an attribute.
The syntax for the spath command is as follows:
… |spath
      input=field_name
      output=field_name
      path=datapath
The parameter description of the spath command is as follows:
input: The field from which the data is to be extracted can be specified in this parameter. The default value for this parameter is_raw.output:The name of the field to which the data is to be extracted to. This is used where a custom name of the field is needed rather than the auto extracted field name.path: This is the path of the value that is to be extracted. Let's take an example of a path from the following sample XML file:<library> <book category="Technical"> <title lang="en">Splunk Basic</title> <author>Jack Thomas</author> <year>2007</year> <price>520.00</price> </book> </library>Now, the path of the tag
yearwill belibrary.book.yearand so on. Depending on the hierarchy, the path can be defined and specified accordingly.
Take a look at the following example:
sourcetype="_json" | spath
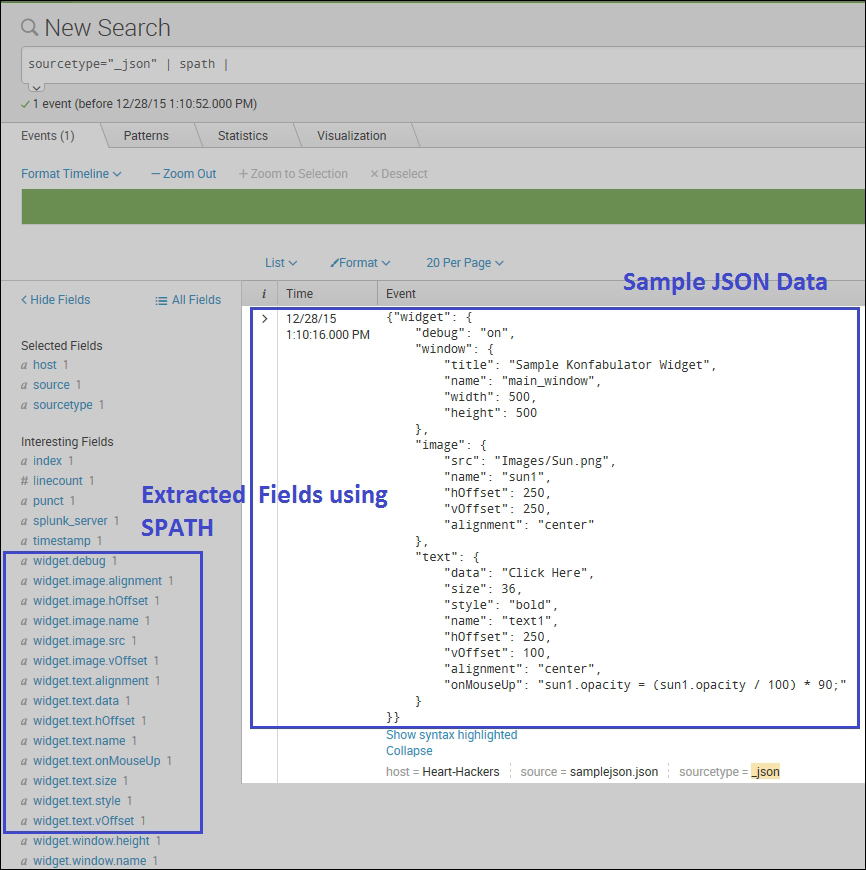
As shown in the preceding example, using spath, structured data tags can be extracted into fields. In the left box in the image, the path to the data can be seen like an access alignment field and the path would be widget.image.alignment. The output parameter can be used to get the value from the specified path into a fieldname of user choice.
This
makemv Splunk command is used to convert a single value field into a multivalued field based on the specified delimiter. This command can be useful to extract information that is available in a single file. For example, from an e-mail ID, [email protected], the username and domain can be extracted using the makemv command.
The syntax for the makemv command is as follows:
makemv delim=Delimiter_string
    | tokenizer=Regex/tokens
      Allowempty=true/false
      setsv=true/false
The description of the parameters is given as follows:
delim: Splits the string on every occurrence of the delimiter specified here. The default delimiter is a single space.tokenizer: A regular expression of a token that is to be matched in the string to split.setsv: If this parameter is set totrue, then there is simultaneous existence of multivalue and single value for the same field.
An example of the makemv command is discussed as follows:
sourcetype=EmailFile | makemvdelim="@" EmailID | table EmailID
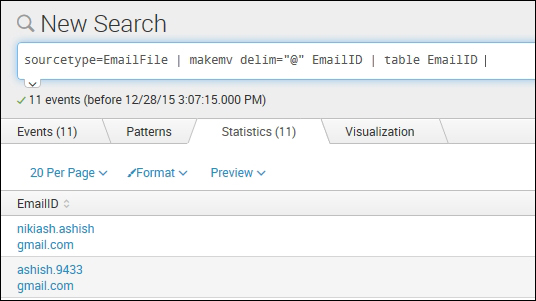
As shown in the preceding screenshot and example, we will convert all the single value EmailID fields into multivalued attributes by breaking them on every occurrence of @. Hence, the EmailID field, after applying the makemv command, will have two values, that is, username and the domain.
The fillnull command of Splunk is used to replace null values in fields with specific user-defined values. Null values are those values that are present for one field but not for another field in a result set. For example, we have a table that displays the personal information of students, such as Name, Address, Phone Number, PAN Number, SSN Number, and so on. It may happen that some students may not have a PAN number or SSN number, so for that specific user, the corresponding filed value will be null. Using fillnull, those null fields can be filled with user-defined values.
The syntax for the fillnull command is as follows:
… | fillnull value=String
Here, the value parameter is a string that the user wants in place of null.
Take a look at the following example of the fillnull command:
index="_audit" | table action info | fillnull value="NOT AVAILABLE"
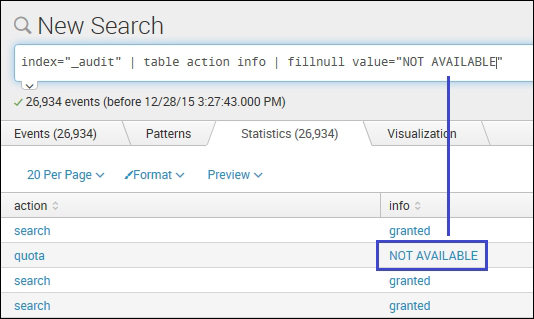
As shown in the example, any null field will be filled with the user-defined value. In our example, the user-defined value is NOT AVAILABLE. If the value parameter is not specified, then the default value, that is, 0 will be entered.
The filldown Splunk is a customized version of the fillnull command, where instead of filling user-defined or zero values to the null fields, the previous non-null value for the field or field set is applied. In a scenario where there is no non-null previous fields, then it will be left blank (NULL).
Refer the following command skeleton for the syntax of the filldown command:
… | filldown field-list
The field-list parameter is a list of fields to which filldown is applied. If the field list is not specified, then all the fields are applied with filldown.
Take a look at the following example for a better understanding:
index="_audit" | table action info | filldown
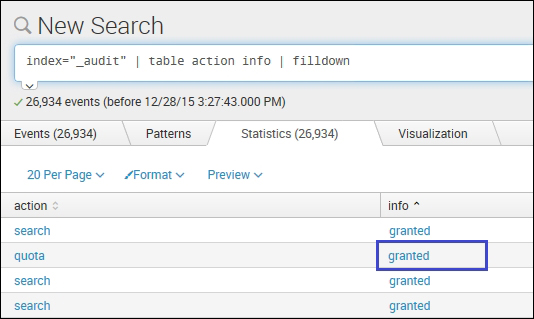
As shown in the fillnull example image, the fields with null values were filled with the user-defined string NOT AVAILABLE. On using filldown for the same instead of null, the previous non-null value, that is, granted, is assigned to that respective field.
The replace command of Splunk works similar to the fillnull command. In the fillnull command, only the null fields were filled up with respective user-defined values, whereas in the replace command, any field value can be replaced with a user-defined string. replace can be used to make the output more readable and understandable to end users or so on. For example, if the user wants the 127.0.0.1 hostname to be replaced with localhost, or say, in my data, android_version is 5.0 and the user wants 5.0 android_version instead to read lollipop then the replace command can be used.
The syntax of the replace command is as follows:
…|replace old_string WITH new_string IN Field_list
The parameter description is as follows:
old string: The string that is to be changednew string: Specifies the new string to which the old string is to be changedField_list: List of fields to which thisreplacecommand is to be applied
Refer to the following examples for a better understanding:
- Example 1:
… | replace 127.0.0.1 WITH localhost IN host - Example 2:
…| replace 5.0 WITH lollipop IN Android_version
In Example 1, every occurrence of 127.0.0.1 in the host field will be replaced by localhost. Similarly, in Example 2, 5.0 will be replaced with lollipop in the Android_version field.