
The search that is enclosed in a square bracket and whose result is passed as a parameter value to the search is called a subsearch. Basically, subsearches are used when the search requires some input that cannot be directly specified or that keeps on changing. Hence, another search query is written, and the result is passed to the original search.
Let's assume a user wants to know the location and IP address of top three users who have failed the login attempt. Now, the top three users who are failing the login will keep on changing, so subsearches are used. The subsearch will show the top three users that will be passed to the original search. This search will result in the location and IP address of those three users.
You will learn in detail how the preceding scenarios can be solved using various subsearch commands.
The
append command of the subsearch category, as the name suggests, is used to append the result of one search with another search result. The subsearch may or may not have the same name and the same number of fields. So, the append command is used to append the final result of two searches (which cannot be combined in a single search) into one result.
The syntax of the append command is as follows:
Search … |append [search …]
The example that follows will give you a better understanding of the append command:
index=_internal | stats count by sourcetype |head 3 | append [search index=main | stats count by sourcetype | head 3]
The following screenshot describes the append command:
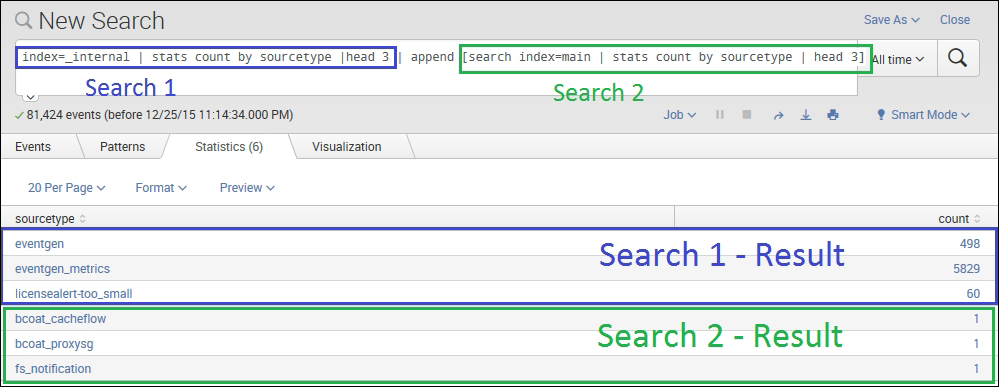
The preceding search query runs the subsearch specified under append, and the results are appended with the search result of the main search query. So, in the preceding screenshot, the first three rows are the results of the main query, and the last three rows are the results of the subsearch written in the append section of the query.
This command is used to append the fields of one search result with another search result (subsearch). The resulting fields are added row wise. For example, the first row of the first search will be combined with the first row of the second search. In the scenario when the fields of the first and second search results are common, then the value will be overwritten by the result of second search.
The syntax of the appendcols command is as follows:
Search … |appendcols
         [override= true/false
         | search ...]
The override parameter accepts the Boolean value of true or false whether to override the value of a common field with the result of a second search or not.
Refer to the following example for better lucidity:
index=_internal | timechart span=1d count as Count1| appendcols [search index=_audit | timechart span=1d count as Count2]
The following screenshot describes the appendcols command:
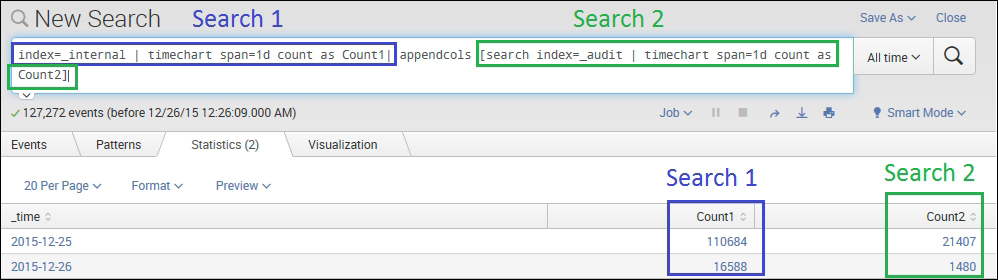
In the preceding example query, the output column Count1 is the result of the first search query and Count2 is the result of the second search query. The appendcols command can be basically used for comparative analysis of two or more search results in the same table or chart.
The appendpipe command is used to append the search results of the post process (subpipeline) of the current result set. In short, appendpipe can be used to add a summary to the current result set.
The syntax for appendpipe is as follows:
Search … | appendpipe [search …]
The following screenshot describes the appendpipe command:
Listed as follows is an example of appendpipe command:
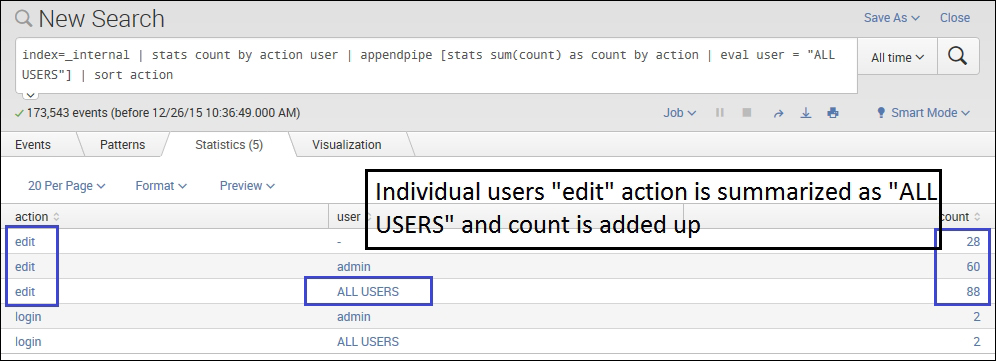
index=_internal | stats count by action user | appendpipe [stats sum(count) as count by action | eval user = "ALL USERS"] | sort action
In the preceding example, appendpipe creates a summary of the edit action whose count is grouped by the user. Thus, the third entry of the edit action has ALL USERS in the user filed, and the count is the sum of all the users. Thus, appendpipe can be used to create a summary of any number of fields by grouping them into one based on the specified field.
The join command is used to combine the results of the subsearch with the main search result. The join command of Splunk works similar to the join command used in SQL. Join in Splunk can be of mainly of two types, that is, inner join and left join (left join is also known as outer join in Splunk). There should be at least one field common for the join command.

The syntax for the join command is as follows:
search … | join jointype [ search …]
The jointype parameter can be defined as Left Join (outer join) or Inner Join. If the join type is not defined, then the default is set to Inner join.
Refer the following example for a better clarity:
| inputlookup dmc_assets | stats first(serverName) as serverName, first(host) as host, first(machine) as machine | join type=outer serverName [ | rest splunk_server=Heart-Hackers /services/server/info | fields serverName, numberOfCores, physicalMemoryMB, os_name, cpu_arch ]
The following screenshot describes the join command:

In the preceding example, the result highlighted in the left-hand box is the output of the query written before the join command, and the one highlighted in the right-hand box is the output of the subsearch written after the join command. In this example, serverName is the common field that is used to join the output of both the search actions, and the result is as shown in the preceding image. Information such as cpu_arch, numberOfCores, os_names is fetched for the serverName specified, and the results are matched and displayed as a single result.