USING AUTOMATION TO DRIVE OUTLOOK FROM ACCESS
Driving Outlook from Access is actually easier, in my opinion, than driving from some of the other Office products. Even though Outlook uses VBScript for its language, from Access it codes just like any other Office app but with a simpler object model.
Most objects you will create will be different types of one object, called an Item. Here are the possible items, with their Outlook.OlItemType enum equivalents used with the CreateItem method:
| Item | enum |
|---|---|
| olMailItem | |
| Appointment | olAppointmentItem |
| Contact | olContactItem |
| Task | olTaskItem |
| Journal | olJournalItem |
| Note | olNoteItem |
| Post | olPostItem |
When you specify the type of item you will use, the properties particular to that type can then be accessed. The following sections look at four of the six types of items:
Mail item
Task item
Contact item
Appointment item (calendar)
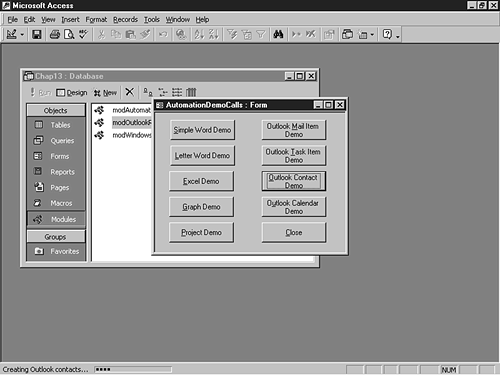
All the examples shown here are called from the form AutomationDemoCalls on their respective command buttons.
Creating a Outlook Mail Item
Let's start with the basics by creating a simple mail item. This procedure is very useful when you're designing any number of applications. One good examples of mail in an Access application is an email to yourself about errors that occur for other users at different times during the application. Another example is an email to the sales manager to be sent when an invoice is prepared for amounts of $1 million or more. (I know I would want to be notified!)
In Figure 13.16, you can see a mail message created from Access.
Figure 13.16. This mail message was created programmatically from Access.

Listing 13.9 shows the code for this example, in the subroutine ap_CreateOLMailItem, which you can find in modOutlookRoutines. This module is located on the CD-ROM in the ExamplesChap13 folder, in the Chap13.mdb database.
Listing 13.8. Chap13.mdb: Creating an Outlook Mail Item from Access
Sub ap_CreateOLMailItem(strRecipient As String, strSubject As String)

    Dim objMailItem As Outlook.MailItem

    Set olkApp = New Outlook.Application

    Set olkNameSpace = olkApp.GetNamespace("MAPI")
    Set objMailItem = olkApp.CreateItem(olMailItem)

    With objMailItem
        .To = strRecipient
        .Recipients.ResolveAll
        .Subject = "This is the subject line"
        .Body = "Here is the body"
        .Display
    End With

    Set objMailItem = Nothing
    Set olkNameSpace = Nothing
    Set olkApp = Nothing

End Sub
|
There are a couple of items to point out. First, notice the new object declared with the line
Dim objMailItem As Outlook.MailItem
This is part of the Outlook object model mentioned earlier and is the object you will use the most.
The next line sets a reference to Outlook.Application. You may ask where the variable called olkApp was declared. It, along with the NameSpace variable, was declared in the declaration section of the modOutlookRoutines, shown here with the constants already mentioned:
Option Compare Database
Option Explicit

Public olkApp As Outlook.Application
Public olkNameSpace As Outlook.NameSpace
The NameSpace object is used to reference MAPI (Mail Application Programming Interface) formatted data, which is what Outlook uses. Notice that I use the GetNameSpace method to point to MAPI, but then reference directly to the application for any objects or methods we might use.
After the NameSpace object is referenced, I then use the CreateItem method to create the object I want—in this case, the mail item. Next, the necessary properties are set, then the Display method is evoked to show the mail item.
Creating a Outlook Task Item from Access
Creating a Outlook task item is about the same as a mail item. The only real difference is the properties that will be set for the item. You can see the finished product in Figure 13.17.
Figure 13.17. Make sure that Outlook reflects tasks created by your application.

You can see the code in Listing 13.9, also in modOutlookRoutines.
Listing 13.9. Chap13.mdb: Creating Outlook Task Items Are a Breeze from Access
As mentioned, the only differences between this and the preceding example are the properties set for the item. The next example gets a little trickier in that you're now going to create contacts in Outlook.
Putting Contacts into Outlook from Access
When creating an Outlook contact, you might think that it will be a pretty big hassle. Well—surprise—all you're doing is specifying a different item type and different properties. The example here does perform a bit more in that it takes all the customer records in the table tblCustomers (see Figure 13.18) and loads them into Outlook.
Figure 13.18. The original Access table will soon reside in Outlook Contacts.

This routine not only puts the customers in the contact of Outlook, but also displays a nice status bar while doing it, using the SysCmd() function in Access (see Figure 13.19.)
Figure 13.19. If a process is lengthy, it's a good idea to give your user a status bar.

Before seeing the contacts in Outlook itself, let's look at the code in Listing 13.10.
Listing 13.10. Chap13.mdb: Copying Access Customers into Outlook Contacts
This routine has a few differences from the previous Outlook routines presented. Rather than just add a single item, it goes through a recordset and adds quite a few items. Another difference is the use of the SysCmd() function, mentioned at the beginning of this section. This command for progress bars is summed up in the three lines of code used in this routine:
-
The first line of code initializes the progress bar:
SysCmd acSysCmdInitMeter, "Creating Outlook contacts...",_
    intRecCount
-
The next line of code is used to update the progress bar:
SysCmd acSysCmdUpdateMeter, intCurrRec
-
The final line removes the progress meter when the process is complete:
SysCmd acSysCmdClearStatus
If you want to see more of SysCmd() for creating progress bars, check out Chapter 14, “Programming for Power with ActiveX Controls,” which examines not only SysCmd(), but also the ActiveX Progress Bar.
The last two differences between the current code and the previous Outlook routines are the most important:
Rather than use the Display property to see the items, you will use the Save method to store the item in the contacts folder.
You are setting the Categories property, shown again in this line of code:
.Categories = "Access Contact"
The Categories property can be used to specify what area this contact is used for. Besides the built-in categories that Outlook supplies, you can add your own. This will be used in the last half of this example, where you will be shown how to delete the Access contacts from the Outlook Contact folder. For now, see in Figure 13.20 how the contact information looks in Outlook coming from Access.
Figure 13.20. Notice that the Categories property is set to Access Contact.

Deleting Contacts in Outlook from Access
Sometimes you will need to remove contacts from Outlook, particularly if you refresh your contacts periodically. The code for performing this action is different from other tasks done in this chapter with the Outlook object model.
To delete or “remove” items from Outlook, you need to reference the folder in which the item exists—in this case, the Contacts folder. Listing 13.11 shows this.
Listing 13.11. Chap13.mdb: Removing Outlook Contacts from Access
Sub ap_ClearOLContacts()

   Dim objOLFolder As Outlook.MAPIFolder
   Dim olContactItem As ContactItem

   Application.Echo True, "Deleting Access Contacts in Outlook..."

   Set olkApp = New Outlook.Application
   Set olkNameSpace = olkApp.GetNamespace("MAPI")

   Dim intCurrContact As Integer

   Set objOLFolder = olkNameSpace.GetDefaultFolder(olFolderContacts)
   '-- Delete starting from the last of the list
   For intCurrContact = objOLFolder.Items.Count To 1 Step -1

      '-- Delete the entry if it came from Calypso
      If objOLFolder.Items(intCurrContact).Categories = _
        "Access Contact" Then
          objOLFolder.Items.Remove (intCurrContact)
      End If

   Next

   Application.Echo True

End Sub
|
Notice that the code uses the Categories property to note which items to remove. Also notice that you'll use the GetDefaultFolder method from the NameSpace object with the intrinsic constant olFolderContacts to open the desired folder.
Creating Outlook Calendar Entries from Access
In this example, you again specify a folder. Before doing that, though, look at an event procedure that supplies the dates that will need to be added to the Outlook calendar. The code behind the command button labeled Outlook Calendar Demo on the AutomationDemoCalls form, on the OnClick event, is listed in Listing 13.12.
Listing 13.12. Chap13.mdb: Moving Through the Table That Supplies the Calendar Entries
Private Sub cmdOLCalendarItemsDemo_Click()

    Dim snpProjects As DAO.Recordset

    Set snpProjects = CurrentDb.OpenRecordset("tblProjects", _
       dbOpenSnapshot)

    With snpProjects
        Do Until .EOF
           ap_AddOLAppointment !Tasks, !Start, _
                    DateAdd("d", !Duration, !Start)
           snpProjects.MoveNext
        Loop
    End With

End Sub
|
For this example, again use the tblProjects table (see Figure 13.21.)
Figure 13.21. These tasks will soon be displayed in the Outlook calendar.

The real power behind this example is in the ap_AddOLAppointment subroutine, located in the modOutlookRoutines module. The listing for this routine is shown in Listing 13.13.
Listing 13.13. Chap13.mdb: Moving Through the Table That Supplies the Calendar Entries
As in the example before this, you will set a reference to the desired folder (olCalendarFolder), and then take actions by using the Items collection in the folder. Again, you set the properties necessary, and then use the Save method to record the new item. Figure 13.22 shows the final calendar.
Figure 13.22. After appointments are moved to Outlook, it is easy to print them.

Well, that's it for Outlook and Automation. Are there a lot of things you can do or what? Some of you may be upset because you are using non-Microsoft systems that you feel are from the stone age. Don't worry, I didn't leave you out. Here is some information on another method for automating other apps from Access, DDE.
