
WORKING WITH COMMAND BARS THROUGH VBA
The really exciting feature beginning in Access 97 concerning command bars is that you can programmatically create, modify, and delete them at runtime. This gives you, the developer, much more flexibility in designing applications and lets you control which users have access to which features. The following sections provide an example that, at runtime, will look at which type of user is opening a form and will assign tools to a submenu command bar designed for that type of user. But first, let's discuss the object model of command bars.
Note
To program command bars in VBA, you need to create a reference to the Microsoft Office 9.0 Object Library. To do so, open a module, and then choose References from the Tools menu. Find the reference and mark that you want to include it. If you don't do this, you won't be able to use the objects available in the Command Bar object model.
Looking at the Command Bars Object Model
The Command Bars object model isn't as extensive as some, but can still be somewhat confusing. The top of the hierarchy (below Application) is CommandBar (see Figure 20.12).
Figure 20.12. This is the Office 2000 Command Bars object model.
Each collection and object in the model has methods and properties. The next section describes some of each. But rather than confuse the issue by listing all of them, this chapter focuses on only those required for the example. For more information about the various properties and methods for the Command Bars object model, open the Object Browser and look up the CommandBars collection.
Modifying a Command Bar Programmatically
Before Office 97, one negative thing about using menus was that you had to create them by using macros (although there was a menu builder to help you with the process). One problem of using macros to create menus was that modifying them at runtime was nearly impossible. This problem also existed for shortcut menus and calling tasks from toolbars. Office 2000's command bars take care of all that.
With the Office 2000 Command Bars object model and VBA, you can pretty much do anything needed programmatically with toolbars and menus. To illustrate using code with command bars, the following example uses three types of personnel: Administrators, Managers, and Entry Level. Based on the type of personnel using the program, different tools will be added to (or removed from) the menu for the form (see Figure 20.13). The type assignments are recorded in tables with the individual tool's information.

Working with the Tables
The two tables used for this example are tblCommandBarViews and tblCommandBarTools. Figure 20.14 shows both tables.
Figure 20.14. These two tables allow you to create a Tools menu dynamically.
The tblCommandBarViews table consists of two fields: ViewNo and Description (refer to Figure 20.14). The tblCommandBarTools table has a few more fields (see Table 20.1).
| Field | Description |
|---|---|
| ToolNo | The primary key |
| ViewNo | Ties to ViewNo in tblCommandBarViews |
| ToolCaption | Creates the Caption property of the tool |
| ToolTip | Used for the TooltipText of the tool |
| FunctionCall | Is the actual OnAction call |
| ButtonFaceID | Number of the FaceID used for the image used on the menu |
The last four of these fields will be used to fill in properties on CommandBarButton types of CommandBarControls, which is the collection of menu commands you are creating programmatically.
Examining the ModifyMenuWithCode Menu Bar
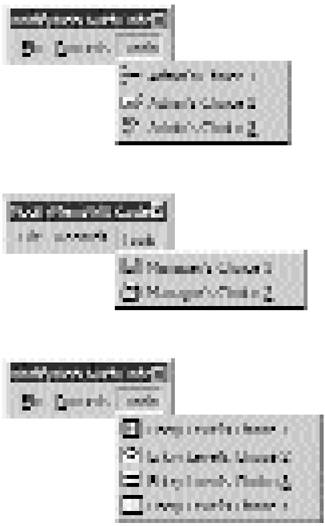
The menu bar that will be used has three choices on the top level: File, Records, and Tools. The first two choices have controls under them, and the third one varies depending on which type of personnel has been chosen (see Figure 20.15).
Figure 20.15. The Tools menu's commands vary based on which view is chosen.
Looking at the Forms Involved
Two forms are involved in this example. One displays the toolbar itself. This form, frmUsingModifiedMenu, is actually just a copy of the Customers form in VideoApp.mdb. This form has ModifyMenuWithCode attached to it in the Menu Bar property.
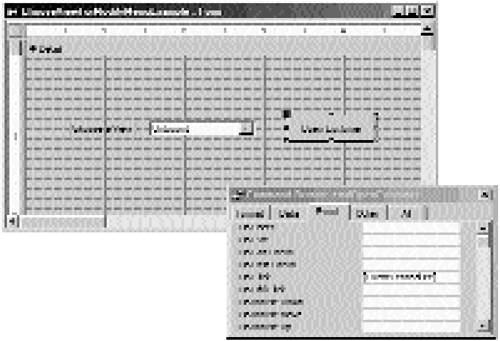
The other form, frmChooseViewForModifyMenuExample, is where the code for modifying the menu is stored (see Figure 20.16). This form has a combo box, cboViews, that uses the table tblCommandBarViews for its row source. The other control on this form, a command button named cmdOpenCustomer, is where the code for creating the menu commands are located.
Figure 20.16. The ChooseViewForModifyMenuExample form in Design view.
Putting the Pieces Together with VBA
The code of interest is attached to the OnClick event of the cmdOpenCustomer button (see Listing 20.1).
Listing 20.1. Chap20.mdb: Manipulating Command Bars
The routine in Listing 20.1 uses various objects in the Command Bars object model as well as their properties and methods. The code performs these steps:
Tip
You could use the type CommandBarControl instead of specific types, but as with other data types, using the specific type rather than the generic type results in better performance. With some built-in types, you have to use the generic form of CommandBarControl.
Note
The properties for a control change based on which type of control they are. You can see some of the possible choices by the following msoControlType constants (this is a partial list):
In this example, the Tag property of the control was used, but you can use other properties to locate the control. Look at the property sheet for the Tools menu and notice the Tag property (see Figure 20.17).
Figure 20.17. As with other types of controls, the Tag property is useful on command bars.
For more information about the FindControl method, use the Object Browser by opening a module and then pressing F2. In the Classes list box, look up CommandBar and then search the Members list box for FindControl.
5. |
Before adding the controls to the Tools submenu, clean up any tools from the session before. Do this by addressing the Controls collection from the Tools submenu: '-- Clean up any tools that may be on the menu currently.
intTotalCurrent = cbTool.Controls.Count
For intCurrControl = 1 To intTotalCurrent
cbTool.Controls(1).Delete
Next
|
Note
The For...Next loop is used rather than the For Each structure. An index of 1 is used on the line that deletes the element, and the collection will adjust itself down each time. If you try to iterate through the collection by using an iterated index, you get an error.
The last thing that occurs is the opening of the form. Play with the example given to get a better understanding of the Command Bars object model and to feel more comfortable diving in and creating your own solutions with them.