
UNDERSTANDING REPLICATION SYNCHRONIZERS
An important aspect of Access replication that has been deferred until now is the Synchronizer. If you want use replication over the Internet—to set scheduled synchronizations or support rarely connected laptop users—you must understand and use replication synchronizers.
The Synchronizer ships with Replication Manager in the Microsoft Office Developer (MOD), which replaces the Office Developer Edition (ODE). The Synchronizer is a background software agent that manages the scheduled synchronizations between replicas and provides the necessary support for rarely connected users.
Replication Manager 2000 provides greatly enhanced support for centralized administration of replicas. You can open any replica, local or remote, whether it's managed by your Replication Manger, another Replication Manger, or not even managed at all, and view the properties and synchronization history.
You can set a scheduled exchange to a replica that isn't being managed. You can create a schedule from one Replication Manager to a remote replica that doesn't have an associated Replication Manager. This particularly benefits locations that don't have staff trained in Replication Manager.
Say that you're in London and want to schedule an exchange with a user in Paris who's using a laptop and therefore isn't always connected to the LAN in Paris. You set a schedule from a Synchronizer running in London to a Synchronizer running in Paris. The London Synchronizer, at the appropriate time, extracts the updates from London and sends them to Paris. If the replica on the laptop is unavailable (maybe the laptop user is on the road), the synchronization updates are stored on the Paris LAN in a special network location called the Paris Synchronizer Dropbox. The laptop user in Paris can subsequently reattach to his LAN and, by using his own Synchronizer, retrieve from his dropbox the synchronization updates sent from London and apply them to his replica.
When the Microsoft Office Developer tools are installed with the replication option, the Replication Manager and Synchronizer are installed on your computer. The Synchronizer is optionally placed in the C:windowsStart MenuProgramsStartup folder and starts each time your computer is switched on.
Replication Manager 4.0 can support synchronizations either over a LAN or over the Internet. This first example describes how to set up for a LAN. Later in the chapter, setting up an Internet synchronizer is described.
The first time you run Replication Manager, the configuration wizard prompts you to enter a number of parameters for the Synchronizer (see Figure 23.10):
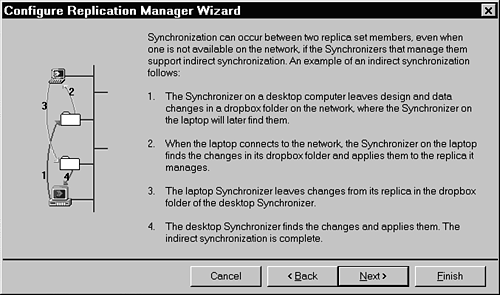
If Support Indirect Synchronization is selected, you can specify a temporary folder (referred to as a dropbox) so that other Synchronizers may send synchronization data, even when this Synchronizer is unavailable (see Figure 23.11). In particular, this is for rarely connected users, such as laptop users, who might be traveling and not connected to the network at all times. When rarely connected users reconnect to the network, their Synchronizers retrieve any synchronization data from their dropboxes.
Figure 23.10. Use the Configure Replication Manager Wizard to manage your Access replication.
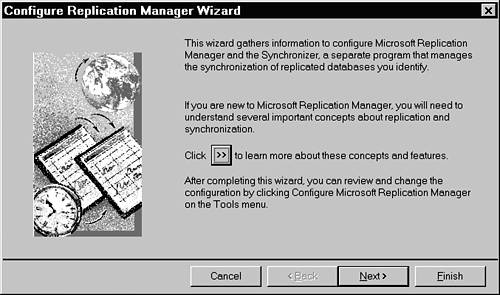
Figure 23.11. Select indirect synchronization in the Configure Replication Manager Wizard.
Tip
Indirect synchronization support is optional, but when you're synchronizing over a wide area network (WAN), significant efficiencies in terms of faster, more reliable network response and reduction in the number of data packets sent can be achieved. In contrast to direct synchronization, which opens both members of the replica set involved in the exchange, indirect synchronization relies on a series of message exchanges between replicas. The Synchronizer managing each replica collects changes into one or many message files (*.msg), which are then sent to a dropbox, which is used by the partner Synchronizer. The partner Synchronizer then processes those message files. Additional message files continue to be sent between Synchronizers until the synchronization is completed.
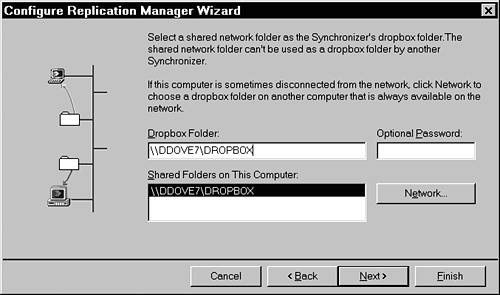
For selecting a dropbox folder, you can select a folder shared on the network or your computer as a dropbox for the Synchronizer (see Figure 23.12).
Figure 23.12. Specify the shared network folder by using the Dropbox Folder selection.
Is this computer an Internet server? Choose No. It's much easier to set up replication over the LAN first. (Internet replication is covered later in the chapter.)
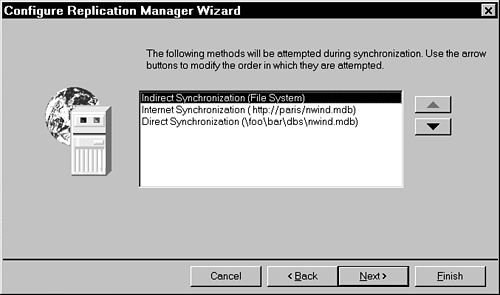
When you execute an indirect synchronization by using the JRO Synchronize method or by clicking Synchronize Now in Replication Manager, a “you-pick” synchronization is executed by using the Synchronizer. This means the Synchronizer will first read the Registry for the order in which it should attempt to execute each type of synchronization. The default order is file system (dropbox), Internet, and then direct synchronization, if the first two methods fail (see Figure 23.13). These attempts don't cause any significant performance hit on synchronizations.
Figure 23.13. Default order in which to attempt a synchronization.
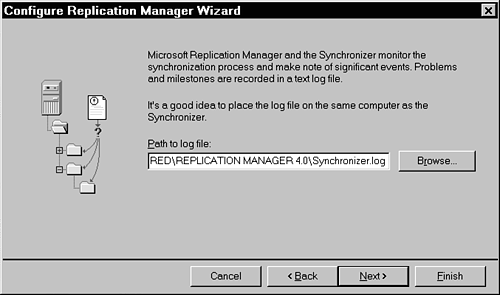
Path to Log File gives a file location where the Synchronizer writes a log, which is used for troubleshooting (see Figure 23.14). The system automatically maintains the log file, so no user intervention is required to curtail its size.
Figure 23.14. Enter the path to where you want the log file written.
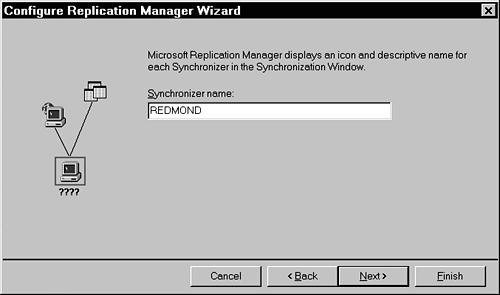
For Synchronizer Name, enter a user-friendly name displayed by Replication Manager (see Figure 23.15).
Figure 23.15. Enter a descriptive name that will help you identify the Synchronizer.
You can subsequently modify each parameter with the Replication Manager by choosing Configure Microsoft Replication Manager from the Tools menu.
Note
Neither the Access menus nor JRO methods let you read or modify Replication Manager or Synchronizer settings. The only exception is that the Retention Period can be modified in JRO.
When the Synchronizer starts running, and every 30 minutes thereafter, it scans its list of managed replicas. Within each managed replica it looks for a synchronization schedule and executes it accordingly.
Note
Scheduled synchronization isn't between replicas, but between Synchronizers. Think of a Synchronizer as a background service, always sending messages to other Synchronizers or checking for new synchronization messages, which are applied to replicas. This is like an email system, where an email background agent is always looking for new mail and placing it in a user's inbox, or sending mail from the user's outbox.
The connection between a replica and a Synchronizer is that
Each replica has one Synchronizer managing it.
When a replica isn't managed by a Synchronizer, it fakes a “virtual Synchronizer” for itself. This simply is a network address that a real Synchronizer can use as a target for direct synchronizations. A virtual Synchronizer is always the passive partner in a synchronization, and therefore can't initiate an exchange or create a schedule. (Virtual Synchronizers weren't supported in Access 95.)
To initiate a scheduled synchronization, at least either the target or source replicas must be managed by a real Synchronizer. You may schedule a synchronization between two replicas managed by the same Synchronizer by setting the Locally Managed Replica Schedule for that Synchronizer. To learn how to set a schedule, see the later section “Scheduled and On-Demand Synchronizations.”
For locally managed replicas, where one Synchronizer manages more than one replica, it initiates a synchronization between the replicas at the appropriate time. This is a direct synchronization.
For replicas at remote locations, the Synchronizer initiating the synchronization opens its local replica and also tries to open the remote replica. The Synchronizer then executes a direct exchange between the two replicas. If the remote replica can't be opened (it might be on a laptop and not currently connected to the network), the Synchronizer places the synchronization data in the dropbox specified for the Synchronizer that manages the remote replica.
Synchronization Phases
A synchronization between replicas has a number of phases. These phases occur in sequence and control what and when items are sent between the source and target replicas.
When two replicas exchange, they synchronize schema and data. It's not possible to exchange data and not schema. You may, however, configure your system to exchange schema without data.
Tip
Sometimes you might want separate synchronization schedules for your data and your application. Split your application into a front-end/back-end application, where the front-end database contains the application's forms, reports, and so on, and the back-end database contains the tables and data. Then set a separate schedule for each.
The first phase of the exchange ensures that both replicas have the same schema version. If two replicas aren't in the same schema version, the replica with the highest schema version initially sends the schema updates; only when the schema versions are the same are data updates applied.
If the exchange between two replicas is indirect, a protocol ensures that the two replicas always synchronize their schema before data. Global schema modifications can be made only in the Design Master, which records each modification, incrementing the schema version for each change.
Direct and Indirect Synchronizations
Synchronizations between two replicas can be direct or indirect. In a direct synchronization, both replicas are opened simultaneously, with updates directly read from one replica and immediately written into the other. An indirect synchronization occurs when one of the replicas isn't accessible, as might be the case for a replica on a laptop that's not currently connected to the network. In that case, the replica initiating the synchronization reads its updates and writes them to a previously designated network share. Later, the laptop user connects to the network and reads the network share for any updates to be applied.
Indirect synchronization is available only in the Microsoft Office Developer tools. Once configured, Access or JRO can be used to execute indirect synchronization.
Scheduled and On-Demand Synchronizations
Briefcase and Access's Tools, Replication, and Synchronize Now menus provide users with on-demand synchronizations. You simply indicate that you want to synchronize two replicas, and it happens immediately.
The Replication Manager offers users the choice of setting a schedule of synchronizations between replicas. Replicas may either be at a remote location or local. In Replication Manager, you can set a schedule in increments of 15 minutes over a seven-day period simply by right-clicking the line joining two icons representing the location of the two replicas. You can set separate schedules for each remote exchange, as well as set a schedule for exchanges with local replicas on the LAN. Figure 23.16 shows the Edit Schedule dialog.
Figure 23.16. Select a scheduled synchronization.
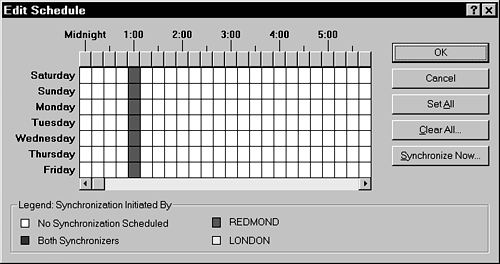
To set a schedule, simply click the time and day you want. To select the same time every day of the week, click the appropriate button on the top row of the grid.
Synchronizing Replicas over the Internet
Access 2000 has extended its replication facilities to support the Internet by configuring a synchronizer for replica exchanges via the Internet. You need Access 2000 Replication Manager 4.0 for Internet support, which ships in the Microsoft Office Developer (MOD).
Internet synchronization is a way to exchange a replicated database's data over an Internet or intranet connection, requiring only the replica on the Internet server to have Replication Manager installed and configured. Internet synchronizations also use a dropbox, like indirect synchronization, but the dropbox on the Internet server is used for all replicas in the replica set. Access 2000 introduces several new features to Internet synchronization, including the following:
Support of the HTTP 1.1 protocol eliminates the reliance on FTP for synchronization and enables support through a proxy server.
Performance enhancements reduce transfer times.
The addition of several Registry keys help control Synchronizer timeouts.
For detailed information about using and configuring Internet synchronization, see the “Internet Synchronization with Microsoft Jet 4.0” white paper available in the file Intrpl40.doc on the accompanying CD-ROM in the ExamplesChap23 folder.
Handling Counter Fields
Counter fields are treated specially in replicated databases in Access. In non-replicated databases, counter fields are always incremented by one, and are usually the primary key field with a unique index constraint. This is fine when there's only a single database. In a replicated database, however, you might have two replicas that increment the counter; when the two replicas synchronize, you have a conflict on the unique key constraint.
To circumvent this potential problem, Access has modified the behavior of counter fields in replicated databases. Now rather than increment by one, counter fields create a random number between 1GB to 4GB (4*10^12—actually, –2GB and +2GB). This doesn't absolutely guarantee that there will never be a conflict, but it greatly reduces the risk. All previous counter values are preserved and, of course, any forms or code that relied on the counter field still work.
The major problem with randomized counters is that counter fields are often used for, say, OrderID, with the implied meaning that the higher OrderID means a more recent order. This is no longer valid, and you might want to consider using a combination of a date/time value and the counter field instead. For example, the new OrderID for an order entered on 19 October 1996 might be 101996-123456789.
In a large database, you might still encounter conflicts with the randomized counter value. Consider replacing the use of the counter field with the ReplicationID (s_GUID) field. The GUID is a 128-bit hex value, and not pretty for use in applications, but it's always unique!
Using Read-Only Attributes with Replication
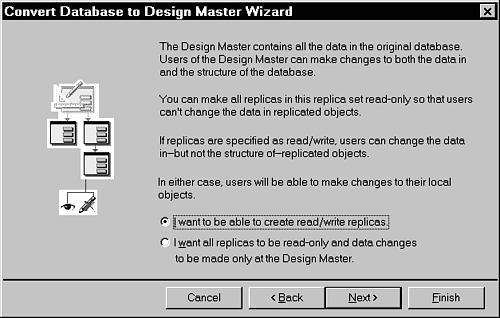
In Microsoft Replication Manager, you have the option of making the replica set a single master for data updates. This ensures that inserts and updates can occur only in the Design Master and guarantees consistency between all replicas. If you decide instead to permit updates at more than one replica, you might get data conflicts when two or more sites update the same record simultaneously. Figure 23.17 shows the dialog to enforce the replication read-only constraint.
Figure 23.17. Use this dialog to create a read-only replica set in replication.
When creating each replica, you may specifically make it a read-only replica.
Read-only has a special meaning for replicas, and needs some explanation to distinguish it from other uses of the term. A read-only replica can't update or insert any data that's replicated around the replica set. A read-only replica can still create local tables and queries and enter local data. Synchronization can update a read-only replica with data from other replicas, as well as modify internal system information.
Note
You should never place a replica that will participate in synchronization exchanges in a read-only network-shared folder. A replica needs write privileges so that it can record the synchronization history and other internal information.
The only time you might consider placing a replica in a network read-only share is for product distribution. Of course, you still can make a database with the normal read-only permissions by using standard Access/Jet security, and therefore only users with adequate permissions can modify the database.
Performing Replication Identification Fixup
A particularly useful and little-known feature in Access replication is replication identification fixup. After a little background, you will see how this can be used to provide a very powerful method for product distribution.
One architectural foundation of Access replication is that each replica is unique and is identified by a unique ReplicaID. This value is stored within each database file.
A potential problem will occur if a user DOS copies a replicable database because this implies that two replicas now have the same ReplicaID (and possibly two Design Masters). Access's solution is that whenever a database is opened, it stores the Unified Naming Convention (UNC), or pathname, to the file. Then whenever a database is opened, the path used to open the file is compared to the UNC path stored internally; if it's different, the ReplicaID is changed to a new, unique value. If the original database was also the Design Master, it's modified so that it's no longer the Design Master. (This prevents two simultaneous Design Masters.) This algorithm works whether the file is opened via any combination of UNC network pathname or local pathname, on Windows 95/98/NT, or on a Microsoft or Novell network.
Caution
Replica identification has particular importance when using the Access Compact utility, or backups. You must be careful not to “lose” the Design Master for your replica set. See the following section.
The benefit for product distribution is that a database might simply be DOS copied from a network share, or distributed on floppy disks onto a user's computer. As soon as Access opens the database, it notices that the pathname used to open the file is different from the pathname stored internally, immediately changes the ReplicaID, and stores the new pathname. All of this is transparent to the user.
Using the Last Synchronization Partner
Name fixup goes even further in making product distribution easy. Each replica has a last synchronization partner used in exchanges. If a user opens a database in Access and from the Tools menu chooses Replication and Synchronize Now, the default replica for the synchronization is the last replica used for a synchronization. However, if a replica has been the subject of a name fixup and given a new ReplicaID, the default partner remains the same.
What this means for third-party application developers is that users need only DOS copy (or use the Microsoft Office Developer's Setup Wizard) to place a replica onto their hard disk; they can then easily synchronize back to the original replica set without any previous knowledge of the origin of the replica. The ReplicaID is automatically and transparently fixed up.
Using the Compact Utility with Replicated Databases
Replication makes extensive use of temporary disk space. However, this space can be recycled and reclaimed by the Compact utility supplied with Access. Simply executing a synchronization can also reclaim disk space.
You're strongly advised to use Compact on a regular basis with replicated databases.
Note
There is an added advantage of using Compact twice in succession on a replicated database. The first pass reclaims some space and then marks other space as available for reclaiming later. A second Compact reclaims all available space. (You don't gain an advantage by running Compact more than twice.)
Deciding Whether to Back Up Your Replicas
This might sound contrary to all other books on databases, but backing up your replicas (in particular, the Design Master) is a not good idea. If one of the replicas is lost, you should simply create a new replica from one of the other replicas in the replica set. If the database that was lost was the Design Master, make one of the other replicas the new Design Master.
Consider what would happen if you restored the Design Master. Assume that you've made a backup. Next, you make some design changes and synchronize with another replica. Now the Design Master somehow gets deleted, so you recover from the backup, which doesn't have the new design changes. The Design Master tries to synchronize with the replica, but now the replica has design changes that aren't in the Design Master.
Note
If you restore a backed-up Design Master and synchronize it, Design Master updates its schema correctly only if design changes haven't been made that would conflict with those that previously existed.