
GROUPING DATA ACCESS PAGES: REPORTS FOR THE WEB
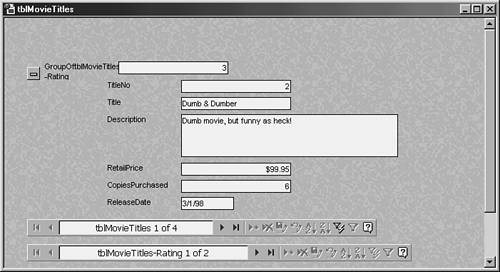
So far, you've created pretty simplistic pages. Besides the standard columnar page used for editing data, the really cool feature with Data Access Pages shows up when you create them by using groupings. You can create pages that contain groups with the Page Wizard. The problem is that it still creates the pages using only a columnar-type layout (see Figure 12.25).
Figure 12.25. This page was created by using the Page Wizard, with a grouping specified on Rating.
I now want to show how to create a grouped report with a filtered view from scratch.
Tip
The following sections will be one big example of creating a multiple grouping page. I have purposefully titled the sections so that when you're creating your own pages, you can turn right to the step and feature needed.
Creating the Base Page
To get going creating a grouped page, you need to start with a base. While in the Database window of Chap12.mdb, follow these steps:
1. | |
2. |
You can fill in Choose the Table or Query Where the Object's Data Comes From with tblMovieTitles. Unlike with forms, filling in the data source in the New Object dialog with a DAP doesn't buy you anything other than opening the field list to the correct table. Your page is still completely unbound when it initially opens in Design view. |
3. |
Because Design view is the default for designing pages in the New Data Access Page dialog, click OK. You're presented with a blank page. |
4. |
Open the Field List to the Database tab via the View menu. |
5. |
Highlight the Title field of the tblMovieTitles table, and then drag and drop it onto the page. |
You've created the first grouping level and will see a Navigation control appear at the bottom of the page.
Note
Before continuing with the current example, it might help if you can see your pages set up as multiple queries, including joins. You will see this with the next step because you will create a relationship on the page between the tblMovieTitles and tblRatings tables, where tblMovieTitles.Rating will be joined to tblRatings.RatingID. This will provide multiple benefits to you on the page. This is analogous to joining the two tables in a query.
As with joining tables in a query, you then can display other fields in the page. The creation of the relationship will take place when you drag tblRatings.Rating onto the page from the field list.
Creating a Relationship on a Data Access Page
To perform the task of creating a relationship and adding the ratings description on the page, follow these steps:
1. |
Expand the tblRatings tree in the Database tab of the Field List. |
2. |
Drag the tblRatings.Rating field onto the page. The Layout Wizard will appear, giving you the choice of laying out the fields individually or using a pivot list. |
3. |
Click OK to accept the default, Individual Controls. |
4. |
In the New Relationship dialog, choose the RatingID in the This field in tblRatings column (see Figure 12.26). Click OK. Figure 12.26. Creating a temporary relationship for the current Data Access Page.
|

Note
If you had a system relationship between these tables in the database, Access would figure out what kind of join you wanted (unless it's ambiguous, which it wouldn't be in this case) and you would not be presented with the New Relationship dialog.
Currently, this is still basically a single group. To change that, you need to add another level of grouping.
Creating Group Levels with Promote
Now is when the fun begins. As confusing as pages can be to work with, they have some cool features. One feature is the ability to take a field from one grouping level and promote it into a new grouping level. That's what will happen next with the Ratings field.
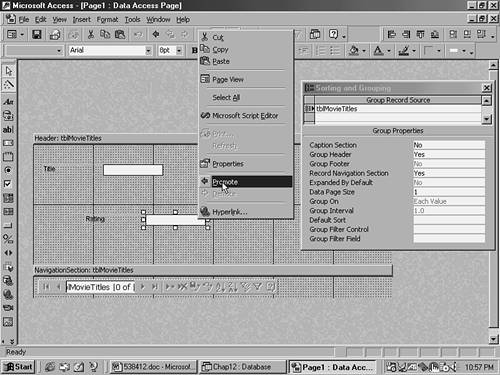
To promote the Ratings field, highlight the field and either click the Promote toolbar button or right-click and choose Promote (see Figure 12.27).
Figure 12.27. Promoting a field will create a higher-level grouping.
After promoting the Rating field, you will have created a new grouping called tblMovieTitles-Rating1. Before looking at the page in View mode, shrink the height of the Header:tblRatings section. Now if you view the page, you will see the two ratings, PG-13 and R, with Expand controls beside them. You can then expand the sections to see the movie titles that fall under each rating.
Tip
To have the tblMovieTitles grouping level expand by default, open the Sorting and Grouping dialog, and then set the Expanded By Default property to True for the tblMovieTitles-Rating1 group.
This page is still a columnar report. It is similar to the Continuous Form view for standard forms. To make this page a true list-type report, you need to add column headings and line up the columns.
Adding a Caption Section
To add columns, you need to have the Sorting and Grouping dialog open. Next, for the tblMovieTitles group, set the Caption Section property to Yes. Another band will appear on the page.
Highlight the label for the Title field, and then choose Cut from the Edit menu. Now highlight the Caption: tblMovieTitles section and choose Paste from the Edit menu.
Tip
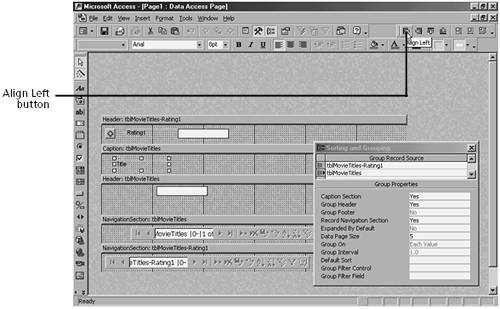
You can align only two controls at a time on Data Access Pages. To align the field with the column header label, place the column heading label at the location you want it and keep it highlighted. Next, click the Align Left toolbar button (see Figure 12.28). Lastly, click the field to be aligned. You can also use this for sizing controls.
Figure 12.28. Aligning columns on a Data Access Page.
You can now add some additional columns on the page from the tblMovieTitles table and line them up as you did with the Title column.
Viewing Your Data Hierarchically with Banded Data Access Pages
This page shows the banded concept pretty well. You can also simply display records hierarchically by traversing down your view of the data by going through the group levels. Creating more than one grouping level makes the “banded” characteristics of Data Access Pages stand out that much more.
You can now add some additional columns on the page from the tblMovieTitles table and line them up as you did with the Title column.
Using a Combo for a Group Filter Control
Now you'll see how to create a combo box control that will allow you to display one higher-level value at a time and filter the lower-level grouping based on the combo box value. Follow these steps for creating a Group Filter control:
1. |
Delete the Rating field in the Header:tblMovieTitles-Ratings1 section. |
2. |
With the Field List open and the tblRatings table expanded in the Database tab, highlight the Rating field. |
3. |
Click the Combo Box toolbox button. |
4. |
With the right (not left) mouse button down, drag and drop the Ratings field into the Header:tblMovieTitles-Rating1 section. |
Caution
If you don't do step 3, or if you hold the left mouse button down in step 4, you have no end of grief. You won't be presented with the menu asking to make the control into the Group Filter control.
5. |
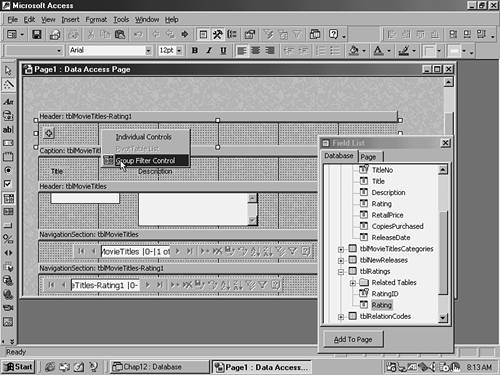
As soon as you drop the field, a pop-up menu will appear, giving you the choice of making the field a regular control or a Group Filter control (see Figure 12.29). Choose Group Filter Control. Figure 12.29. Creating a Group Filter control on the page.
|
Now if you pick a value from the list displayed in the GroupOfRating combo box (you probably will want to change the caption of that label), you will see all the movie titles with that rating.
Note
Notice that when you click the combo box, the list is limited to those actually used by the movie titles. This is another feature reminiscent of queries in that only those values found in the tblRatings and tblMovieTitles tables will appear.
That's it! You've created a data page with a Group Filter control.