
THE ELUSIVE FEATURE: CREATING SNAKING REPORTS
In snaking reports, data that normally runs down one column instead shows up in two or more columns, depending on how you want them. Some examples of uses for snaking reports are as follows:
Mailing labels—The Label Wizard uses the snaking feature in creating the different types of Avery mailing label sizes. Figure 11.11 shows an example of labels created with the Label Wizard.
Figure 11.11. Use the layout features available through the File menu's Page Setup comment to create the snaking feature used for these mailing labels.

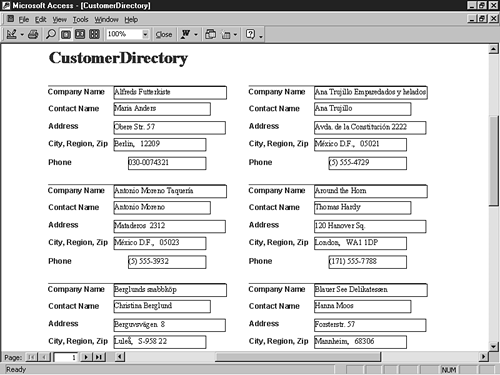
Address book—When you want more than one person's name and address across the page, the snaking feature is your tool. The report in Figure 11.12 is located in Chap11.mdb as CustomerDirectory.
Figure 11.12. By using the snaking report feature, you can create this address book–style layout.
Multiple-column customer list—Sometimes you want to show two columns of names to save paper. Figure 11.13 shows such a report, which is found in Chap11.mdb. The report is named SnakingReportAfterExample.
Figure 11.13. The snaking feature helps you save paper by fitting more than one column on a page.

Tip
Use the View toolbar button (the first button on the left) to go to Design view, even if you didn't go to Print Preview from Design view to begin with. This saves steps in closing and then reopening reports to switch between views.
Looking at the Before Report
This last example shows you how to use the snaking feature. This feature is actually quite easy to use and takes no coding whatsoever. To get started, open the SnakingReportBeforeExample report, found in the Chap11.mdb database in the ExamplesChap11 folder on the accompanying CD. This report was initially created with the Report Wizard and just showed the CompanyName for the Detail section.
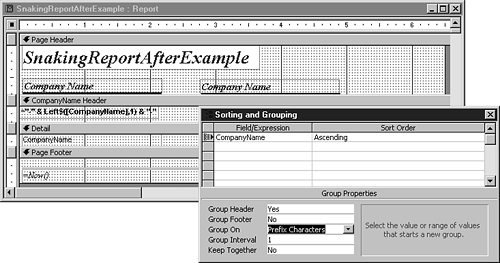
The Group Header is created off the first letter of the CompanyName. The syntax for this is
="–" & Left$([CompanyName],1) & "–"
The text box is named—aptly enough—txtCompanyFirstLetter. In the Sorting and Grouping dialog, the CompanyName is the expression used with the Group On property set to Prefix Characters and Group Interval set to 1 (see Figure 11.14).
Figure 11.14. By using the Group Interval property, you can group on single characters.
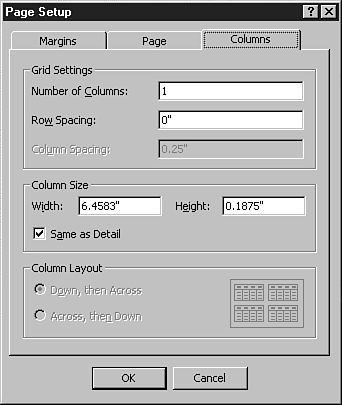
If you ran this report now, a single column would be created. The magic that needs to take place is in the Page Setup dialog (see Figure 11.15). To get to this dialog, from the File menu choose Page Setup, and then click the Columns tab.
Figure 11.15. Use the Columns page of the Page Setup dialog to set up the snaking feature on reports.
Examining the Properties of the Columns Page
Table 11.1 lists the different settings and their effects on the snaking feature.
Caution
Nine times out of 10, the Width setting screws you up when you switch from using one column to more than one. If you don't reduce this setting, you won't see your other columns, and you won't get an error. Start by reducing this property to 2.5 inches, as shown in the example in the following section.
Figure 11.16 shows the Page Setup dialog for the SnakingReportAfterExample report, which is the modified report that uses the snaking feature.
Figure 11.16. Using the Page Setup dialog to affect the snaking feature is much easier than most people realize.

Working with the After Report
Follow these steps to put the correct settings in the Page Setup dialog for the SnakingReportAfterExample report:
1. |
Put a 2 in the Number of Columns text box. |
2. |
Change the Width of the item to 2.5 inches. (This deselects the Same as Detail check box.) |
3. |
Choose whether you want to have the data go Down, Then Across, or Across, Then Down. |
4. |
Click OK and then open the report in Print Preview. |
Tip
You might want to put a column header over the other columns you make. Access does not create these automatically.
Play around with a few of your single-column reports and dazzle your boss by adding a couple more columns of information. Although snaking reports are pretty cool, they're also pretty easy to create.
Other report tasks take a bit more work. For example, you can create a report that uses dynamic columns. You can also create one that's based off a crosstab query.