
GETTING STARTED WITH PROGRAMMING
The following sections introduce you to programming in Access 2000. First, you're introduced to the concept of code modules, which is where you write your code. Here, you design and write a very simple form.
Then you're introduced to declaring variables and subroutines, and how to control your program's flow. This information is the basis for programming in Access 2000. Along the way, you learn about different techniques for writing maintainable code.
Using Code Modules
You can write your code in three places in Access 2000: in class modules that can be one of three types, in code behind forms and reports, and in standalone class modules. The last module type is a self-contained standard code module. You should write all your code that processes a form or report in the form's or report's code module, and you should write any generic routines that aren't form- or report-specific in separate code modules. The independent class modules let you create custom objects that can include their own properties and methods.
By organizing common functions into separate code modules, you can more easily maintain your application. For example, you can write all your network routines in a Network Utilities code module, routines for manipulating strings in a Basic Utilities code module, and generic form code in a Form Utilities module.
Coding Behind Forms
To write any code behind forms in Access, you first must recognize the difference between Design, Form, and Datasheet view. When a form is in Design view, you can add and remove controls and write code. No code written behind the form is being run.
Note
The steps for editing code behind forms here also apply to editing code behind reports.
A form in Form or Datasheet view can have code running behind it. The primary differences between being in Form and Datasheet view is the way the form is displayed, and how much control you have over the data presented. Datasheet view displays a form in a grid-like fashion and is limited in how you can customize it; Form view, on the other hand, lets you create complex forms and fully customize their appearance. Form view allows you to create forms that aren't limited to grids, and to display one record at a time or a continuous list.
Note
You can have different forms in your application in different modes at the same time. Some forms can be running while you're designing other forms. This is important to note, especially when debugging, because you might get an error if a running form tries to reference another form that's in Design mode.
You're now going to create a new form. This example introduces you to the code editor and to switching form views. Follow these steps:
1. |
From the database window, click the Forms tab and then the New button. |
2. |
The New Form dialog appears. Select Design View and click OK. |
3. |
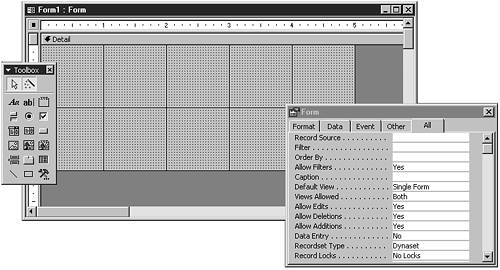
You should see the form in Design view (see Figure 2.1). If you don't also see a toolbox or the property sheet, choose Toolbox and Properties from the View menu. Figure 2.1. With the form in Design mode, you can add, remove, and modify the controls on the form as well as write code behind the form.
|
4. |
To add a control to the form, select the control from the toolbox. Then click and drag a region on the form to draw the control. Select a command button and add it to the form. Note If the Command Button Wizard appears, click the Cancel button. To ensure that you understand how to create and customize forms in Access, you won't use the wizards in this chapter. Although the wizards let you work quickly, they hide complexities that you should understand. To disable wizards from appearing every time you add controls, click the Wizard toggle button (the magic wand) in the upper-right corner of the toolbox. When the button is raised, the control wizards are turned on; when the button is down, the wizards are off. |
Note
If you highlight the text of the button, the property sheet becomes blank. When this happens, click the form's background, and then re-click the control's border to select it.
5. | |
6. |
You're going to write an event handler for the button. (Event handlers, also known as event procedures, are pieces of code that execute when an action occurs.) The event handler will display a message when the button is clicked. Right-click the button and choose Build Event. From the Choose Builder dialog, select Code Builder and then click OK. |
7. |
You should be in the code module, using the new VBE. Type the following code line, which will display a message box when the button is clicked: MsgBox "Hello World!" The code module editor is a text editor in which you type your code (see Figure 2.2). It's organized by object and procedure. Look in the (General) object to find any custom procedures you might have written behind this form as well as variable declarations available to the entire form. Figure 2.2. VBA automatically capitalizes keywords for you in the code module window.
Variables available to the entire form are found under the General object, Declarations section. To view procedures relating to other controls or objects on the form, drop down the Objects list and select the object. To change the procedure you're viewing, drop down the Procedure list. |
8. |
Tip
A shortcut to switching views is to click the Design button (the first button on the left on the Form toolbar). This button automatically switches you between Design view and Form or Datasheet view, depending on the form type. You can force Access to switch to a different view by clicking the down arrow that's attached to the button. When you're editing a module in the VBE and want to switch back to Form view, choose Object from the View menu.
9. |
Congratulations! You just designed your first form with code behind it.
Note
Coding in custom class modules is discussed later in the section “Coding Class Modules,” with more advanced examples in Chapter 16, “Extending Your VBA Library Power with Class Modules and Collections.”
Coding in Standard Modules
Any code or variables not specific to an individual form are written in standard modules. Standard modules are code modules that don't exist behind a form or report. When you use standard modules, it's a good idea to group related procedures into their own standard modules. You don't want to create a single module that contains all your generic code.
You can create and view standard modules on the Modules page of the database window.
Tip
When viewing a subroutine in the code module, you can jump to another subroutine that's being called by pressing Shift+F2 or by clicking the subroutine's name, opening the View menu, and choosing Definition.
Declaring Variables
In the form you just created, you displayed a message box. You didn't have to store or manipulate information with this form. As you develop applications, you're often going to need to store information temporarily while your application is running. This information can be the result of a calculation or data the user entered.
To store this information, you use a variable. To create a variable, you must answer the following questions:
How long and where do you need the information?
What do you want to name the variable?
Defining the Life and Location of Variables
How long and where you're going to use a variable are referred to as the variable's scope and visibility. You can scope variables to either the procedure level or module level. Procedure level refers to variables defined within a subroutine. An example of a subroutine is the click event you used in the Hello World example. Variables declared within a subroutine are visible only to that subroutine.
Variables declared at the module level are available to the entire code module—and possibly the entire application. To determine whether a variable is available only to its code module or the entire application, the Private (or Dim) and Public keywords are used.
You can use the Dim keyword to declare variables in a procedure or module. A variable declared by using Dim is available only to the subroutine or code module where it's defined. Variables dimmed within procedures exist only during the procedure's execution. This means that when you exit the subroutine, all variables declared within the subroutine are released from memory. Variables dimmed at a module level live until you exit or recompile the application. For example,
Dim strUser as String
Tip
At the module level, it's a good idea to use either Private or Public rather than Dim, simply because you then know exactly where you're at with the variable. Although perfectly legitimate, Dim is actually a leftover from previous versions.
You can also declare static variables in procedures. Static variables are similar to module-level variables in that they exist until an application is exited or recompiled. This way, you can create subroutines that can keep a value in memory for subsequent calls. For example,
Static strUser as String
At the module level, you can create variables that are available outside the module. These variables are defined with the Private and Public keywords. Public variables can be accessed from anywhere within your application; private variables, on the other hand, are similar to those declared with Dim and are available only within that code module. (Private and Public are discussed in much greater detail later in this chapter.) You can declare variables this way in a form's code module and a standard code module. For example,
Private strUser as String
Public strUser as String
You can declare private variables within the module to store information that's required by each routine within the module. Any information that might be necessary to other modules in your application should be stored in public variables.
Note
The Public keyword replaces the Global keyword from Access 2. Unlike with Access 2, you can now declare public variables in a form's code module.
Naming Variables with the Leszynski Naming Conventions
After determining the scope of your variable, you need to give the variable an appropriate name. To write more maintainable code, it's a good idea to follow a standard naming convention. The naming convention used in this book is derived from the Leszynski Naming Conventions. This standard prefixes all variable declarations with an abbreviated form of the variable type. This prefix should be lowercase, followed by a name that describes the variable's use. For example, string-type variables are prefixed with str. A string variable that holds a user's name can be declared as follows:
Dim strUserName as String
Any developers looking at this declaration can correctly determine that the variable must contain a string that represents the username. Another benefit of supplying the data type as part of the variable name is that you don't have to locate the declaration of the variable to determine its type.
The recommended prefix for the data types available in Access are used throughout the book. A complete list of naming conventions can be found in Appendix D, “Leszynski Naming Conventions for Microsoft Access.”
Forcing a Variable Declaration with Option Explicit
The last step to declaring a variable is always to specify the variable's data type. You should do this even though VBA lets you write code without declaring any variables. Although not declaring variables might sound great at first, in the long run you'll find out that you created a debugging nightmare. Therefore, it's highly recommended that you declare all your variables with the correct data type at the beginning of the subroutine, before writing any other code.
Note
Notice the emphasis on specifying a data type. Not only should you declare variables, you should always assign them an appropriate data type.
Some might consider the ability to code as you go without declaring variables a benefit. However, this feature exposes a weakness in VBA. Because VBA isn't a strongly typed language (which means it's legal to use undeclared variables), it's very easy to write unmaintainable code. When running your code, VBA recognizes undeclared variables and automatically allocates memory for them as a Variant data type. You may wonder why it's so important to require declarations of variables. Consider the following code example, which returns a string in reverse order:
Function Reverse (strValue)
    For intLoop = Len(strValue) To 1 Step -1
        strCurrentCharacter = Mid$(strValue, intLoop, 1)
        strNew = strNew & strCurentCharacter
    Next
    Reverse = strNew
End Function
This example has quite a few errors. First, strCurrentCharacter is misspelled on line 4 (it's missing an r). In a very large program, this mistake might be very hard to debug. Worse, because no syntax error is generated, your bug might appear as a random calculation error.
Next, because variables or the return type for the function aren't defined, the sample function allows any data type to be passed in without error.
By using a small, two-word command on top of every code module in the Declarations section, you can avoid all of these types of mistakes. This simple command is Option Explicit. This statement causes VBA to ensure that all your variables are declared. All undeclared variables (that is, typing errors) generate compile-time errors. In the preceding code example, even if you declared all your variables, you would get a compilation error on the misspelling. The preceding function would now be written as follows:
Function Reverse(strValue as String) as String
     Dim intLoop as Integer, strNewString as String
     Dim strCurrentCharacter as String
     For intLoop = Len(strValue) To 1 Step - 1
          strCurrentCharacter = Mid$(strValue,intLoop,1)
          strNewString = strNewString & strCurrentCharacter
     Next
     Reverse = strNewString
End Function
Note
This routine is strictly to show the issue of Option Explicit. VBA 6 now includes a function for reversing a string call, StrReverse.
Caution
In Access 97, the Require Variable Declaration option was True by default. To follow the other product standards, Access 2000 (actually, VBA 6) leaves it False by default, so you have to turn it on yourself. If you don't do this, you can cause yourself hours of grief from misspelled variables.
To ensure that you never forget to add Option Explicit to your modules, Access provides a convenient option that automatically adds the statement to the beginning of every code module. To turn on this option, follow these steps in the VBE:
1. | |
2. |
Click the Editor tab. This page contains all the settings relating to a code module and the editor. |
3. |
Under Code Settings, make sure that the Require Variable Declaration option is selected (see Figure 2.3). This causes the Option Explicit keyword to be inserted at the beginning of every module. Figure 2.3. The Editor tab in the Options dialog of the VBE controls a great deal of your programming environment.
|
Note
This option affects only new modules. You must manually add the Option Explicit statement to any existing code modules.
Caution
Access 2000 strongly types object properties; in versions of Access before 97, properties were considered Variant. Because variables are strongly typed, prior versions of your code could potentially break, but the performance advantage of using strongly typed variables is well worth it.
For a detailed explanation of the Options dialog's Editor page, see Appendix A, “Debugging Code in Access 2000.”
Note
By default, at the top of your modules, you will see the statement Option Compare Database. This statement—used only within Access, not in other Office applications—specifies how Access does string comparisons within VBA. To learn more about this statement, look up Option Compare in Help.
Declaring Procedures
You use procedures to organize your code within code modules. In procedures, you call statements and methods that perform a certain function. You can create two types of procedures: subroutines and functions. Subroutines perform an operation without returning a value, whereas functions manipulate data and return a value.
There are four steps to creating a subroutine or function:
1. |
Determine the scope of the procedure (Private or Public). |
2. |
Declare the subroutine with the Sub or Function keyword, followed by the name of the routine or function. |
3. |
Determine what information you need to pass to the subroutine. These bits of information are called the arguments of the subroutine and are specified in parentheses after the subroutine's name. |
4. |
Write code that performs the desired operation. |
You wrote a subroutine earlier in this chapter when you wrote the click event of the Hello World button. All event handlers are subroutines. The difference between an event and your custom subroutine is that Access calls events automatically in response to some action; on the other hand, your code must call custom subroutines.
An example of a function is the Reverse string function used in the preceding section.
Determining the Scope of Your Procedures
Similar to declaring variables, you can also specify whether a procedure is available only to the current code module or to the entire application. This is done by using the Public and Private keywords introduced earlier in the section “Defining the Life and Location of Variables.”
By default, all procedures are public except for Access event handlers, which are private (you'll see the Private keyword before their declarations). If a procedure is required only within the code module, you should declare it as private. Using private is valuable because it prevents calling a procedure that should never be directly called. For example, a utility function that's specific to a procedure in the same code module should be made private. With your own class modules, make sure that you use the Public keyword with your properties.
The concept of static variables is explained earlier in the section “Defining the Life and Location of Variables.” You can also create static functions or subroutines. If you use the Static keyword before the Sub or Function keyword, all variables declared within the subroutine automatically become static. Here's an example of how to declare a public static function:
Public Static Function Increment(intValue as Integer) as Integer
You can find a more detailed discussion of the Public and Private keywords later in the section “Programming with Objects.”
Specifying Arguments in Procedures
Procedures also can take any number of arguments, which are used to pass additional information to the procedure. In most cases, when calling a procedure, you must supply every specified argument.
You've already seen how to declare arguments in the Reverse() string function. For the Reverse() example, you needed to pass only a single argument, strValue. However, nothing prevents you from declaring no arguments or even many arguments. Arguments are specified with a comma-delimited list. For example, the following function, SaveFile(), would take three parameters:
Function SaveFile(strFileName as String, strFileExtension as String, _
   strPath as String) As String
Again, as when declaring variables, you should define your arguments with an appropriate argument name and also an appropriate data type. (Notice that the Leszynski naming standard is also used by subroutines defined in this book in the arguments' names.)
In the SaveFile() function, notice As String following the argument list. This specifies the type of data that the function is returning. If this part is omitted from the function declaration, the return value is assumed to be a Variant. Therefore, you should always specify the appropriate return value.
Note
You may come across functions written in VB that are specified as follows:
Function Reverse$ (strValue as String)
The $ following the name of the function specifies the return data type of String. VBA exposes special characters that can be used as shortcuts to define the data type. This method isn't recommended because anyone reading your code—including you—might not know all the different characters that can be used to declare data types.
Using Enumeration to Control Parameters
Enumeration has been used as far back as Access 95 with Access's and VBA's built-in functions and commands. An example of this can be seen in the OpenForm method of the DoCmd object, mentioned in Chapter 1, “Macros Are for Weenies; Code Is Cool!” The DoCmd.OpenForm method uses various built-in enumerations, as shown in the following code line:
DoCmd.OpenForm "frmTest", acNormal,,, acEFormdit, acDialog
The three parameters used here each have multiple choices. For instance, the second parameter is Form Mode. The possible choices are acDesign, acFormDS, acNormal, and acPreview. These choices are then listed as you type the comma preceding the parameter (see Figure 2.4.)
Figure 2.4. VBA uses enumeration for some parameters in built-in commands and functions.

The really cool thing with VBA 6 is that you can have enumerators for your own routines. The syntax for declaring enumerators is
Public|Private Enum Name
Enumerators...
...
End Enum
An example of a use for enumerators is lists such as tracking quarters in the year. Here's the syntax for such an enumerator list:
Public Enum apQuarter
    qtrFirst = 1
    qtrSecond = 2
    qtrThird = 3
    qtrFourth = 4
End Enum
Note
If all you need is a list of unique values and don't care exactly what they end up being, you don't need to use the = 1, = 2 syntax.
The routine call that would use this enumerator would look like this:
Sub ShowQtr(intQuarter As apQuarter)
    MsgBox intQuarter
End Sub
Now, when this subroutine is called and the parameter begins, Figure 2.5 shows you how it will look.
Figure 2.5. Using enumerators is easy and can save time trying to remember possible parameters for user-defined routines.
Taking Advantage of Optional Parameters
Sometimes you might need to have one or many optional arguments. VBA now supports subroutines and functions that can take any number of optional arguments. Optional parameters must be the last declarations in the prototype. You can declare multiple optional parameters in succession.
You can specify optional parameters in a couple of ways. One way is to specify the optional parameter to be a Variant data type. When you specify the optional parameter as Variant, you can use the IsMissing() function to tell whether the parameter was supplied.
The following is an example of using an optional argument with the Variant data type and IsMissing() function:
Function Salutation(strFirst as String, strLast as String, _
     Optional varSalutation as Variant) as String

     If IsMissing(varSalutation) Then
          Salutation = strFirst & " " & strLast
     Else
          Salutation = varSalutation & " " & strFirst & " " & StrLast
     End If
End Function
Note
The underscore character (_) is a line-continuation character. You can use it to break up a long line of code into multiple lines.
IsMissing() checks whether an optional argument is being supplied. When using optional arguments, you should always verify whether the parameter was supplied and respond appropriately; otherwise, you'll experience errors if you try to reference a missing parameter.
You can now call the preceding function as follows:
Debug.Print Salutation("Diana","Barker","Mrs.")
Debug.Print Salutation("Diana","Barker")
The other alternative in optional arguments is to specify what the default should be. Here is an example of what that declaration would look like:
Function OpenFile(Optional strSkeleton As String = "*.*") as String
Thus, if no argument is specified for strSkeleton, the "*.*" is used.
You can specify a strong data type for optional parameters without explicitly giving a default value. VBA uses "" for String, 0 for numbers.
Taking Advantage of Parameterized Arrays
VBA provides support for all subroutines and functions to take various numbers of arguments. For example, consider the following concatenate function, which takes two strings and returns them appended to each other:
Public Function Concat(sStart as String, sAppend as String) as String
     Concat = sStart & sAppend
End Function
This function is limited to concatenating only two strings. It would be great if you could write a function that could take any number of strings and concatenate them together. With VBA, this is now possible:
Public Function Concat(ParamArray avarArray() as Variant) as String
     Dim varElement as Variant, strTemp as String
     strTemp = ""
     For Each varElement in avarArray
          strTemp = strTemp & varElement
     Next
     Concat = strTemp
End Function
In this function, the keyword ParamArray specifies that anywhere from 0 to n number of parameters will be specified. ParamArrays must be declared as Variants and must be the last argument of any declaration. One difference between ParamArray and Optional arguments is that you can define only a single ParamArray at the end of an argument list.
Also, the For Each notation is used to iterate automatically over all the array's elements. This functionality, also present in collections, is discussed in greater detail later in the section “Getting Dizzy with Loops.”
Calling this function can now be done with any number of parameters:
? Concat()     ' Returns an empty string
? Concat ("Hi ","Out "," There","!") ' Returns Hi Out There!
? Concat (1,2)     ' Returns 12 (not 3)
Note
You can't use the Optional, ByRef, or ByVal keywords with ParamArrays. ParamArrays are optional by definition, as you can provide anywhere from 0 to n values. ParamArrays are implicitly ByVal, which means that you're working on a copy of the variable.
Passing Arguments ByRef or ByVal
The effect of passing arguments to subroutines or functions isn't as obvious as you might expect. When you pass a variable to your subroutine or function, what happens if you modify the value of the variable? Does this change the variable's value in the calling subroutine? The following code demonstrates the importance of distinguishing between ByVal and ByRef:
Sub WhatsMyValue()
     Dim intX as integer
     intX = 10
     SquareIt(intX)
     MsgBox intX
End Sub

Sub SquareIt(intSquare as Integer)
     intSquare = intSquare * intSquare
End Sub
When the line MsgBox intX is executed, what's the value of intX? Is it 10 or 100? In this example, the answer is 100. This change in value can have important implications on your program. You might not want a subroutine to modify its parameters. This can create another common pitfall and debugging nightmare: as with using undeclared variables without Option Explicit, no visible error is generated.
You can define the behavior of your subroutine parameters. By default, all parameters you define are considered by reference. Simply defined, this means that the subroutine is operating directly on the passed-in variable.
The other option, by value, causes your subroutine or function to operate on a copy of the variable. When a parameter is specified by value, a copy of the variable is made in memory that's discarded at the end of the subroutine. Thus, if a parameter is specified ByVal, modifying the value of the parameter doesn't change the source variable.
Note
One disadvantage to ByVal is the small amount of overhead needed to create the extra copy of the variable. Memory is also needed to store the extra copy of the variable.
You can use ByVal only with the basic data types. You can't use it with user-defined types or object-valued variables.
Using ByVal parameters is as simple as supplying the ByVal keyword in the parameter list. For example, in the SquareIt procedure earlier, if you want intSquare to be specified by value, you would rewrite the subroutine's header as follows:
Sub SquareIt(ByVal intSquare as Integer)
Note
The same rules hold true for parameters in functions. By default, all parameters are passed by reference.
Controlling Program Flow
VBA provides different methods for controlling the flow of your application. You can control the flow of your program with loops and decision-making commands. You've already seen one type of loop in the Reverse() function, another in the Concat() function, and decision-making code in the Salutation() function earlier in this chapter.
VBA also supports the capability to branch your code by using Goto and GoSub statements. Extensive use of these statements often leads to unmaintainable code and isn't recommended unless they're used for error handling. Error handling is discussed in Chapter 7, “Handling Your Errors in Access with VBA.”
Making Decisions in Your Code
Decision-making code is when you run different code based on different situations. For example, in the Salutation() function shown earlier in the “Taking Advantage of Optional Parameters” section, you checked whether the optional parameter was specified. VBA exposes two different decision-making statements:
If..Then
Select..Case
The If..Then statement is very useful for running different code depending on the value of an expression. Before dividing two numbers, for example, you should first check to see whether you're dividing by zero:
If intB <> 0 Then
     intReturn = intA / intB
Else
      ' Generate an Error, or perform special processing.
End If
You can also nest If..Then statements to check for a number of conditions. VBA provides an easier mechanism for nesting conditional code that results in cleaner, more maintainable code—the Select..Case statement. Imagine that you're writing code depending on the date of the week:
Select Case strWeek
     Case "Saturday", "Sunday"
          ' Process the weekend
     Case "Friday"
          ' Process Friday
     Case Else
          ' All other days.
End Select
Getting Dizzy with Loops
Writing loops allows you to repeat a block of code until a certain condition is met. The following types of loops are supported:
Do..Loop
For..Next
For Each..Next
The type of loop you use depends on the situation. Do..Loop repeats until a specific condition is reached. With Do..Loop, you can have three different syntaxes: one with the condition at the bottom of the loop, another with the condition at the top, and one without a condition. For example, you can continue to loop until the user enters a username. This condition might be met after one iteration or after many. Thus, this loop may be written as follows:
Do
    strUserName = InputBox("Please enter your User Name", "Logon Screen")
Loop While strUserName = ""
This is one of a few different syntaxes Do..Loop supports. One checks the condition before the code block executes, as in the preceding logon example; another checks the syntax after the code block executes.
Checking the condition before the loop executes has a slightly different syntax than checking the condition at the end of the loop. The following syntax checks for the condition before the loop executes. In this case, the code within the loop might never be executed, depending on whether the condition is met.
Do While | Until condition
     statements
     Exit Do
     statements
Loop
In the second syntax, the loop always executes at least once because the condition isn't checked until the end of the loop:
Do
     statements
     Exit Do
     statements
Loop While | Until condition
Note
In the preceding syntax, you can supply a condition only with the Do or the Loop keyword, but not both at the same time. The condition is optional. You can write a loop that loops unconditionally. When this occurs, the loop continues infinitely or until an Exit Do statement is executed.
There's a difference between the While and Until keywords. You use the While keyword when you want the loop to continue while a certain condition is being met. You use the Until keyword when you want to loop until a condition is met. For example, the condition
Loop While x = 10
is the same as
Loop Until x <> 10
To force an exit from Do..Loop before the condition is met, use the Exit Do statement. This forces the loop to exit without executing any additional lines of code.
Note
VBA supports an additional type of loop—While..Wend, which is functionally equivalent to Do While..Loop. However, Do..Loop is more flexible because it offers the capability to loop until a condition is met or not met, and it allows you to force the loop to occur at least once. The While..Wend loop is limited to looping only while a specific condition is met.
The For..Next loop is useful when you know the number of times you need to repeat. For example, to loop 10 times, you use
For intLoop = 1 To 10
     ' Run Code
Next intLoop
Tip
Although the intLoop on the Next statement is optional, it will save a lot confusion by including it each time.
Similar to the Exit Do statement in Do..Loop, you can force a For..Next loop to exit at any point by using an Exit For statement.
Loops can also run in reverse. For example, to run the preceding loop backward, use
For intLoop = 10 To 1 Step -1
     ' Run Code
Next intLoop
You already saw an example of a loop stepping backward in the Reverse() function demonstrated earlier in the “Forcing a Variable Declaration with Option Explicit” section. Omitting the Step statement causes the loop to increment 1 at a time. You can also use Step with integers larger and smaller than 1 to cause the loop to iterate in multiples.
VBA also supports a For Each..Next Loop statement. This special type of loop iterates over collections. This is discussed later in the section “Using Collections.”
Indenting Rules for Control-Flow Code Blocks
To make your code more readable, all control–flow-related blocks should be indented. Control–flow-related code includes all types of loops and If..Then statements. For example, the following code loops and checks the state of a variable:
For intLoop = 1 To 10
     If intLoop = 1 Then
          ' Do something
     End If
Next intLoop
As with comments, indenting code has no effect on your code's execution. Adding tabs doesn't cause your code to execute any more slowly. It does, however, make it much clearer to follow your control flow.
Commenting Code
All comments in the code are specified by an apostrophe. Comments are ignored during the execution of your application. Comments are used to explain the flow of the program and to make your code more maintainable. An example of a comment is as follows:
' The strUserName variable is used to cache the email name
' of the current user.
Compared with writing code, comments are often considered wasted time. However, comments are one of the most important ways to make your code more maintainable. For the short term, you probably can remember how you wrote your code, but imagine looking at your code after weeks or months pass. Using comments is one way to ensure that you still can understand decisions and algorithms well into the future.
Handling Errors
Unfortunately, many predictable and unpredictable errors might occur in your application. Your application must be prepared to respond to errors at all times. If you write an Access application without any error handling, depending on the type of error, your user might get an indecipherable error message, or the whole program might shut itself down without warning.
In Access, two types of errors can occur: synchronous, which can occur during the execution of your code, and asynchronous, which occurs outside your code's execution. The following sections introduce these error types. Chapter 7 provides a deeper discussion on responding to errors.
Errors While Code Is Running
Errors that occur during your code's execution are synchronous errors. If no error handler is present, these errors can often bring your application to a halt. Again, because it's almost impossible to anticipate all the errors that can occur (for example, Out of Memory), you should do your best to trap the most common errors and generically handle the rest. If an error occurs that you didn't anticipate, it's usually a good idea to notify the user that an error occurred and you're shutting down the application. A graceful exit is always much cleaner than reading an Access error message that would confuse users.
To trap synchronous errors, you should use the On Error command at every entry point to your code. This usually is any event-handler code or code that may be called by a macro. Unless you want to do special processing within functions or subroutines called by the event handler, it's not always necessary to have an event handler in every routine.
Errors While Code Isn't Running
Errors that occur while your code isn't running are called asynchronous errors. These errors are interesting, as there might be very little you can do. Also, they often might be unpredictable because you usually have no control over when they occur. All you can do is respond to the error and, in many cases, gracefully close your application. Examples of asynchronous errors are when a network error occurs or when you run out of disk space. This error can occur at any time and is independent of any code you might have written.
Note
Many errors that can occur when your code isn't running can also occur when your code is running. For example, an Out of Memory error can occur while your code is being executed (causing a synchronous error) or when no code is running (causing an asynchronous error).
When asynchronous errors occur in a form, an Error event is fired. This event gives you an error identifier and an error message. By using the error identifier, you can determine the error that occurred and respond appropriately. You can also use the Error event to display a clearer error message than the one Access provides. You can find a list of Access 2000 and Jet 4 errors in Appendix C, “Access 2000 and Jet 4 Errors.”
Programming Style Used Throughout This Book
The programming standards introduced in the preceding sections for indentation, variable naming, and comments are used throughout the book. By following a consistent standard, your code becomes easier to read and debug and is more maintainable.