EXAMINING ACCESS'S RUNTIME ERROR HANDLING
When working with Access's error handling, look at each command that can be used: On Error, Exit, and Resume.
Using the On Error Command
The On Error command lets you specify exactly where you want Access to proceed to when an error occurs. Following are the variations of the On Error command used to direct program execution.
The On Error Goto Statement
To control error handling, you must take over for the default handler by issuing the On Error Goto statement:
On Error Goto LineNumber|LineLabel
The On Error Goto statement has two options:
LineNumber can be a number placed in your routine.
Note
Although VBA lets you use line numbers to specify lines to go to, it's not good practice to do so. Goto tends to lead to unreadable code, unless it's used with the On Error statement.
LineLabel is a label signifying the start of a section of a routine, equivalent to a label used in a DOS batch file.
The code in Listing 7.1 shows a very simple error handler. You can find the SimpleError subroutine in the modErrorHandling module in the VideoApp.mdb database, which you can find in the Examples folder on the accompanying CD.
Listing 7.1. VideoApp.mdb: Creating a Simple Error Handler
Sub SimpleError(intNumerator as Integer, intDenominator as Integer) On Error GoTo SimpleError_Error Debug.Print intNumerator / intDenominator Exit Sub SimpleError_Error: MsgBox Err.Description, vbCritical, "Error Occurred" Exit Sub End Sub |
Note
For simplicity, this chapter has been written completely by using the DAO version of VideoApp.mdb. However, you can find equivalent code for ADO in VideoApp(ADO).mdb in the Examples folder on the CD.
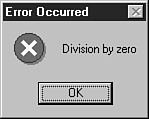
SimpleError_Error is the line label used for the error handler in Listing 7.1. Rather than give you the dialog shown in Figure 7.1 as in the default error handler, this routine displays an error message and then exits the subroutine. Figure 7.2 shows the message box generated by the error handler in the SimpleError routine.
Figure 7.2. After receiving this simple message, the user is exited directly from the routine with the error.

Note
The Err object in the line MsgBox Err.Description, vbCritical, "Error Occurred" is discussed later in the section “Working with the Err and Error Objects.”
The On Error Resume Next Statement
You use On Error Resume Next when the program needs to continue with just the next line of code if an error occurs. An example of this is when you're trying to delete a table that has already been deleted. The following is the code for this example:
Sub InlineResumeNextExample()

   '-- This command tells Access to ignore errors and
   '-- resume on the next line.
   On Error Resume Next

   DoCmd.DeleteObject acTable, "NoTable"

End Sub
The On Error GoTo 0 Statement
On Error GoTo 0 is used when you want to have Access either return to its default error handler, or refer to an error handler that was enabled in a routine above the current routine (also called nesting an error). More information on nesting error handlers is discussed later in the section “Nesting Error Handlers.”
Using the Exit Sub|Function Command
Depending on the type of routine that's executing, you can use Exit Sub|Function to exit directly from the error handler. The code shown in the SimpleError routine in Listing 7.1 uses the Exit Sub command to leave the routine after the error is displayed.
Using Resume, Resume Next, and Resume LineLabel
The Resume statements are used within the error handler to continue with the routine after the error is handled. You can use three alternatives—Resume, Resume Next, and Resume LineLabel. Figure 7.3 shows how these options work.
Figure 7.3. Resume, Resume Next, and Resume LineLabel give you flexibility in handling errors.

The Resume Statement
Resume by itself retries the line on which the error occurred. This statement is used when the error can be fixed and then retried. An example of using the Resume statement is when the user tries to copy a file to a floppy in drive A when no disk is in the drive. By using the Resume statement, you can prompt the user to insert the disk and then retry.
Listing 7.2 shows the use of Resume to prompt users to re-enter a value for the denominator.
Listing 7.2. VideoApp.mdb: Resuming After an Error
Sub ResumeExample(intNumerator As Integer, intDenominator As Long)

   On Error GoTo Error_ResumeExample

   Debug.Print intNumerator / intDenominator

   Exit Sub

Error_ResumeExample:

   If Err.Number = apDivisionByZero Then 'Division by zero error (11)
      intDenominator = InputBox("Please re-enter the denominator:", _
          "Denominator can't be Zero")
      Resume
   Else
      Exit Sub
   End If
End Sub
|
Figure 7.4 shows the input box displayed after you get the error.
Figure 7.4. By using the Resume command, you can allow users to fix the error and try again.

Caution
In this case, if the value entered for the denominator is a different data type, such as text, this routine will halt in execution. You need an error handler outside the routine. When you use the CallResumeExample routine in Listing 7.3, the error that occurs in the ResumeExample's error handler is trapped. This is called nesting error handlers. To read more about nesting error handlers, see “Nesting Error Handlers” later in this chapter.
Listing 7.3 shows the code for CallResumeExample, which traps errors for ResumeExample's error handler.
Listing 7.3. VideoApp.mdb: Calling the Resume Example
Sub CallResumeExample(intNumerator As Integer, intDenominator As Integer) On Error GoTo Error_CallResumeExample ResumeExample intNumerator, intDenominator Exit Sub Error_CallResumeExample: MsgBox Err.Description Exit Sub End Sub |
In this example, trapping the error handler saves the user from being dumped into the code module editor.
The Resume Next Statement
In the error handler, Resume Next provides the capability to give a message and handle the error, and then move to the next line of code from where the error occurred. Listing 7.4, from ResumeNextExample, is modified to display a message that the table doesn't exist and then to continue to the next line.
Listing 7.4. VideoApp.mdb: Resuming to the Next Line
Sub ResumeNextExample() On Error GoTo Error_ResumeNextExample DoCmd.DeleteObject acTable, "NoTable" Exit Sub Error_ResumeNextExample: MsgBox Err.Description, vbCritical, "Delete Table Error" Resume Next End Sub |
In this case, Resume Next doesn't do much for you. But sometimes the capability to skip to the line following the error comes in handy.
The Resume LineLabel Statement
Resume LineLabel allows you to resume at a specified line label—usually one that's placed before cleanup and exit statements. This statement is generally used to create one exit for the routine.
You can see from the code in Listing 7.7 for the ResumeLineLabelExample subroutine that in the error handler, Access resumes to the Exit_ResumeLineLabelExample line label.
Listing 7.7. VideoApp.mdb: Resuming to a Line Label
Sub ResumeLineLabelExample() On Error GoTo Error_ResumeLineLabelExample DoCmd.DeleteObject acTable, "NoTable" '-- This label starts the cleanup and exit section Exit_ResumeLineLabelExample: Exit Sub '-- This label is for the error handler Error_ResumeLineLabelExample: MsgBox Err.Description, vbCritical, "Delete Table Error" Resume Exit_ResumeLineLabelExample End Sub |
Additional examples are shown later in this chapter. One item that you might have noticed throughout the examples is the use of the Err object.
