
CREATING A WIZARD-LIKE INTERFACE FOR SELECTING GROUP-BY ITEMS
Along with the wizard-like interface being much more powerful than the one presented in the last section, the interface also makes the current example easier to adapt. Figure 11.28 shows the wizard-type interface for reports. (This is considered a wizard-type interface because, being data-driven, it doesn't take much to adapt the same interface for new reports.)
Figure 11.28. This interface can be used for an unlimited number of single-level grouping reports.
Here are the main features of this example:
The interface used for calling the report uses a wizard-like look and feel, giving users something they're used to working with.
The routines are written so that for you to use the main form created with a new report, you only have to make an entry in a table and have the record source for the report use the table specified here.
Not only can the individual group elements in this category be selected, but the order in which the groups are printed can be chosen as well.
You'll be looking at a lot of code shortly, but the great news is that the example is pretty much data-driven. As a result, all you have to do is make an entry in a table and use another table in the query that the report is based on. This is covered later in the section “Using the Group Element Wizard with a New Report.” For now, let's go through the code and objects for the current example.
To work this example, I want to start with the two tables that are the core for making this puppy work. I'll move on to the form that's used, and then work my way to the other objects as they're mentioned.
The Core Tables: WizExReports and WizExElements
The two tables used for this example are for two very different purposes. The first table, WizExReports, is maintained for adding new reports. Figure 11.29 shows the entries for the first report.
Figure 11.29. Here are the entries for the report WizExCategory-Report.

Here's a breakdown of the fields used:
ReportName stores the name of the report—in this case, the WizExCategoryReport report.
GroupByTable is the table that supplies the key values and/or description of the Grouping field. The current example uses the Categories table.
TitleForReport is just what it says: the caption and title of the WizExReports form.
KeyField is the KeyField for the record source mentioned in GroupByTable. CategoryID is used here.
DescriptionField describes the elements. CategoryName is used here.
Note
In some cases, when DescriptionField and KeyField are the same, only DescriptionField is filled in. For example, if you were looking at the video store application by using the Ratings table, KeyField and DescriptionField might be the same in that they're both G, PG, or R. Then DescriptionField would say Rating and KeyField would be Null. You see this addressed in the Form_Open subroutine of the WizExReports form in Listing 11.14.
SubjectDescription describes what the elements are—in this case, categories. This field is used in the titles for the list boxes on the WizExReports form.
I'll go over adding another report to this table later in the chapter.
The second table used, WizExElements, drives the form and reports used for the wizard-like interface by controlling the grouping elements—in this case, categories. It also specifies the order, and whether the grouping elements are to be included.
Note
Rather than add elements to and delete elements from a table, this technique toggles a flag field between whether or not to include an element. This can result in better performance, although it generally takes a bit more work.
Figure 11.30 shows the sample data supplied by using the WizExCategoryReport example in the WizExElements table.
Figure 11.30. Don't panic—users don't deal directly with this data.
Again, let's walk through each field used in this table:
FieldID tracks the original order in which the elements were loaded into the table. The lboGetFields list box (on the WizExReports form) sorts on this AutoNumber field and is discussed in more detail in the next section.
ElementKey stores the information from the field that was supplied in the KeyField field in the WizExReports table.
ElementDescription stores the information from the field that was supplied in the DescriptionField field in the WizExReports table.
OrderNo is set when an element is to be included in a report. It keeps the order in which the group is printed in the report. It's set to zero if the element isn't included.
Now that you've seen the tables involved, you should have a better understanding when you look at code and other objects that use them. Let's start with the form used.
Working with the WizExReports Form
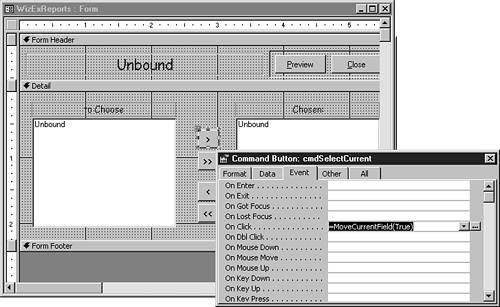
The WizExReports form (in the Chap11.mdb file) has six controls to set up a table with the elements to include for the grouping (see Figure 11.31).
Figure 11.31. The WizExReports form uses two list boxes to maintain whether to include an element for a group.
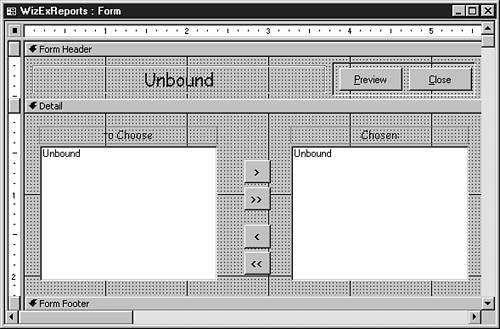
The two list boxes shown, lboGetFields and lboFieldsChosen, are actually based on the same row source, with a Boolean field specifying whether the element is included. Here's the SQL string used for the lboGetFields:
Select ElementDescription From WizExElements Where
Not Include Order By FieldID;
The row source for lboFieldsChosen looks like this:
Select ElementDescription From WizExElements Where
Include Order By OrderNo;
The two differences in these two SQL statements are
The flag showing whether to Include or Not Include the element.
The FieldID found in the row source for lboGetFields, which refers to an AutoNumber field created when the Append query is run for populating the WizExElements table. This is for maintaining the order of the original elements used.
The OrderNo field found in the row source for lboFieldsChosen, used to track the order of the choices made for including group elements in the report. This is later referred to directly for the group header of the report.
The four command buttons—cmdSelectCurrent, cmdSelectAll, cmdUnselectCurrent, and cmdUnselectAll—select and deselect current choices or all choices. I'll discuss the code behind these buttons in a bit, but first I want to take you logically through the form code as the form opens and is used. Let's start by looking at the declaration section, shown in Listing 11.13.
Listing 11.13. Chap11.mdb: Declaration Section of the WizExReport Form's Module
Option Compare Database Option Explicit Dim dbLocal As Database Dim snpReportToUse As Recordset Dim qdfUpdateInclude As QueryDef |
snpReportToUse is the variable reference to the WizExReports table, specifically to the current report. You see this assigned in the Form_Open event.
QdfUpdateInclude is a QueryDef used to update an element as to whether to update the Include field found in the WizExElements table. You see this assigned in Listing 11.14 for the Form_Open event.
Listing 11.14. Chap11.mdb: Setting Up WizExReports for Use
Before you panic, look at the code in sections so it won't be quite so overwhelming. The first piece of code initializes the intCurrOrder variable used to set the order of the included elements:
'–– Initialize the Order numberintCurrOrder = 0

'–– Open the current databaseSet dbLocal = CurrentDb()

'–– Getting the information for the current Group by subject
Set snpReportToUse = dbLocal. _
    OpenRecordset("Select * from WizExReports Where ReportName = '"_
    & Me.OpenArgs & "'", DB_OPEN_SNAPSHOT)

DoCmd.Echo True, "Loading " & snpReportToUse!SubjectDescription & _
    ", Please wait..."
Next, the recordset variable snpReportToUse is set to return the record in the WizExReports table that has the same Report Name (ReportName field), as was passed by using the form's OpenArgs property. You can see this call on the WizExCallingForm form.
Figure 11.32 shows the event procedure assigned to the OnClick event with WizExCallingForm in the background. Notice that named arguments are used.
Figure 11.32. This is all it takes to call the wizard-like report interface after the tables and queries are set up.
The last line uses the SubjectDescription field in the recordset to create a status message; you just don't know how long it could take to load the WizExElements table initially.
Caution
If performance is an issue, you definitely want to test the new report with client data before giving the application to the user. This example does an Append query in the section after the next piece of code, and could take a few seconds to run, depending on the amount of data.
Generally, users understand that reports can take some time to set up, but this routine might not be suitable for the amount of data. If it's not a lot of data, you have no problem. Your client has to be the judge.
In the next code section, the TitleForReport and SubjectDescription fields are used to populate various labels on the form and the form's Caption:
'–– Set the form caption and title to reflect the current subject
Me.Caption = snpReportToUse!TitleForReport & " Report"
Me!lblTitle = snpReportToUse!TitleForReport & " Report"
Me!lblToChoose.Caption = snpReportToUse!SubjectDescription & _
    " To Choose"
Me!lblChosen.Caption = snpReportToUse!SubjectDescription & _
    " Chosen"

'–– Set references up for including and unincluding elements
'–– in the temp tableSet qdfUpdateInclude = _
    dbLocal.QueryDefs("qryWizExUpdateElementToInclude")
Next, a reference is set up with the qdfUpdateInclude variable. This query is run when an element is selected or unselected.
The next section of code first clears the temp table, WizExElements, and then loads the table with the specified data:
'–– Clear the temp tabledbLocal.Execute "DELETE * FROM WizExElements;"

'–– Copy the current group by table into the elements table
If IsNull(snpReportToUse!KeyField) Then
  dbLocal.Execute "INSERT INTO WizExElements (ElementDescription) " & _
    "SELECT " & snpReportToUse!DescriptionField & " FROM " & _
    snpReportToUse!GroupByTable & ";"
Else
  dbLocal.Execute "INSERT INTO WizExElements (ElementKey, " & _
    "ElementDescription) SELECT " & snpReportToUse!KeyField & _
    ", " & snpReportToUse!DescriptionField & " FROM " & _
    snpReportToUse!GroupByTable & ";"
End If
The If statements check to see whether there's a value in the KeyField field. If it's null, only the DescriptionField is loaded; otherwise, both fields are loaded. (As mentioned earlier, this is for the cases when the description field is also the key field.)
Finally, the last section of code for the Form_Open procedure requeries both list boxes because both look at the temporary table for their data, and then sets the first element in lboGetFields as selected:
'–– Requery the two listboxesMe!lboGetFields.Requery
Me!lboFieldsChosen.Requery

'–– Set the initially selected element
Me!lboGetFields = Me!lboGetFields.ItemData(0)
That's it for the Form_Open subprocedure. Now, I have good news and bad news. The bad news is that there's one more kind of hairy routine that needs to be looked at. The good news is that four of the controls on the form use it, so it must be discussed only once. The routine I'm talking about, the MoveCurrentField() function, is stored with the general functions behind the WizExReports form. Listing 11.15 shows this function.
Listing 11.15. Chap11.mdb: Toggling an Element from Selected to Unselected Based on the blnInclude Argument
This routine is used in the OnClick event of the cmdSelectCurrent and cmdUnselectCurrent command buttons (see Figure 11.33). It's also called from the OnDblClick event of both list boxes.
Figure 11.33. Centralizing code such as the MoveCurrentField() function saves a lot of recoding.
The code is commented quite heavily, so rather than go line by line, I'll lay out the steps that this routine performs:
1. |
The routine sets up the list boxes according to whether you will be selecting or deselecting an element—a “from” and “to” type of setup. |
2. |
The routine stores the current string and index in variables. |
3. |
It sets the parameters of qdfUpdateInclude to the element to update. It also specifies whether to change the Include field to true or false, depending on the value passed in with blnInclude. Another parameter set is OrderNo, which is incremented if an element is being selected, and set to 0 if an element is not selected. The query is then executed. |
4. | |
5. |
The new source element is selected. If the last source element was the last in the list, the previous choice is selected; otherwise, whichever one comes next is selected. |
6. |
The new selected destination is set to the element just selected or unselected. |
Remember that this heavy-duty routine does the work of four controls. The last three controls to mention are the command buttons that select and deselect all the elements, and the button that calls the report itself. Listing 11.16 shows the code, which is attached to the OnClick events of the first two buttons mentioned.
Listing 11.16. Chap11.mdb: Selecting and Deselecting All Elements
Private Sub cmdSelectAll_Click()

  '–– Flag the last elements that aren't included as being included.
  CurrentDb.Execute "qryWizExIncludeAll"
  '–– Requery the two list boxes
  Me!lboGetFields.Requery
  Me!lboFieldsChosen.Requery

  '–– Set the last item as the selected element
  Me!lboFieldsChosen = _
     Me!lboFieldsChosen.ItemData(Me!lboFieldsChosen.ListCount – 1)

End Sub

Private Sub cmdUnSelectAll_Click()

  '–– Flag all the elements as not included.
  CurrentDb.Execute _
      "UPDATE WizExElements SET Include = False,OrderNo = 0;"

  '–– Requery the two list boxes
  Me!lboGetFields.Requery
  Me!lboFieldsChosen.Requery

  '–– Set the first item as the selected element
  Me!lboGetFields = Me!lboGetFields.ItemData(0)

End Sub
|
The last routine calls the report requested, using the ReportName field in the WizExReport table. It's attached to the cmdPrintPreview button, which is located at the top of the form with the caption Print:
Private Sub cmdPrintReview_Click()

   DoCmd.OpenReport snpReportToUse!ReportName, acPreview

End Sub
That's it for the creation of the form. I know it's pretty extensive, and if you had to deal with modifying it for every report to be printed, you probably wouldn't use it. (I know I wouldn't.) Fortunately, there are only a few steps to add a new report to use the wizard-type interface. Let's take a look at them.
Using the Group Element Wizard with a New Report
When you add reports to use with this interface, you can do it in about 10 minutes, not including the time it takes to create the report itself. I held off showing the report and record source needed for the report earlier, so I wouldn't be duplicating steps. This way, if you don't want to get into the guts of the form, you don't need to.
Follow these steps to add a report. You're going to create a report that's grouped by supplier:
1. |
Create the query first. Look at the query used for the Product by Supplier report, WizExSupplierReport. Figure 11.34 shows the query, qryWizExSupplierReport. Figure 11.34. Notice that the WizExElements table is central to this query.
In Figure 11.34, notice how
|
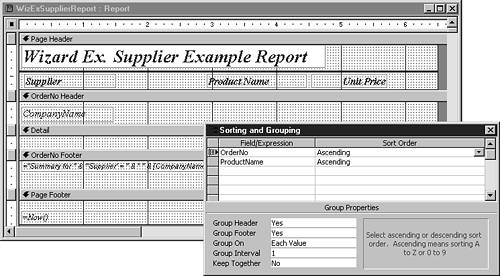
2. |
Set up the report. You can do this with the Report Wizard, as long as you set the OrderNo to be the value grouped by (see Figure 11.35). Figure 11.35. Even though grouping is set as OrderNo, the data displayed is the element description you want—in this case, CompanyName.
As far as setting up the report goes, that's about it. You can have additional levels under the OrderNo grouping if you want. Be sure to set the record source to the query you set up in the previous step. |
3. | |
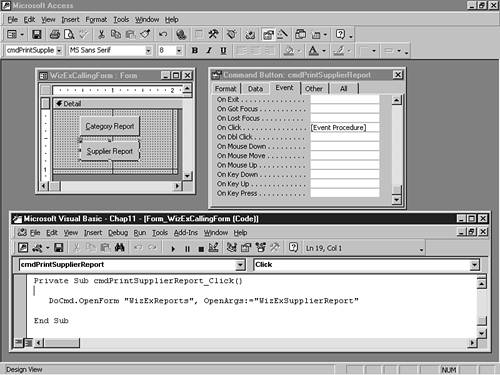
4. |
Add the call for the WizExReport form, with the new report specified. The WizExCallingForm form is where you can find the example of this for both the reports mentioned in this chapter. Open this form in Design view, and look at the code behind the OnClick event of the cmdPrintSupplierReport command button: Private Sub cmdPrintSupplierReport_Click() DoCmd.OpenForm "WizExReports", OpenArgs:="WizExSupplierReport" End Sub |
That's all it takes to use this technique. After you do it a couple of times, it shouldn't take too long to add reports and expand on the concept of the grouping wizard.