
RUNNING OTHER APPLICATIONS FROM ACCESS WITH AUTOMATION
The number of applications you can drive from Access grows with every version of Access. You can automate all Office 2000 applications, including Access itself.
Driving Word from Access
When using Word or any other application that has a set reference to it, you can receive help while programming for that application, even while in Access. You just have to make sure that you've included VBA Help for that application when you installed Office 2000.
An Access-to-Word Automation Example
This first example for automating Word from Access is fairly straightforward. It performs these functions:
The routine opens a new document in Word.
The routine maximizes Word.
It inserts some text into the document.
It returns to the start of the document.
The routine selects all the text in the document.
It sets all the text to be bulleted.
Listing 13.1 shows the code that performs these steps. It can be found in the modAutomationDemos module in the Chap13.mdb database.
Listing 13.1. Chap13.mdb: A Simple Automation Example
A More Complex Example of Access-to-Word Automation
In some cases, you want to fill in data in a Word document while still in Access. Normally, you need to create a mail merge document that users can utilize. The problem with using mail merge is that users tend to change their minds about where they want things. For example, in one case they want a name at the beginning of the document; but the next time, they want it at the end. They can change the document to suit their needs. If you are using mail merge functions, you now have to change the layout of the data to match the users' changes. This problem is demonstrated in the next example in which a form letter is created to send to customers who have overdue video tapes (see Figure 13.5).
Figure 13.5. The document template, WordDemo.dot, is copied to another file to protect it.

Following are items needed to create the finished document:
You need a document created in Word that has keywords enclosed with braces ({}). The braces are optional because the keywords can be anything you decide. Braces are used here because it's unlikely that you'll have actual words in the text of the document that have braces around them. You can find the template for this document, WordDemo.dot, on the accompanying CD-ROM in the same folder as Chap13.mdb—ExamplesChap13.
A table of keywords in Access, named tblAutomationWordReplaceCodes, is set up with all the fields that are used on the form (see Figure 13.6).
Figure 13.6. This table contains the keywords (left column) and the replacement values for the keywords (right column).

All the fields that supply the replacement values for the keywords are located on the tblAutomationLetterWordDemo form (see Figure 13.7). This form also contains the code that's launched to perform the operation.
Figure 13.7. This form contains all the fields for which the searches and replaces are performed.

Now that you've seen all the pieces, here are the steps the code follows:
1. |
It gets the application's path and establishes the final file name. |
2. |
Before copying the template to the final file name, the routine deletes the current final file, if it already exists; then the routine copies the template. |
3. |
The routine creates the Automation instance of Word. |
4. |
The code adds a document to the Documents collection and opens the document, also creating a reference to the document. |
5. |
The routine opens the table of replace codes and cycles through them. |
6. |
It activates Word by making it visible. |
7. |
For each replace code, the routine does the following:
|
To retrieve the actual value desired, use the Eval() function, which evaluates a string passed to it, returning whatever result is retrieved. (For more information on Eval(), search for it in the Answer Wizard.)
Listing 13.2 shows the actual code to perform these actions. You can find the code for the cmdCreateLetter_Click event procedure on the OnClick event for the cmdCreateLetter command buttons.
Listing 13.2. Chap13.mdb: Creating a Custom Letter
What's great about this method is that the order in which the fields are used doesn't matter. If keywords are deleted from the document, Word just doesn't find them during the search-and-replace operation. Figure 13.8 shows the final document for the example.
Figure 13.8. You can even have Word perform special selection of text from Access.

Driving Excel from Access
Manipulating Excel isn't much tougher than manipulating Word. The hard part is knowing which Excel properties and methods to use. In this example, a spreadsheet is populated with data from an Access table named tblProjects. The data represents tasks that are actually used by Microsoft Project in another example. The duration for each task is stored and totaled after the last row.
This example performs the following steps to load an Excel spreadsheet from Access by using Automation:
1. |
It opens the tblProjects table as a Table-type recordset. |
2. |
It creates a reference to a new Workbook, using the instance of Excel declared with the New statement in the declarations section. |
3. |
The routine creates a reference to a new worksheet, and then activates Excel by setting the Visible property to true. |
4. |
It creates the column headings. |
5. |
It loops through the tblProjects recordset, adding the cells to the spreadsheet. |
6. |
In the row following the last value, the routine creates a calculated cell. |
Listing 13.3 shows the code, which is in the modAutomationDemos module.
Listing 13.3. Chap13.mdb: Writing Data to an Excel Spreadsheet from Access
In this code, the Excel application object has a Visible property. For the Excel application to be seen, this property is explicitly set by this line of code:
appExcel.Visible = True
The most exciting part of the code is how you can combine an element of Access with an element of Excel. For example, in the following lines of code, values from an Access table are being assigned to an Excel spreadsheet, using a method off the Excel Range object that is designed especially to use with recordsets:
Set rngCurr = wksNew.Range(wksNew.Cells(2, 1), _
   wksNew.Cells(2 + snpProjects.RecordCount, 3))
The last bit to look at is the code that assigns a formula to a spreadsheet cell and then best fits the columns by using the AutoFit method:
'-- Create the calculation that sums up the Duration Column
   wksNew.Cells(2 + snpProjects.RecordCount, 3).Value = _
            "=SUM(C2:C" & LTrim(Str(snpProjects.RecordCount) + 1) _
             & ")"

   wksNew.Columns("A:C").AutoFit
There are few tasks that you can't perform by using Automation.
The AccessToExcelAutomation() function can be called from the immediate window or by clicking the Excel Demo button on the AutomationDemoCalls form (refer to Figure 13.4). Figure 13.9 shows the final spreadsheet.
Figure 13.9. Not only can you populate Excel spreadsheet cells programmatically, but you can create formulas as well.

Driving Microsoft Graph from Access
This example uses Automation to drive Graph through a Chart object, located on the AutomationGraphDemo form. This very useful method adds pizzazz to a demonstration by animating a graph.
To run this demonstration, click the Graph Demo button on the AutomationDemoCalls form (refer to Figure 13.4); then click Demo It on the AutomationGraphDemo form. The demo rotates a graph 360 degrees and then cycles through each piece of the pie, displaying the piece pulled out. Listing 13.4 shows the code that does this.
Listing 13.4. Chap13.mdb: Animating a Graph
Note
You should try to use strong types instead of generic object types, because strong types result in better performance. For example, Dim objGraph as Chart is used in Listing 13.4 instead of Dim objGraph as Object.
The code in Listing 13.4 takes a graph object located on the form and creates a reference to it with the following statement:
Set objChart = Me![objMonthlyGraph].Object.Application.Chart
The methods available to Microsoft Graph are performed on the objChart object to first rotate the graph and then explode the pie chart slices one by one. Figure 13.10 shows the exploding action.
Figure 13.10. The AutomationGraph-Demo form shows one of the pieces of the graph pulled out.

Driving Microsoft Project from Access
Driving Project from Access with VBA is as easy as driving the other applications; you just have to know how the Project object model works. The next example creates a project from an Access table, which includes creating the task relations. Here are the steps performed:
1. |
The routine creates a reference to the current database. |
2. |
It opens the tblProjects table as a Dynaset-type recordset. |
3. |
It creates a reference to a Project instance. |
4. |
The routine turns off alerts and opens a new project. |
5. |
The routine writes the data from the Access record to Project. |
6. |
It sets the project to be visible within Microsoft Project. |
You can fire off this demo from the AutomationDemoCalls form by clicking the Project Demo button. Listing 13.5 shows the code, which is found in the modAutomationDemos module.
Listing 13.5. Chap13.mdb: Creating a Project from an Access Table
An interesting code segment assigns values from Access into Project. One of the lines of code that does this is
appProject.SetTaskField Field:="Name", Value:=dynTasks!Tasks, _
         TaskID:=intCurrTask
By using the With statement, the Microsoft Project application is made visible by assigning the Visible property of the application object. Then the application is maximized:
With appProject
   .Visible = True
   .AppMaximize
End With
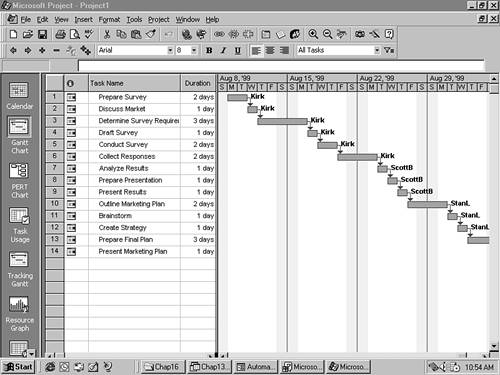
Figure 13.11 shows the original table used to create the project, and Figure 13.12 shows the project as seen in Microsoft Project.
Figure 13.11. The tblProjects table contains all the fields necessary to create a small project.

Figure 13.12. This project was created by using Access and Automation.
Next, you see how to have Project create an Access table containing key elements of a project.