
WORKING WITH THE OFFICE ASSISTANT
The Office Assistant is another shared Office component that you can take advantage of in Access 2000. Its purpose is to take the various products and to make them a little more personable, while at the same time helping users.
The Assistant is one of those tools that people tend to either love or hate. The reason for this is that, while the Assistant is cute with all the animations that it can do, it can be irritating having someone making funny faces and feats while telling you that you made an error. Plus, some of the antics can get old after awhile.
If you press F1 in the main Database window, a small window appears, displaying the Assistant you've chosen (see Figure 20.18).
Figure 20.18. This Assistant, called The Genius (one of my favorites), is one of many possible Assistants.

You can choose from a number of different Assistants. To see the various Assistants possible, follow these steps:
1. |
Click the Assistant to bring up the main balloon. |
2. |
Click Options. A dialog with two tabbed pages appears; the second page is displayed by default, showing actual options available (see Figure 20.19). Figure 20.19. Set up your Assistant to help you effectively in your programming.
|

Tip
While the Office Assistant dialog's Options page is displayed, make sure that the Search of Both Product and Programming Help When Programming check box is marked. That way, programming help will appear when you're developing VBA code.
3. |
Click the Gallery tab to see a larger version of the current Assistant chosen, as shown in Figure 20.20 with The Genius. Figure 20.20. Choose from a number of different Assistants by clicking Back and Next.
|
4. |
Click Next to see each of the other Assistants available. |
5. |
Click OK to accept the new Assistant you want to use. |

When you leave the Assistant open, it will display all error, compile, and syntax messages in balloons. You can choose to have the Assistant present or not; you also can use the Assistant to supply help to users in your own application.
Note
You can supply the Assistant only for applications that run with the complete Office 2000 product. If you're planning on using the Microsoft Office Developer to create distribution disks with the runtime version of Access, remember that users can use the Assistant only if they have Office 2000 fully installed on their machines.
Looking at the Office Assistant Object Model
One of the coolest features of the Assistant, as with most objects in Access and Office, is that you can program the Assistant object yourself.
The Assistant object model is different from others because it has collections in it. It's actually pretty straightforward to use, though: The Assistant has its own properties and methods, and then you create balloons off the Assistant (see Figure 20.21). You can specify what balloon types you want to create—to display a message only or to receive input from the user.
Figure 20.21. The Assistant object model is straightforward.
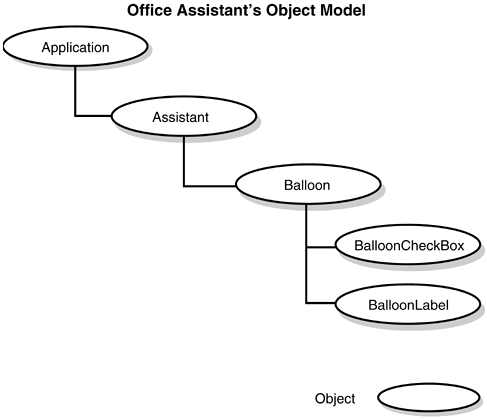
Note
Although there are no collections as DAO uses them, a couple of collections are used: BalloonLabels and BalloonCheckBoxes. These aren't used in this example.
Using the Office Assistant as Help for a Form
This example uses the Office Assistant to do several things:
Prompts users for each field available on a form, taking the information from the ControlTipText property of each control
Displays an error message when a particular field (or fields) is left Null.
Note
This example doesn't show how to use the Assistant with Help files; it displays how to manipulate the Assistant by using VBA.
The form used to demonstrate using the Assistant with VBA is actually a copy of SpreadsheetTypMovementExample in Chap10.mdb. For more information about this form, see Chapter 10, “Expanding the Power of Your Forms with Controls.” The discussion in the current chapter focuses on the routines used to display the Assistant. You can find the copy of the Chapter 10 form, frmWorkingWithTheAssistantExample, on the accompanying CD-ROM in Chap20.mdb in the ExamplesChap20 folder. Figure 20.22 shows an example of this form in action.
Figure 20.22. This Assistant displays the ControlTipText for each field the user moves into.

The code for this example is all behind the frmWorkingWithTheAssistantExample form, found in Chap20.mdb. The first section to look at is the form's Declarations section:
Option Compare Database
Option Explicit

Dim balCurrent As Balloon
Dim blnAssistantVisible As Boolean
Dim strSaveOrigFileName As String
The first variable, balCurrent, is of type Balloon. This variable keeps track of the current balloon being displayed. The last two variables, blnAssistantVisible and strSaveOrigFileName, are used to store the status of the Assistant object before fully opening the form, where
blnAssistantVisible tracks whether the user had the Assistant visible before going into the form.
strSaveOrigFileName keeps track of which Assistant was being used.
When the form is loaded, the code sets how it wants the Assistant to look (see Listing 20.2).
Listing 20.2. Chap20.mdb: Setting Up the Assistant for Use on a Form
Private Sub Form_Load()

  strSaveOrigFileName = Assistant.FileName
  blnAssistantVisible = Assistant.Visible

  With Assistant
    .FileName = "clippit.acs"
    .Visible = True
  End With

End Sub
|
The Form_Load event procedure first stores the current status of the Assistant object to the variables just mentioned. It then sets up the Assistant to use The Genius assistant by assigning the FileName property to genius.act. Table 20.3 lists the other assistants available.
The Form_Load event procedure goes on to set the visibility of the Assistant to True.
Next, you'll see the DisplayBalloonDisp() function attached to the OnGotFocus event of each text field control (see Listing 20.3).
Listing 20.3. Chap20.mdb: Displaying a New Balloon
Function DisplayBalloonTip(Optional strCurrent)

'-- Close the previous balloon if one exists.
If Not (balCurrent Is Nothing) Then
    balCurrent.Close
End If

'-- If no string for balloon text is passed in, then
'-- grab the active control's tool tip text.
If IsMissing(strCurrent) Then
    strCurrent = Screen.ActiveControl.ControlTipText
End If

'-- Create a new balloon
Set balCurrent = Assistant.NewBalloon

'-- Set the values for the balloon and display it.
With balCurrent
    .Mode = msoModeModeless
    .Button = msoButtonSetNone
    .Heading = "Current Field"
    .Text = strCurrent
    .Show
End With

Exit Function

Err_DisplayBalloonTip:
   Exit Function

End Function
|
This function accomplishes the following tasks:
It closes any balloon used previously.
'-- Close the previous balloon if one exists.
If Not (balCurrent Is Nothing) Then
    balCurrent.Close
End If
It verifies whether a string has been passed in to display.
'-- If no string for balloon text is passed in, then
'-- grab the active control's tool tip text.
If IsMissing(strCurrent) Then
    strCurrent = Screen.ActiveControl.ControlTipText
End If
In this code, on the first field, when the form is opened, you can't grab the Screen.ActiveControl information, so the call is made to the function with the literal string passed in. Here's the call made from the first field's OnFocus event, from the Year1 field:
=DisplayBalloonTip([Year1].[ControlTipText])
The rest of the calls from other controls don't pass anything and rely on the Screen.ActiveControl object.
The routine creates a reference to a new Balloon object by using the NewBalloon method off the Assistant object:
'-- Create a new balloon
Set balCurrent = Assistant.NewBalloon
Because there are no collections in this object model, you can't index through a collection of balloons. To create multiple balloons, you can create references to multiple Balloon variables and then use the Show method to display the one you want.
The routine sets the balloon up the way you want it:
'-- Set the values for the balloon and display it.
With balCurrent
    .Mode = msoModeModeless
    .Button = msoButtonSetNone
    .Heading = "Current Field"
    .Text = strCurrent
    .Show
End With
In this case, you're creating a modeless balloon, which allows it to remain open without detracting from what's going on with the rest of the screen. The following settings are available for the Mode property:
Setting Characteristics msoModeModeless User can work anywhere onscreen with the balloon visible msoModeModal User has to close the balloon before working anywhere else onscreen (similar to the Modal property on a form) msoModeAutoDown Balloon disappears when user clicks anywhere onscreen The next property to be set is Button, which has a number of settings. (To find the other constants for this property, look up the Button property in Help.) The Heading and Text properties are then set, and finally the Show method is invoked to display the balloon itself.
That's all there is to displaying a balloon without any user interaction. The next routine of interest is one that's placed on the IncomeYr1 text box, attached to the OnExit event (see Listing 20.4).
Listing 20.4. Chap20.mdb: Displaying a Balloon and Waiting for Acknowledgment
Listing 20.4 is pretty well documented and follows the pattern set in the DisplayBalloonTip() function. One feature stores and then closes the currently opened balloon to a variable:
'-- Store the current balloon
If Not (balCurrent Is Nothing) Then

   Set balSaved = balCurrent
   balCurrent.Close

End If
Another feature is where a specific animation is requested of the Assistant:
'-- Make the Assistant act a certain way
Assistant.Animation = msoAnimationGetAttentionMajor
The last feature is that this balloon is set up differently—it's set to Modal, and an OK button is specified with the following lines of code:
'-- Set up the balloon
With balCurrent
  .Mode = msoModeModal
  .Button = msoButtonSetOK
  .Heading = "Income Field Required"
  .Text = "You must enter a value for the Income Field."
  .Show
End With
Figure 20.23 shows the error message that users see when they leave the income field Null.
Figure 20.23. Creating error messages is easy with the Assistant and VBA.

The last bit of code used in this example is in the OnClose event of the form itself. This code (see Listing 20.5) cleans up and restores the Assistant to the way it was before the form was opened.
Listing 20.5. Chap20.mdb: Clean Up and Reset the Assistant Properties
Private Sub Form_Close()

    '-- Close the last balloon
    balCurrent.Close

    '-- Restore the original assistant
    Assistant.FileName = strSaveOrigFileName

    '-- If the original assistant wasn't visible, then hide it again.
    If Not blnAssistantVisible Then
       Assistant.Visible = False
    End If

End Sub
|
You can do many other things with the Assistant, as far as using multiple choices of responses and such. You can take it from here because you now have a good start in programming the Assistant object model.