CODING CLASS MODULES
Thus far, you've seen how to use standard and form modules, which are also referred to as class modules. You can also create your own class modules that you can use as objects, complete with properties and methods.
The next example gives you an idea of how to start using your own class modules, but it's up to you to figure out when in your applications you can take full advantage of them. As with other examples in this chapter, you can find this example on the CD-ROM in the back of this book in the Chap02.mdb file, located in the ExamplesChap02 folder.
Tip
After you work your way through this section and chapter, if you want to read more about class modules, check out Chapter 16 to see how to use class modules in a real-world application.
As with forms, you can use Get, Set, and Let for adding custom properties to your class module object, and you can use Sub and Function commands for creating methods. The best way to show you this is to jump right into the example. Class modules are mainly for you, the developer, whereas many of the other features in Access allow you to create something cool for users.
The example given here allows you to add custom error messages to your application into a table. Then, by using a constant, you call a method of the class module object called CustomMessages, which is created to display the message desired. Next, you retrieve the message box button that was clicked. This class module has only one property, UseBeep, which turns the beep on and off when messages are displayed through the CustomMessages type object. I'll point out other features as the example progresses.
Creating the Support Objects
Although it would be nice to always create a totally black box object with no outside support objects, you sometimes end up creating a more unusable object that way. Such is the case here. For creating custom messages (in addition the class module you'll create), you use a table for the message information, called tblCustomMessages (see Figure 2.9) and a standard module to create corresponding constants for the messages.
Figure 2.9. This table supplies the messages to use with the CustomMessages class module.

The constants used are kept in the PublicCustomConstant module. Here's the module listing:
Option Compare Database
Option Explicit

Public Const apSaveCon = 1
Public Const apLeaveAppCon = 2
When you need to add a new message, you need to add an entry to tblCustomMessages and create a new public constant.
Now it's time to look at the class module itself.
Creating the Class Module
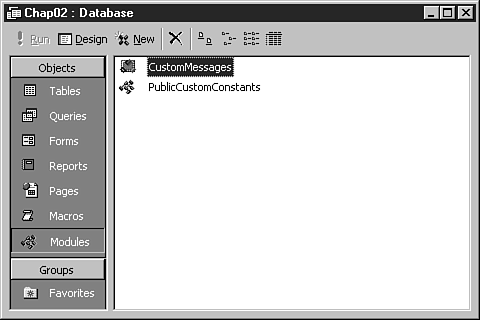
Creating separate class modules is basically a combination of creating standard modules (in the module tab of the database window) and creating code behind forms, adding custom methods and properties. If you look at the Modules page of the database window for Chap02.mdb, you see the CustomMessages class module along with the standard module, PublicCustomConstants. Notice that they have different icons beside their names, based on which type of module they are (see Figure 2.10).
Figure 2.10. Two types of modules can now be seen in the Modules page of the Database window.
To create a class module, from the Insert menu choose Class Module. At the top of the module window, the words Class Module appear beside the name; in the standard module, the word Module appears.
The CustomMessages class module consists of one method and one property. The method, DispMessage, takes the constant passed in and looks up the message number in the tblCustomMessages table. The MsgBox() function is then called by passing the fields that were entered for the desired message. The return value of the MsgBox() function is passed back.
Note
When a method passes back a value, a function is used. If no value is to be passed back, a routine can be used instead.
You can see the code for the DispMessage method here:
Function DispMessage(lngMsgNo As Long) As Integer

   Dim snpMessages As Recordset

   '-- Retrieve the desired message
   Set snpMessages = CurrentDb.OpenRecordset _
      ("Select * from tblCustomMessages where MsgNo = " & _
      lngMsgNo, dbOpenSnapshot)

   '-- If the UseBeep property is set to True, beep
   If blnBeep Then
      Beep
   End If

   '-- Display the message
   DispMessage = MsgBox(snpMessages!MsgText, _
      snpMessages!MsgType + snpMessages!MsgButtons, snpMessages!MsgTitle)

End Function
This method also looks at the Boolean value of blnBeep. This variable is actually the internal value of the UseBeep property that has been specified by the following Property Get and Let routines; the Let routine sets blnBeep to the value passed in, and the Get routine merely returns the current status of blnBeep.
Property Get UseBeep() As Boolean
   UseBeep = blnBeep
End Property

Property Let UseBeep(blnBeepArg As Boolean)
   blnBeep = blnBeepArg
End Property
The blnBeep variable is declared in the declarations section of the class module:
Option Compare Database
Option Explicit

Dim blnBeep As Boolean
That's it for creating the class module itself.
Using the Class Module
Now that the class module is created, it's time to test it. To do so, I created a form in Chap02.mdb named frmShowClassModules. This form has two command buttons, which correspond with the two custom messages that have been included. In each button's OnClick event, a reference has been created to the CustomMessages object. Listing 2.1 shows the code for the first button, which calls the DispMessage method with the apShowCon constant.
Listing 2.1. Chap02.mdb: Calling a Custom Class Module's DispMessage Method, Setting the UseBeep Property First
Private Sub cmdShowMsg1_Click()

   Dim clsMessages As New CustomMessages

   clsMessages.UseBeep = True

   If clsMessages.DispMessage(apSaveCon) = vbYes Then
      MsgBox "Yes, I will save"
   Else
      MsgBox "No, I won't save"
   End If
|
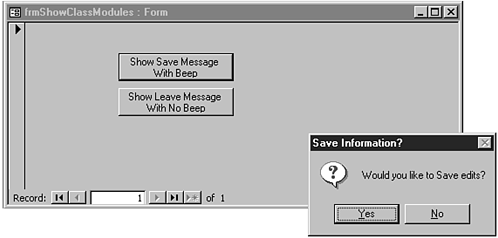
The first statement declares a variable to be a new instance of the CustomMessages class module by using the New keyword. Next, the UseBeep property of the CustomMessages type object is set to true. Then the DispMessage method is called, and the return value is examined. Figure 2.11 shows the object in action.
Figure 2.11. Creating objects to perform specific tasks is now possible, as with the CustomMessages type object.
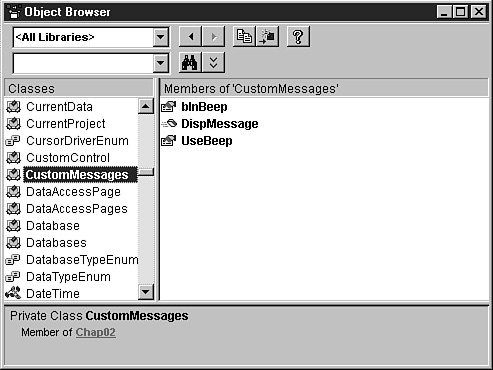
One benefit of using class modules is that the object now shows up in the Object Browser (see Figure 2.12).
Figure 2.12. You can view properties and methods of class module objects inside the Object Browser.
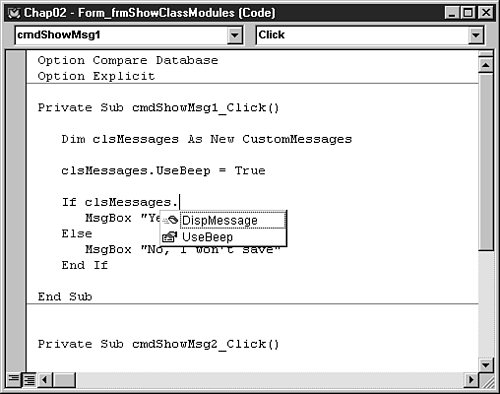
Another benefit is that Access uses the object and displays the properties and methods as you use them in the module editor (see Figure 2.13). For more information on using the new auto information features available to the editor, see Appendix A.
Figure 2.13. Getting Auto Tip information on custom objects can save a great deal of time.
The last routine to display is used with the second command button on the form (see Listing 2.2).
Listing 2.2. Chap02.mdb: Not Setting a UseBeep Property
Private Sub cmdShowMsg2_Click()

   Dim clsMessages As New CustomMessages

   If clsMessages.DispMessage(apLeaveAppCon) = vbYes Then
      MsgBox "Yes, I will leave"
   Else
      MsgBox "No, I won't leave"
   End If
|
The only notable difference between this routine and the first button's (shown in Listing 2.1) is that the UseBeep property isn't set. By not setting this property, it defaults to false.
Note
Notice that when you click the first button (and therefore set the UseBeep property to true), it doesn't stay set for the second button. As two separate instances of the object, they don't see each other or the properties set.
