
CREATING AND ENHANCING SIMPLE DATA ACCESS PAGES
It's time now to show how to enhance the data-entry[nd]style page, as discussed in the last section. The data-entry[nd]style page was also discussed in the section “Understanding the Navigation Control,” where the properties of the Navigation control was discussed.
To start enhancing a page, you need to get a closer look at the Field List dialog.
Looking at the Data Access Page Field List
As with standard Access forms and reports, DAPs have a field list that you can pull fields from and place them on your page. Unlike the other objects just mentioned, which list only the fields of the record source specified in the RecordSource property, the Data Access Page Field List displays a tabbed form with two tabs:
Database contains all the record sources available in the entire database, whether or not they're being used (see Figure 12.13).
Figure 12.13. The Database tab of the Data Access Page Field List.

Note
Note that the tables are arranged hierarchically, with one level of related tables below each table node. That's one reason why defining system relationships on your database is more important than ever.
Page contains the record sources, calculated fields, and data fields specified on the Data Access Page itself (see Figure 12.14). These record sources include all the groupings you might have on the page.
Figure 12.14. The Page tab of the Data Access Page Field List displays only record sources and fields actually used by the current page.

Note
For the prior two figures, the page Review Orders was used from Northwind.mdb.
More will be discussed about the field list as it's used in various areas of creating pages. Let's continue now by showing how to add hyperlinks to the page.
Adding Hyperlinks
A common task with HTML pages of any kind is to be able to use hyperlinks on them. Hyperlinks can be thought of as shortcuts to locations on the Internet or other files on an intranet. A thorough explanation of what a hyperlink is and the hyperlink dialogs can be found in Chapter 19.
Note
You can add hyperlinks to labels and image controls, as explained in Chapter 19, and command buttons using code.
Adding an Unbound Hyperlink
Adding an unbound hyperlink is pretty straightforward. Open the dapCustomers Data Access Page (created in the last section) in Design view.
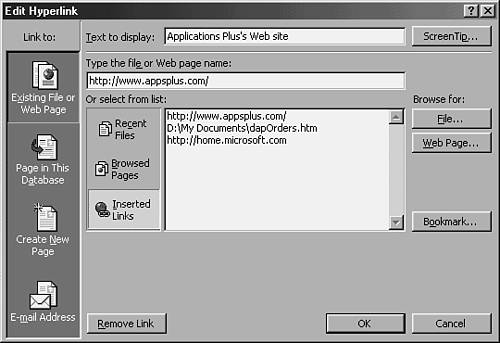
Now let's add a hyperlink to my Web site, www.AppsPlus.com. To do so, choose Hyperlink from the Insert menu. In the Insert Hyperlink dialog, type http://www.AppsPlus.com in the text box the cursor appears in by default (Type the file or Web page name) (see Figure 12.15). Click OK.
Figure 12.15. Adding an unbound hyperlink to a page.
Now when you open the page in View mode, you see the hyperlink displayed on the page at all times. Then, when you click the hyperlink, you are brought to my Web site (see Figure 12.16).
Figure 12.16. Okay, a little flagrant advertising happening here!

Now, because this hyperlink is unbound, it remains the same regardless of which record you happen to be on. Look at what it takes to create a bound hyperlink.
Adding a Bound Hyperlink
Creating a bound hyperlink isn't much tougher than using the unbound hyperlink. If you look at Figure 12.17, you'll notice that the hyperlink field FavoriteHomePage is displayed. The field can't be used to follow the link, however, because it's simply a text box. To follow the link, you need to bind a Bound Hyperlink control to the field.
Figure 12.17. The field at the bottom of this page is a text box with a Web address for data.

Caution
When using hyperlinks on Access forms, the Hyperlink data type causes a hyperlink to be created as the control for the form by default. If you use the Hyperlink data type with the Bound Hyperlink control on a DAP, it won't work the same way.
The Bound Hyperlink control takes the text in a field and treats the text as a hyperlink address. If you used a field of type Hyperlink with a display text specified, the Data Access Page will try to use that text as the hyperlink address.
To see how to bind a hyperlink to a text box column, follow these steps:
1. |
Open the dapCustomers page in Design view. |
2. |
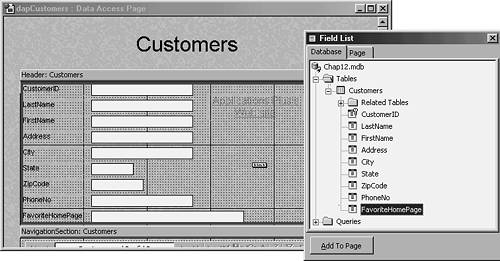
Open the Field List by clicking the Field List toolbar button, and then click the Database tab in the field list. |
3. |
Expand the Tables folder and then the Customers table field list. |
4. |
Click the Bound Hyperlink control located in the Toolbox. |
5. |
Click the FavoriteHomePage field, and drag and drop it onto the dapCustomers page (see Figure 12.18). You will then see a hyperlink with the name FavoriteHomePage1. Figure 12.18. The field at the bottom of this page is a hyperlink.
|
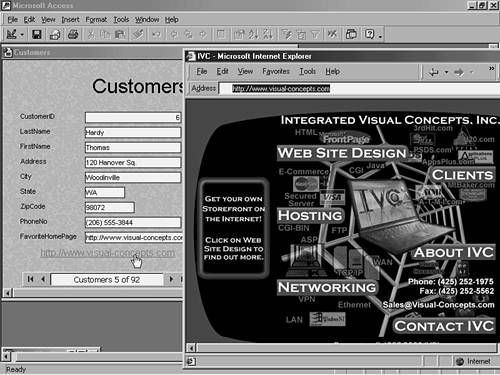
When you go to the same record as in Figure 12.18, you see a hyperlink displayed in the new bound hyperlink. If you click the new Bound Hyperlink control, you will be taken to the specified URL: the Web site for Integrated Visual Concepts, as shown in Figure 12.19.
Figure 12.19. No, I am not part owner in IVC; it just does my Web site.
That's about it for hyperlinks. Now look at what it takes to use expressions on your page.
Using Expressions on Data Access Pages
As with standard forms and reports, you can use expressions on your Data Access Pages. There are a few differences in how you use them in DAPs versus in the standard forms and reports.
Differences in Using Expressions on Data Access Pages
Here are a few of the differences to note when using expressions (or calculated values) on your page:
When typing a calculated value on standard forms and reports, precede the expression with an equal sign (=). Although you can do this with Data Access Pages, it's not necessary. Instead—as with a query—you can type a label, and then :, and the expression. Here is an example:
TotalCost0 Format(RetailPrice*QuantityPurchased,"Currency")
When you create a control on forms and reports, you have a unique Name property to set. With a page, you set the ID field to a unique name.
You can use all the fields in a form or report's recordset, but with a page, the control must be listed on the Field List's Page tab.
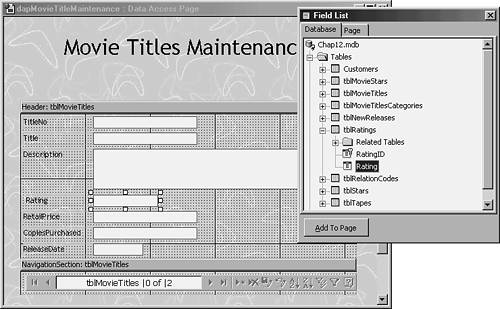
Accessing other controls on the Data Access Page that aren't in the same section of the calculated field takes a different syntax than what is used in form and reports. For instance, in Figure 12.20, you can see the text box under the Rental Date label. This control uses the txtRentalDays text box highlighted with its property sheet displayed. The expression in txtRentalDate reads
txtRentalDate: DateAdd("d",Document.All("txtRentalDays").value, _
ReleaseDate)
Figure 12.20. Using hidden controls in different sections of a page.

Note
You can access anything in IE's document model using the syntax of the code just presented.
This expression takes the field ReleaseDate and adds the value in txtRentalDays to it by using the DateAdd() function, which is a standard VBA function. The page used here, dapMovieTitles, is located in the Chap12.mdb database, located on the CD-ROM in the ExamplesChap12 folder. The good news is that there is actually a subset of VBA that's available via page expressions for security reasons. You don't want a Web page to have access to the Kill function.
You will create a page similar to dapMovieTitles in the section “Creating Group Levels with Promote.”
Caution
Make sure you fill in the ID and the alias for the expression you're using. If you don't fill in the ID, and then try to use the control from another with the label name, you will get an error.
If you just leave the alias Expr?, that's what will be displayed on the Page tab in the Field List in the Calculated Fields. You can see the calculated fields used on the dapMovieTitles page, shown in the Field List's Page tab in Figure 12.21.
Figure 12.21. Be sure to fill in the alias of the expression and ID property to be thorough.

Note
You will look at the object model for Data Access Pages in the section “Data Access Page Object Model,” which delves into using code with DAPs.
Using Bound Combo and List Boxes
Using the combo and list boxes on a Data Access Page isn't too painful—if you're using them as you would on a page or report for updating a field from another table of values. If you want use a combo box to control your grouping, however, it takes a bit more work and can be somewhat confusing. (Using a combo box in this manner is discussed in the section “Using a Combo for a Group Filter Control.”)
Note
The combo box controls are actually referred to as drop-down lists on pages. If you place the cursor over what Access developers know as the combo box control in the Toolbox, the ScreenTip displays Dropdown list. Yet, when a wizard is used, it's the Combo Box Wizard. So for simplicity's sake, when the control is being referred to, it will be called a combo box.
Note
This section will mainly be spent discussing the combo box control; everything discussed will also apply to the list box control as well.
In the meantime, let's stick to the more straightforward purpose: adding a combo or list box control on your Data Access Page. To see how to perform this task, create the base page by walking through the Page Wizard with tblMovieTitles (in Chap12.mdb) and creating a simple page as described earlier in the section “Taking Off with the Page Wizard.”After you create the page based on tblMovieTitles, it should look like the page in Figure 12.22.
Figure 12.22. This page was created by using the Page Wizard.
Notice that the control next to the Rating label is selected in Figure 12.22. Go ahead and delete that control. The label will also be deleted.
As with forms, when you create a combo box, you can use the Combo Box Wizard, with one exception. As with a form, make sure that the wizards are enabled at the top of the toolbox. Then click the combo box control in the toolbox. When creating a form, you would click the field that you want in the field list, and then drag it onto the form. On the form, the Combo Box Wizard would then be invoked. However, with a page, if you click the field and drag it onto the page, the wizard won't be invoked.
To use the wizard, you need to go directly to the form with the new control after you click the combo box control in the Toolbox. When you place the control on the page, the Combo Box Wizard is then invoked. Follow the instructions as the wizard takes you through creating a combo box control by using the tblRatings table for the ListRowSource (analogous to a RowSource on the form) of the combo box. After you create your combo box, all the properties needed to use the combo box will be filled in, except ControlSource (see Figure 12.23).
Figure 12.23. Properties of a combo box (drop-down list) on a Data Access Page.

The properties in Table 12.3 are set on the DAP's combo box.
ControlSource is used on DAPs and forms. Set the ControlSource of the combo box control to the Rating field.
Note
You can display only one field in the combo and list boxes on a DAP. To display more than one field, you must create an expression in a query, and then display that expression. Even then, it still won't be neatly formatted with a dividing line, as on a form/report.
Note
As with list boxes on forms, you can set the list box to allow multiple selections. To do this on a DAP, you will set the Multi property to True and use VBScript to manipulate the control.
Formatting with Themes
As you saw in Figure 12.11, which shows the Theme dialog as called from the Page Wizard, you can also apply a theme to a page after it's created. To do this while designing a page, follow these steps:
1. | |
2. | |
3. |
Click OK. |
The theme will now be applied to the Data Access Page.
Additional Controls to Be Used on Data Access Pages
In addition to the standard controls found on forms and reports, a number of other controls can be used on Data Access Pages. Some controls are as follows:
Bound HTML control allows you to create HTML, and then bind this control to it to perform tasks and calculations. The HTML can also be text in a table, which you can bind to a field.
Tip
If you don't have an updateable page, you might want to use Bound HTML controls to display your data so users don't get the mistaken impression that they can actually change the data. Choose Select Page from the Edit menu. Then, choose Properties from the View menu, and click on the Data tab. You can then change the Default Control Type to make the field list create these instead of textboxes. Then your pages will look more like reports and less like forms that don't allow you to change data.
Scrolling Text control adds an IE-specific MARQUEE tag to the page. Set the ControlSource to a string and watch it go. It can also be data bound.
Image control is the same as on forms and reports. It can be used to display pictures but can't be data bound.
Movie control lets you place a movie clip right on your page.
Expand control is used to expand and collapse a group level or banding level.
Record Navigation control is used to control the record navigation of a group of records.
Hyperlink controls consist of Bound, Unbound, and Hotspot. The Hotspot Image control allows you to place an image on the control that's “hot” with a hyperlink. When you click on it, you navigate to the URL specified.
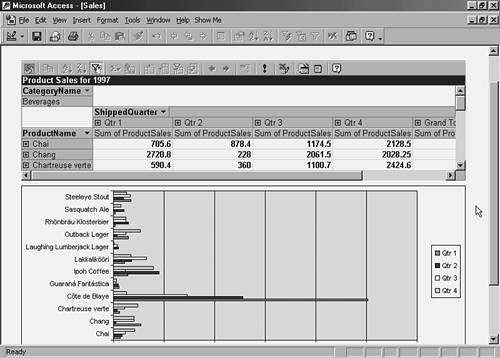
Pivot Table Office Web Component allows you to create a pivot table on your Data Access Page, similar to the pivot table found in Excel.
Chart Office Web Component helps you create a chart that can be updated dynamically. You can see an example of the Pivot Table and Chart Web Components control on the Sales page in Northwind.mdb (see Figure 12.24).
Figure 12.24. The new Pivot Table and Chart ActiveX controls in action.
Spreadsheet Office Web Component allows your users to work with numbers in a spreadsheet within your page.
Additional ActiveX controls are being created for the Web that can be used with your pages.
Now it's time to create a serious Data Access Page with multiple groupings.