
TAPPING INTO THE POWER OF COMBO BOXES
Using combo boxes is fairly straightforward when you use them just to look up and display one item of data from another table. Access also includes a Combo Box Wizard that makes creating combo boxes even easier.
Using the Combo Box Wizard
Because the Combo Box Wizard is powerful and helps create a rather complex control, it's covered here—unlike most of the other wizards that would be presented in a lower-end book. You'll walk through how to use the Combo Box Wizard to create a combo box that performs the following tasks:
Allows users to look for a record on the current form and display one field while searching on another value
Performs a lookup and updates the foreign key in the current record while displaying another value
The second task is the standard you use when creating a combo box. The first task is used but it's a feature of the Combo Box Wizard. To use the first task, follow these steps:
1. |
Create a form by using the AutoForm: Columnar Wizard, with MovieTitles as the base table (see Figure 10.3). Figure 10.3. Creating quick forms is easy with all the form wizards available in Access 2000.
|
2. | |
3. |
For this example, delete the ScreenShot, Trailer, TitleNo, and Title fields from the form. (Don't worry, this simply removes the fields from the form.) Your screen should now look similar to Figure 10.4. Figure 10.4. This base form is used to add a combo box lookup in the example.
|
4. |
Make sure that the Wizard toggle button is toggled so that wizards are turned on. You'll find this button in Form Design view in the toolbox. |
5. |
Click the ComboBox control in the toolbox and drag it onto the form, just above the Description field. The Combo Box Wizard appears, showing the three choices available (see Figure 10.5). Figure 10.5. Using the Combo Box Wizard is a great way to jump-start creating a ComboBox control.
|

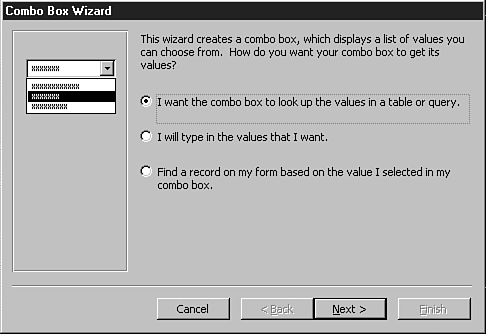
Note
You're given the first two choices when the combo box is used on a form that has no recordset, called an unbound form.
6. |
Select Find a Record on My Form Based on the Value I Selected in My Combo Box and click Next. |
7. |
Choose the fields to include in the combo box—in this case, TitleNo and Title. Click Next. |
8. |
At the next dialog, adjust the columns onscreen. This dialog also hides the key column for you. For now, simply click Next. |
9. |
The next dialog lets you change the label of the combo box. Use the default in this case. |
10. |
The combo box is now complete. Click Finish. |
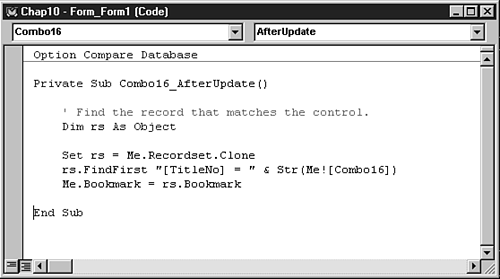
Now when you change to Form view, you can choose a title from the combo box and have Access automatically go to that record. Figure 10.6 shows the module editor with the AfterUpdate event procedure of the Combo16 combo box displayed, which is the combo box the wizard created.
Figure 10.6. The Combo Box Wizard automatically created this VBA code for the AfterUpdate event.
Programming Combo Boxes Beyond the Wizard
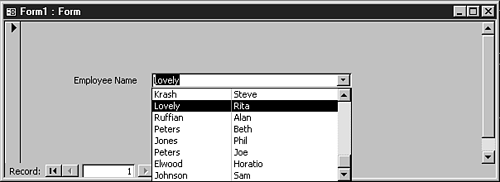
One weakness of the Combo Box Wizard is that you can't show calculated values in a combo box created through the wizard. For example, when you want to display the first and last names of an employee, the Combo Box Wizard produces a combo box with three columns. One column, usually for the last name, appears in the field (see Figure 10.7). The first column is displayed in the list, but the EmployeeID field isn't displayed at all. However, the combo box is bound to that column.
Figure 10.7. Although the list displays a last name and a first name, it would be nice to see both in the field.
Changing this combo box to display the last and first names in the field itself isn't too tough. The trick is to concatenate the two values into one value and change a couple of other properties. You need to change these properties and their current values:
| Property | Current Value |
|---|---|
| Row Source |
SELECT DISTINCTROW [Employees].[EmployeeID], [Employees].[LastName], [Employees].[FirstName] FROM [Employees]; |
| Column Count | 3 |
| Column Widths | 0";1";1" |
The first change is to the Row Source property. Change the SELECT statement to display the FirstName and LastName fields in one expression:
SELECT DISTINCTROW [Employees].[EmployeeID], [Employees].[LastName] &
", " & [Employees].[FirstName] FROM [Employees];
The other two properties also need to be changed to reflect two fields rather than the original three. The following table shows the new values of the properties:
| Property | New Value |
|---|---|
| Row Source |
SELECT DISTINCTROW [Employees].[EmployeeID], [Employees].[LastName] & ", " & [Employees].[FirstName] FROM [Employees]; |
| Column Count | 2 |
| Column Widths | 0";2" |
When you use these new values, your combo box should look like Figure 10.8.
Figure 10.8. The combo box shows the LastName and FirstName fields concatenated, giving the full name in the field.
Sometimes when you're displaying information in a report or query, you might want to let users show information either for one choice or for all choices. To do so, you can use the UNION SQL statement in the combo box, along with a query that knows how to handle it. (For more information on queries and using SQL statements, see Chapter 8, “Using Queries to Get the Most Out of Your Data.”)
Using a Union Query to Give the Choice of One or All
This section's title sounds somewhat like a Three Musketeers saying, but the usage is still very useful. The following steps create a standard form and query that are used to view information for a particular piece of data. In this case, the query returns the full record of information found in the Employees table for the employee requested. This is the starting point for showing how to use the union query after the basics are completed.
Note
The ComboBoxExample1 form and qComboBoxExample1 query both are available from Chap10.mdb, on the accompanying CD-ROM in the ExamplesChap10 folder.
Follow these steps to create a standard type form and query to view information for a particular employee:
1. |
Name the combo box you created in the preceding section cboEmployeeToQuery. |
2. |
Add a command button named cmdShowInfo and give it the caption Show Information. |
3. |
With the cmdShowInfo command button you just created, open the property sheet and go to the Events page. |
4. | |
5. |
Now create the qComboBoxExample1 query by following these steps:
1. |
Create a new query with the Employees table as the source. |
2. |
Drag down the Employees.* field, and then drag down the EmployeeID field. |
3. |
Click the Show check box in the EmployeeID field to deselect it. |
4. |
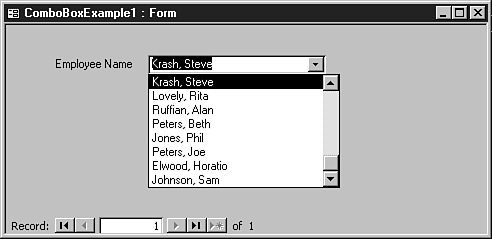
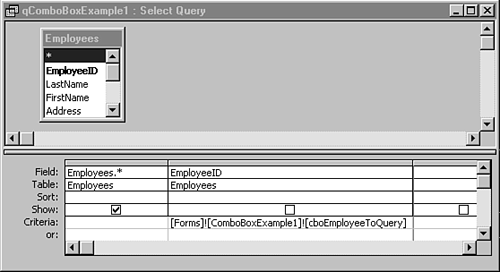
In the criteria portion of the EmployeeID field, enter the following statement: Forms!ComboBoxExample!cboEmployeeToQuery Your query should now look like the one in Figure 10.9. Note that Access puts the brackets in for you if you don't have any spaces in your statement. Figure 10.9. The query named qComboBoxExample1 now looks directly to the form named ComboBoxExample1.
|
5. |
Now, by opening the ComboBoxExample1 form in Form view, you can choose an employee from the list and click the Show Information button to display all the available information about that employee.
The preceding steps work fine for one employee, but suppose that you want to see all the information listed for all employees at the same time. To do so, you use the wonderful UNION SQL statement. First, copy and paste the two objects from the preceding steps into new objects. Name the new form ComboBoxExample2 and the new query qComboBoxExample2.
Note
The ComboBoxExample2 form and qComboBoxExample2 query are already created in the Chap10.mdb database, which is on the accompanying CD-ROM in the ExamplesChap10 folder.
Next, modify the ComboBoxExample2 form by following these steps:
1. |
Open the form in Design view. |
2. |
Edit the OnClick event procedure of the cmdShowInfo command button to read as follows: DoCmd.OpenQuery "qComboBoxExample2" |
3. |
Close the module editor. |
4. |
Here, the process gets tricky. Remember that the UNION SQL statement takes the two sources listed and combines them into one list. Next, you'll trick Access into thinking that two sources exist when only one source actually exists—Employees. Literal values are used with the Employees table.
Add the following statement to the front of the current SQL statement:
SELECT 0, "<< All Employees >>" FROM Employees UNION
Enclose the existing code with parentheses, excluding the semicolon on the end. The resulting SQL statement looks like this:
SELECT 0, "<< All Employees >>" FROM Employees UNION (SELECT DISTINCTROW
[Employees].[EmployeeID], [Employees].[LastName] & ", "&[Employees].[FirstName]
FROM [Employees]);
The reason for using 0 in the EmployeeID field is that you know it's an AutoIncrement type field, which will never be 0, so the query can safely look for 0 as a value to display all the information.
Tip
To make this even more slick, you can have the form default to the choice << All Employees >> by placing a 0 in the Default Value property of the combo box cboEmployeeToQuery. This is nice when you want the listing to default to showing all employees.
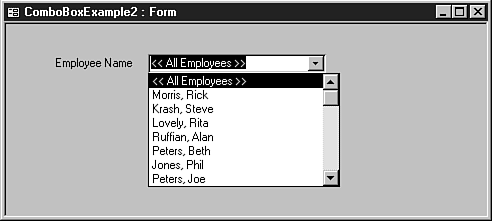
By entering the preceding statement, when you run the form and click the combo box, a list similar to the one shown in Figure 10.10 appears.
Figure 10.10. Here, the combo box gives a choice of viewing all employees' information.
Although the form design looks the way you want it with the combo box displaying << All Employees >> as a choice, your work is only half done. You need to modify the query to handle the cboEmployeeToQuery combo box correctly in its criteria.
Open the qComboBoxExample1 query and modify the criteria for the EmployeeID field from
[Forms]![ComboBoxExample1]![cboEmployeeToQuery]
to
IIf([Forms]![ComboBoxExample2]![cboEmployeeToQuery]=
0,[EmployeeID],[Forms]![ComboBoxExample2]![cboEmployeeToQuery])
For more information on the syntax for accessing the Access collections, see Chapter 4, “Looking at the Access Collections.”
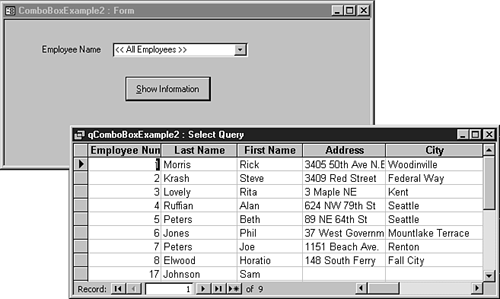
By using the IIf() function, the [Forms]![ComboBoxExample2]![cboEmployeeToQuery]=0 portion checks to see whether the << All Employees >> choice, which is 0, has been made from the cboEmployeeToQuery combo box. If it was, the current EmployeeID is compared to itself, which always returns true. Otherwise, the current EmployeeID is compared to the value in the cboEmployeeToQuery combo box, just as in the first example. Figure 10.11 shows the query results, with the << All Employees >> choice made.
Figure 10.11. Here are the query results when choosing << All Employees >>.
In addition to using the UNION SQL statement to open a separate window and display a list for all choices, you can also use it to requery a subform on the same form as the combo box.
Using a UNION SQL Statement to Requery All in a Subform
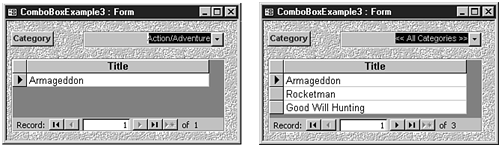
The form used for the example in this section, ComboBoxExample3, can also be found in Chap10.mdb in the ExamplesChap10 folder on the accompanying CD-ROM. Figure 10.12 shows two versions of the same form, displaying a subform that's based on a query that uses a similar IIF() statement, which was covered in the preceding section. The left form shows a specific category being entered, whereas the right form shows the entry for All Categories.
Figure 10.12. First choose an individual category for a movie (left), and then choose All Categories of movies (right).
You can see the row source for the cboCategories combo box in the following code:
SELECT 0, "<< All Categories >>" FROM Categories UNION (SELECT
DISTINCTROW [Categories].[CategoryCode], [Categories].[Description]
FROM [Categories]);
Again, this code looks similar to the SQL code used in the cboEmployeeToQuery combo box in the preceding example.
The query that reads the combo box is also similar. But this query isn't called by a DoCmd.OpenQuery method. Instead, this query is the record source for the subform control ComboBoxExample3Subform.
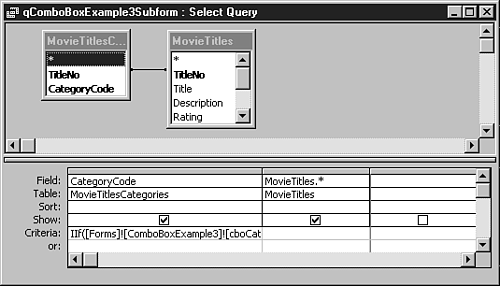
The subform control itself doesn't use the LinkChildFields and LinkMasterFields properties as most subform controls do. By contrast, the query itself reads the master field directly—in this case, the cboCategories combo box. Figure 10.13 shows this query in Design view.
Figure 10.13. This query, in Design view, reads the cboCategories combo box directly.
Note
One reason for choosing not to use the LinkChildFields and LinkMasterFields properties is if the link between the subform control and the main form has to change. Changing the link on the fly can sometimes be hard. If you control the link in the query with the criteria, however, it's pretty easy to change the link.
Here's the code for the criteria portion of the CategoryCode field:
IIf([Forms]![ComboBoxExample3]![cboCategories]=0,[MovieTitlesCategories]!
[CategoryCode],[Forms]![ComboBoxExample3]![cboCategories])
This code is another good example of the versatility of Access controls. A final example with the combo box is using more columns in the combo box than are used in the control itself.
Displaying Combo Box Columns Outside the Control
In some cases, you might have information that you can access through a combo box. This saves your application the overhead of joining another table in the underlying query that makes up a form's record source.
Combo boxes (and list boxes) have a Columns() property. This property is an array of the columns that you can specify for a combo box. These columns, as with the CategoryCode column in the earlier example, don't need to be visible for you to access them. You can access this array either in VBA code behind forms or as a control's source for another control. The latter method is used for this example.
In this example, you use the Combo Box Wizard again because it's the quickest and easiest method. The combo box that's created also passes back other information that, in turn, is displayed on the form. Follow these steps:
1. |
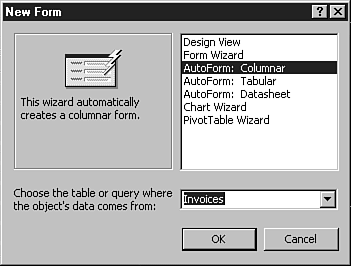
Create a form by using the AutoForm: Columnar Wizard. Select the Invoices table as the record source (see Figure 10.14). Figure 10.14. Here's the starting dialog for creating the ComboBox Example4 form.
|
2. | |
3. |
Open the field list by choosing Field List from the View menu. |
4. |
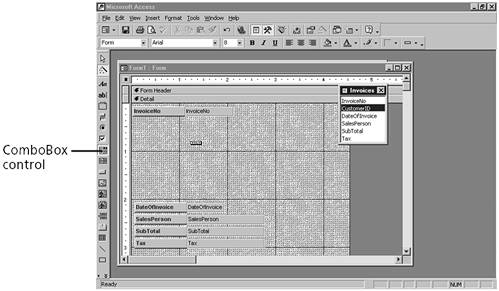
Click the ComboBox control in the toolbox. |
5. |
Click and drag the CustomerID field onto the form (see Figure 10.15). Figure 10.15. The ComboBox control is selected, along with the CustomerID field that's being dragged onto the form.
|
Tip
Use steps 4 and 5 to drag specific control types for fields for other control types in addition to combo boxes. This method works for list boxes as well.
You need to use the toolbox method only with the field list if you want a nondefault control type. The field list is very smart about what kinds of fields it drops: check boxes for Boolean fields, combo boxes for fields with table-level lookups, and so on.
6. |
Accept the default choice on the first dialog of the Combo Box Wizard. Click the Next button. |
7. |
In the next dialog, choose Customers for the table to use and then click Next. |
8. |
Select the CustomerID, LastName, FirstName, and PhoneNo fields and click Next. |
9. |
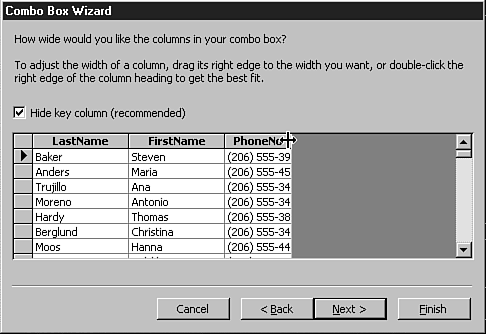
Drag the right edge of the PhoneNo field to the left to shrink the field down and hide it (see Figure 10.16). Click Next. Figure 10.16. If you shrink the PhoneNo field, it won't be displayed, but can still be accessed.
|
10. |
In the next dialog, simply click Next because the correct field, CustomerID, is already highlighted (because you dragged it from the field list in step 5). |
11. |
Change the label to Customer instead of CustomerID, and then click Finish. |
12. |
Change the name of the new combo box to cboCustomer. |
Now if you look at the property sheet for cboCustomer—in particular, the Format properties—you see that the Column Count is 4 and the Column Widths are 0";1";1";0".
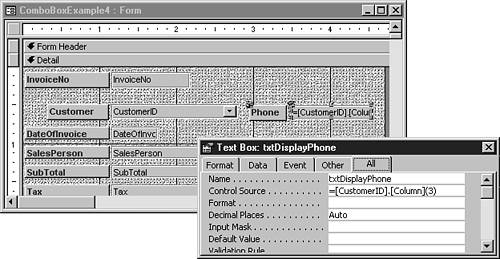
You're ready to create a control to display the phone number from this combo box. Create a text box named txtDisplayPhone and set the label to Phone. Then set the Control Source of the txtDisplayPhone text box to =cboCustomer.Column(3). Figure 10.17 shows the completed form in Design view, with the property sheet of txtDisplayPhone showing.
Figure 10.17. Using the Column property of a combo box or list box is another great way to display information from a different table.
Tip
Although the column you want to show (PhoneNo) is the fourth column, because Access objects are zero-based, it ends up being 3.
To prevent users from trying to update this field, lock and disable it.
Note
As with other methods for displaying information, using combo box columns has a diminishing return on performance. Always try a couple of different ways, such as joined queries and combo box columns, when you're trying to display information from more than one table.
Adding New Combo Box Items Based on User Input
Frequently, you will want to give users a list of input choices in a combo box and also let them add items that aren't in the list. You can set the combo box's Limit To List property to No, but this makes maintaining the integrity of your data more difficult because you have less control over the values entered into the field. Fortunately, Access provides the NotInList event for combo boxes and list boxes to help you deal with this situation.
With the NotInList event, you can modify the form from the preceding example to prompt users to enter a new customer record when an unknown name is entered into an invoice. The code in Listing 10.1 handles the NotInList event for the CustomerID combo box.
Listing 10.1. Chap10.mdb: Handling a Customer Not in the List
Private Sub CustomerID_NotInList(NewData As String, Response As Integer)
    Dim intReply As Integer

    intReply = MsgBox("The Customer '" & NewData & _
    "' is not in the list. Would you like to add?", vbYesNo)

    If intReply = vbYes Then

       '-- Open CustomersForm in data entry mode, passing the new data as
       '-- an OpenArg
       DoCmd.OpenForm "CustomersForm", , , , acFormAdd, acDialog, NewData

       '-- Record added, so cancel Access's default processing
       Response = acDataErrAdded
    Else
       MsgBox "Please select an item in the list."

       '-- We have handled the error, so tell Access not to put up
       '-- its own default error.
       Response = acDataErrContinue
    End If

End Sub
|
This code tells users that the customer isn't in the list and asks whether they want to add the customer. If so, it opens the CustomersForm form as a dialog in Add view so that they can fill in the new customer record.
Note
The NewData event argument contains the string that users entered, which isn't in the list. It's passed as the OpenArgs parameter to the OpenForm method so that CustomersForm can fill in its LastName field, making it faster and easier for users to add the new record. For more information on using OpenArgs, see the section “Reusing Forms to Perform Standard Tasks with the OpenArgs and Tag Properties” in Chapter 9, “Creating Powerful Forms.”
Finally, the Response argument is set depending on the outcome of the event processing. Table 10.1 shows the possible settings for Response, the situations in which you should use them, and Access's corresponding actions.
| Constant | Usage |
|---|---|
| acDataErrAdded | The item was added, averting the not-in-list condition. No errors are displayed. |
| acDataErrContinue | The item wasn't added. No default error is displayed. |
| acDataErrDisplay (default) | The item wasn't added. The default Access error is displayed. |
The code in Listing 10.1 sets Response to acDataErrAdded after the CustomersForm is closed, indicating that the customer is added. When users choose not to add the customer, a custom message is displayed and Response is set to acDataErrContinue to prevent Access from displaying its default message.
The resulting form can be found in ExamplesChap10Chap10.mdb on the CD-ROM as ComboBoxExample5.