
Tokens are nothing but variables, as in programming languages, which can be used to run dynamic queries taken from input fields or clicked events. Token name works as a reference to the information which captures value that is used to manage dashboard behavior. The delimiter used for the token is having syntax as $token_name$.
The following are a few ways token values can be captured:
- Tokens can be used to capture values from an input field
- Define the token to specify actions, based on conditions based on the value of the token
- Tokens can be defined in a search string, using values based on previously defined tokens
- Splunk Enterprise pre-defined default tokens
The tokens can be used in various locations and use cases on the Splunk dashboard, as described here:
- Search events: The result of a search based on the token value can be changed using search metadata tokens
- Form inputs: Depending upon the selection of the input value, the results in the visualization change
- Drilldown tokens: Depending upon the value/field clicked on the visualization, the respective tokens are passed and the result is obtained by the drilldown of visualizations
- Conditional display: Tokens are set and unset conditions for displaying the panels/content on the dashboard
Tokens can be used to implement various functionalities on the Splunk dashboard. Tokens can be used as a single value visualization title, as a different functionality in case the search result is empty, or they hide/show panels on the basis of search result values.
We will learn in detail about using tokens to hide/show panels on the basis of a search result value in the next topic (Null search swapper) of this chapter.
The following are the tokens within the search event handler to access specific job properties. These features have been newly introduced in Splunk 6.3 to access search results:
$job.earliestTime$: Initial job start time$job.latestTime$: Latest time recorded for the search job$job.resultCount$: Number of results a search job returned$job.runDuration$: Time, in seconds, for the search to complete$job.messages$: List of error and/or debug messages generated by the search job
The tokens can be used to add custom logic to a dashboard with an eval token. The dashboard's eval expression can be used to define a condition to match. Let us see an example of how an eval token can be used to implement a customized and dynamic dashboard.
Let us go through an example of using eval tokens and understand their use. The following image shows a visualization, at the top of which is a result of the search query. The bottom section shows a time, which is nothing but the result of the time required for execution of the search query of the visualization:

The time duration in the preceding search query is calculated on every run of the search query of the bar chart visualization. It is obtained by using job.runDuration, which is available as one of the default tokens from the Splunk Enterprise job properties of the <progress> tag. Similarly, an eval token can be used in various scenarios to display the required result even on a conditional basis on the Splunk dashboard.
An eval token is very easy to implement. Let us see what needs to be modified in the XML code to implement an eval token on the Splunk dashboard. The following diagram shows the source code snippet, which implements the use of the eval token in the dashboard:
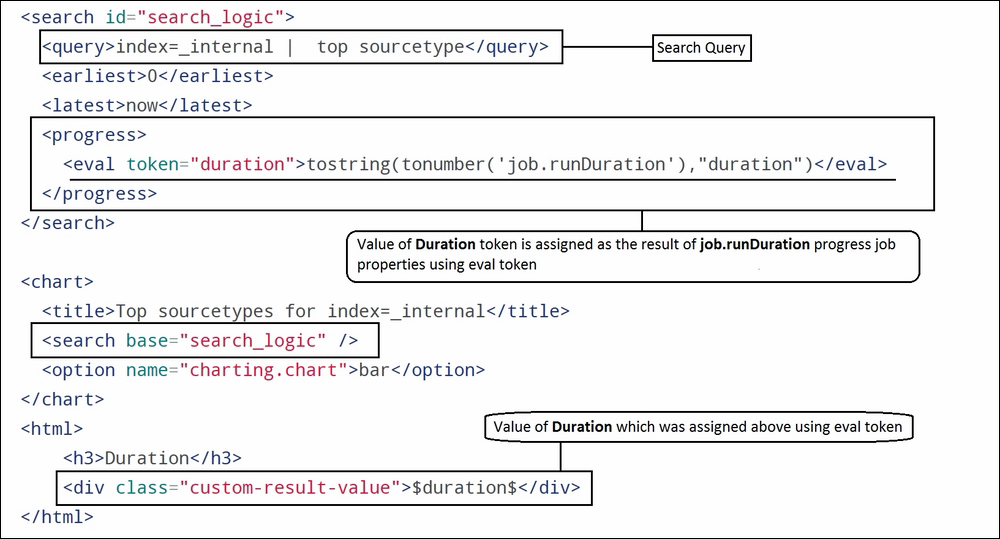
In the preceding image, the first segment is the search query, which results in the visualization in the explained example. The <progress> tag is used to get various job properties of the search event handler. In this section, the eval token named Duration is used to get the value in the Duration token of the search run duration. The eval token duration also has functions to convert the result into strings and numbers.
In the later section of the preceding code, a single value visualization is used to pass the result of the duration variable whose result was assigned by the eval token once the search is completed. Thus, the eval token can be used to customize the token as per need and helps to make a user-interactive and customized dashboard on Splunk.
We have already learned in detail about tokens and eval tokens; now let us learn about custom tokens in which we will use JavaScript to set tokens in panel titles, HTML content of a panel, and also for drilldown scenarios. The custom tokens can be used to enrich the dashboard with important information relating to applications, users, and so on.
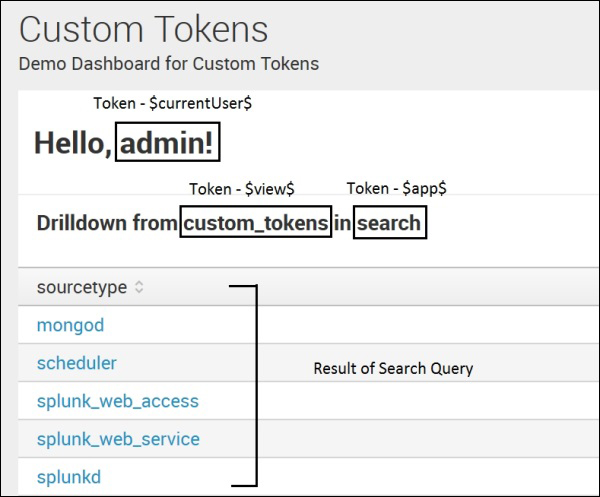
Let us understand the use of custom tokens with the help of an example, and then later, we will look into implementing them on the Splunk dashboard. The following screenshot of the Splunk dashboard shows the value of custom tokens, like the username, app name, and view name. In this example, we have set custom tokens even for the drilldown on the result of the search query. Similarly, depending upon the requirement, any number of custom tokens can be defined and used:
Now since we are aware of the use of custom tokens, let us see how to create, define, and use custom tokens on the Splunk dashboard.
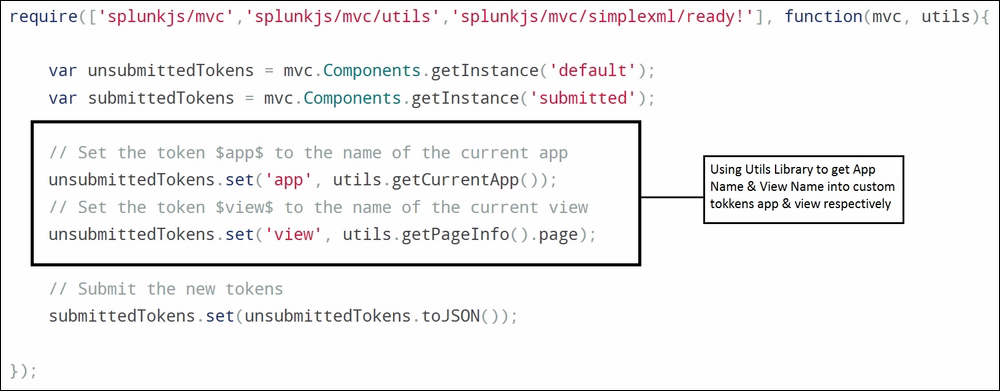
The following code is the code snippet to get the app name and view name by using the utils library provided by Splunk Enterprise. In this snippet, we have set the values of the app name and view name obtained by the utils library to app and view tokens, which we will be using in the panel to display the required information. The following code snippet can be named as required; let's say we name it app_token.js:
Similar to the way we got the app name and View Name, we will now get username from the SplunkConfig API to access various Splunk parameters, as follows. The following code snippet is saved as user_token.js:

Note
The preceding two JavaScript files, app_token.js and user_token.js, in which we have defined a custom token, need to be saved in the static folder of respective app directory. In our example, we have saved the files in the static folder of the app directory, that is: $SPLUNK_HOMEetcappssearchappserverstatic.
Now the custom tokens are set and can be used in the XML source code of the dashboard, like any other tokens. The important point here will be to include the app_token.js and user_token.js in the dashboard panel by specifying it in the XML, code as follows:
<dashboard script="app_token.js, user_token.js">
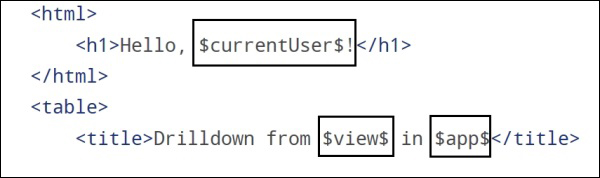
The following is the code snippet to get/use the custom tokens on the Splunk dashboard panels. Thus, we can use custom tokens to get the required information on the dashboard, using JavaScript:
Apart from custom tokens, Splunk provides functionality to set multiple tokens within form inputs to derive multiple searches for better, user-interactive, and informative dashboards. The following are the use cases of multitoken setters:
- It can be used to set tokens for both label and value, which can be used throughout the dashboard and its panels
- It can be used to create an empty/null option that includes a unique token transformation
- It can be used to unset other tokens from the page on selection of a given form input
- A time range picker input can be created to set unique earliest and latest token values
- It can set multiple tokens based on search results and specified conditions