- Create a new project of type Integration Services Project called Packt.Xrm.SSIS:

- Rename the default dtsx file to LoadingAccounts.dtsx.
- Add a data flow task and rename it to Loading Accounts to Dynamics 365.
- Right-click on the Connection Manager window (usually at the bottom) and select New Connection followed by Flat File.
- Enter the following details in Flat File Connection Manager Editor:
- Connection manager name: Account CSV
- File name: <The location of your accounts file>
- Click on OK
- Right-click on the Connection Manager window again and select New Connection followed by Flat File.
- Enter the following details in Flat File Connection Manager Editor:
- Connection manager name: Failure CSV
- File name: <The location of your failure file>
- Click on OK
- Right-click on the Connection Manager window one last time and select New Connection followed by DynamicsCRM:

- Enter your Dynamics 365 details in CRM Connection Manager Editor. As an example, take a look at the following:
- Authentication Type: Online Federation
- CRM Discovery Server: https://disco.crm.dynamics.com
- Your username and password in the Authentication area
- Organization: The organization you are targeting
- Click on OK
- Right-click on the newly created connection manager and rename it to Dynamics 365.
- Back in your dtsx designer, double-click on Loading Accounts to Dynamics 365 task.
- From your SSIS Toolbox (usually the window on the left-hand side) under Other Sources, drag and drop Flat File Source onto your designer.
- Double-click on Flat File Source and ensure the flat connection manager is Account CSV. Click OK when the dialog appears.
- Right-click on the Flat File Source step and rename it to Account CSV Source.
- From the SSIS Toolbox under Common, drag and drop Dynamics CRM Destination into your designer.
- Right-click and rename it to Dynamics 365 Account Destination.
- Link Account CSV Source normal flow (blue line) to the newly renamed Dynamics 365 Account Destination.
- Double-click on Dynamics 365 Account Destination.
- In CRM Destination Editor, enter the following details:
- CRM Connection Manager: Dynamics 365
- Action: Upsert
- Destination Entity: account
- Upsert/Update Matching Criteria: Manually Specify
- Handling of Multiple Matches: Raise an Error
- In the columns tab, from the left-hand side map, enter the fields as follows:
- Account Name | name (also select the primary key column)
- Phone | telephone1
- In the Error Handling tab, on the left-hand side, select the Redirect rows to error output option.
- Click on OK.
- Under Other Destinations, drag and drop a Flat File Destination task from your toolbox and rename it to CSV Error Destination.
- Wire the error flow (red line) from Dynamics 365 Account Destination to the newly created task and click on OK after the dialog appears.
- Double-click on the CSV Error Destination task.
- Ensure Failure CSV is selected under Connection Manager and Overwrite data in the file is selected.
- Under the mappings tab, again on the left-hand side, ensure that the fields are mapped correctly. All names should have a matching counterpart.
- Click on OK.
- Click on Start to launch your package.
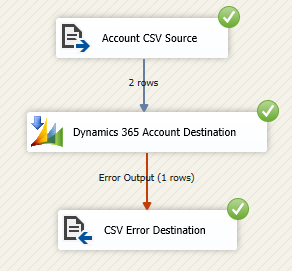
Your final execution will look similar to what is shown in the following figure, with different numbers depending on your records in the CSV file and the records in Dynamics 365: