Scanned images cannot turn out better than the original film which was scanned. Every defect on the film will be recorded by the scanner as an image detail. It can be frustrating to start with an image that appears satisfactory as a 4″ × 6″ print, only to find noticeable image defects when the same image is viewed on the monitor. One must check whether such defects are caused by the scan or originate from the film. Quite often a poor original is to blame. If an image is scanned at 4000 dpi and viewed at full size, even the smallest defects become visible. The film should be checked with a good loupe. In many cases the film is fine, but the scanner is poorly focused. Even the best scanning method cannot compensate for a blurry original on film.
Contents
| Handling Film |
| Film Types |
Curled or wavy filmstrips are a problem that is commonly encountered when scanning. A good scan requires a flat original. High-end film scanners have a very shallow depth of field – a curvature of just 1 mm can cause a blurry scan. Some film holders manage to minimize this curvature, but they are generally clumsy. Whenever possible, it is best to start with flat film stock.
Note
Always handle your slides and negatives with care. You cannot fully compensate for defects in the scanning process.
Various factors determine the flatness of films. Non-curling layers in the film base can reduce excessive curvature of the material. However, a certain amount of curvature is required, allowing the film to stay in good contact with the film pressure plate inside the camera, and to avoid arching toward the shutter. Unfortunately, there is no binding standard for this concave curvature; manufacturers use their own guidelines.
Film processing and storage methods can also have a major influence on film flatness. Mistakes made in processing and storage can cause trouble later. For that reason, it does make a difference whether films are developed by a professional lab or by a discount processing service. If the film does not get dried according to instructions for that particular type of film, it will curl more strongly.
Though standard processes are used for all common color films, the results of processing can still vary greatly. The key processing factors for each lab are in how well they manage their quality control and how closely they follow the film manufacturers’ processing guidelines. Ideally, the result of high-quality processing is that the film is flat after processing and can be scanned without difficulty.
How to Deal with Curled Film
There are limits as to how much film curvature can be corrected. The film base tends to return to its original shape by virtue of a memory effect. The simplest method to correct curvature is to store the negatives pressed between book pages. (Note: If this method is used, the negatives should be kept in their protective sleeves to avoid direct contact with the book’s ink.) Also, a press could be used for storage. If the film is badly warped, it may help if the film is washed and dried once more. Unfortunately, there is no guarantee that any of these methods will truly keep the film flat.
Apart from lab processing, film storage is also a key factor in dealing with film curling. Storing films rolled up in a film canister may make it difficult for them to ever be flat enough for scanning. Often a flat filmstrip is fed into the scanner’s film gate only to reemerge curved and curled lengthwise, like a pig’s tail. This is most likely related to mechanical stress during the motorized film advance.

Whatever the reason, labs do not always deliver flat film stock. Typically, a mechanical fix is required to produce flat film. The best solution is to use slide mounts with a tensioning feature, such as the mounts available from Wess. These keep the film flat even when the negatives are very badly curved. However, to use slide mounts, the negative strip must be cut; once this is done, the negative can no longer be processed at most large labs (for example, when ordering reprints).
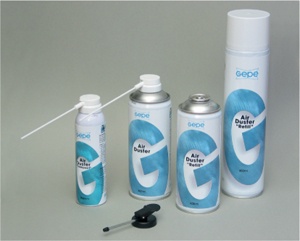
Before scanning, all dust and dirt particles should be removed from the film. The dirtier the original, the worse the resulting scan. The better the scanner, the more clearly even minute contaminations will be recorded. Although these can be removed to a certain degree with Digital ICE or FARE, it is better to first clean the film properly. If a large speck of dust obstructs a part of the image on the film, then even the best algorithm cannot adequately reconstruct the image. When cleaning with a normal cloth, there is a danger of statically charging the filmstrip. This has the undesirable effect of attracting even more dust to the strip. It is best to clean filmstrips with an aerosol dust remover or a blower. Avoid using air from a compressor, since the air may contain traces of oil. Blowing away the dust with your mouth is also not advised, since breath contains too much moisture, which can lead to Newton rings in the scan.
If the film is statically charged, even cleaning with an aerosol dust remover will not be very successful as the film will attract new dust particles from the surroundings; having just cleaned the film makes almost no difference. If negatives are kept in plastic sleeves, they should not be pulled out of the sleeves quickly. Pulling them out quickly generates a static charge and causes more dust to gather on the film surface.
When film is inserted into the scanner, it is important that the film be oriented correctly. Film has two different sides. The emulsion side contains the image information. The emulsion is a thin layer deposited onto a high-gloss film base. It is the emulsion side which must be scanned for best results. Of course, film is transparent – if it is scanned the wrong way, there will be only a minor loss in quality.
You can identify the emulsion side of film by holding the film at a steep angle against a strong light. The film base is glossy and smooth, but the emulsion side shows relief lines from the image details. Slides have very visible relief lines. For negatives, however, it is not so obvious; the less glossy side is the emulsion side. Every filmstrip also features frame numbers which can help you determine the emulsion side: if the numbers are mirrored, then the emulsion side is facing you. (Note: for best scanning results, the scanner should read the emulsion side.)
It is very important that film be handled and stored with proper care. Slides are easy to handle as they can be grabbed by the wide frame of the mount. Negatives are more delicate and difficult to handle. Avoid touching negatives with your bare hands. Fingerprints damage the film surface and are tough to remove from scanned image files afterward. It is better to remove fingerprints beforehand with film cleaners such as Tetenal and Hama. You can also safely handle negatives with thin cotton gloves, or use tweezers with slanted tips to remove the strips from their archival sleeves without damaging them. These tweezers are relatively inexpensive and can be found in shops catering to stamp collectors. It is recommended that negatives be stored in either glassine (matte) sleeves or archival-quality clear sleeves. Be sure to keep your film archive free of light, dust, humidity, and heat.
Note
Both negative and slide film are delicate and subject to damage due to dust and scratches. If you want to avoid loss of picture information, you have to store your filmstrips carefully.
After a successful scan, the original file is no longer needed; yet, it is a good idea to keep your slides and negatives on hand. Future generations of scanners may produce better results than currently available scanners; and in case of data loss, as a last resort, you can always go back to the original film and rescan your images. Data formats and storage media are constantly changing and must be converted on a regular basis to stay compatible with current systems. In the case of 35mm film, the situation is somewhat better; even negatives as old as 50 years can be used for printing or scanning without problems.
It can make sense to rescan certain images. Results of scanning depend, among other things, on the skill of the user. That is, if you gain more experience and rescan an original at a later date, you may get a better quality image. The best recommendation, therefore, is to never discard your analog originals (although it does make sense to sort out and discard any bad shots to reduce your archive).