Note
Scanhancer can effectively subdue the harshness of an LED scanner lamp, which is especially useful when scanning black-and-white originals. Most scan software, however, is not geared to deal with Scanhancer, and using it often results in unwanted color shifts.
Originally Erik de Goederen developed the Scanhancer for the Minolta DiMAGE Scan Multi PRO. It is available at www.scanhancer.com and consists of a small polymer plate that is placed between the scanner lamp and the film. The idea behind the Scanhancer is to diffuse the scanner’s light source, which de-emphasizes film scratches and also makes film grain appear more subdued. I have tested the Scanhancer on a Nikon Super Coolscan 5000 ED with slide mount adapter MA-21. My test results apply only conditionally to other scanner models. While the 5000 ED works fine with the Scanhancer, problems have been reported frequently with older models such as the 4000 ED. The Scanhancer was optimized for the DiMAGE Scan Multi PRO, which is still based on cold cathode fluorescent lamps. The image samples on the Scanhancer website were scanned using this scanner.
The above picture shows that the polymer plate was shortened for the MA-21. This enables calibration; otherwise it would cause error messages. Calibration does not happen directly through the Scanhancer but must be done separately. Also, after the conversion, the scanner no longer automatically detects when a slide is inserted. This automatic function, which starts a prescan after a slide is inserted, no longer works. Scanning times become noticeably longer with the Scanhancer, but in return scanning can be done without the processor-intensive GEM.
When starting the software with the Scanhancer, an error message pops up. However, just click to remove the error message and the scanner will continue to work. These are the unavoidable side effects experienced when modifying the scanner’s hardware. For Nikon, the Scanhancer is not installed in the scanner body but in the slide mount adapter. Therefore, it is convenient to get a second MA-21 adapter for a quick change between scans with and without a diffuser.
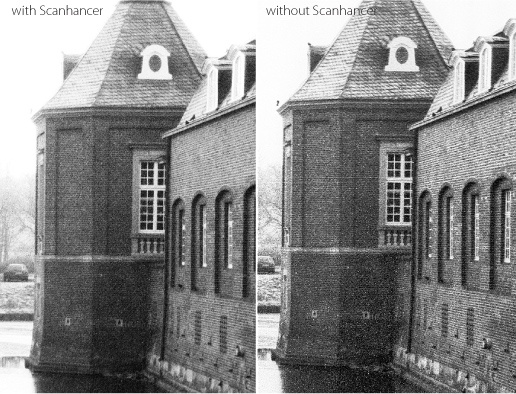
A common complaint about scanning black and white negatives, especially on standard Nikon scanners, is that the results are less than ideal. The harsh LED light points out every little scratch or dust particle. If you want to fix this, you have to spend a remarkable amount of time with Photoshop after the scan, but who wants to post-process every picture after the scan for an hour or more? So, I was curious to see whether using a Scanhancer would improve this obvious weakness of the LED technology. In my test, removal of scratches and dust particles worked properly after installing the scanhancer. However, as with all good things in life, there is a catch - there is a visible loss of contrast and fine details. Unprocessed black-and-white images not using the Scanhancer seem more contrasty and sharper. This becomes very obvious when comparing enlarged details. You must decide whether this is worth the time you save in post-processing.
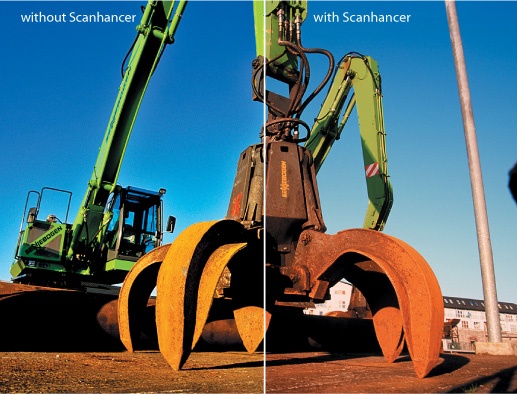
With color slides, scratches and dust are not a big problem thanks to ICE, even though ICE does affect sharpness in a way. But there is also the dreaded pepper-grain effect, which can somewhat spoil the fun of scanning. When enlarging tight crops, quite often slide film looks like somebody sprinkled ground pepper over it. The film grain causes the little black dots, which are especially distracting in skin and sky areas. With a grain reduction filter such as GEM, this effect can be mostly eliminated. Depending on the amount of GEM correction, the image can get the plasticky look of digital photos, which can look quite strange. You have to decide whether this appeals to you; a finer representation of the grain would be better. This is where the Scanhancer is supposed to help. It does help, but not exactly as planned.

In the scanning program’s preview window you can already see dramatically different colors. The colors become more muted and the image becomes generally darker with a noticeable color cast. The grain texture, however, is actually improved. It looks better than a standard scan. The Scanhancer suppresses many scratches and specs of dust, but at the expense of resolution and contrast. The image samples show slide film with relatively large grain. Do not expect any miracles from the Scanhancer, but it does do an acceptable job of smoothing the grain texture. With fine-grain films like Fuji Velvia, the Scanhancer smoothes the grain perfectly, but it alters the colors so badly that I chose to quit using the Scanhancer for color slides. Films with less saturated colors produce better results. But anyway: Color reproduction of a Nikon Coolscan 5000 is distorted by the Scanhancer, there is no doubt about it. As Scanhancer was developed originally for Minolta scanners, this may be an explanation for the reported symptoms.
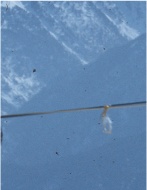
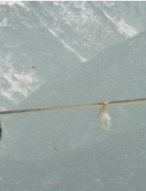
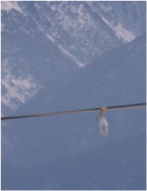
Similar to normal color slides, Kodachrome slides will also exhibit a color cast with the Scanhancer. However, since Kodachrome slides have less vibrant colors than Fuji Velvia, the effect is not as bad. The color cast can be removed later in Photoshop. The Coolscan 5000 ED scanner has no ICE function specifically geared for Kodachrome. The only scanner with this function is the rather expensive 9000 ED. With the 5000 ED you can apply ICE to Kodachrome, but it removes image details that should actually be kept. In the sample image, you can see a cord that has been mostly shredded by ICE. This will not happen when using the Scanhancer. The conventional ICE (not optimized for Kodachrome) in combination with the Scanhancer can be recommended unconditionally. The scratch and dust removal through ICE no longer comes at the expense of details.
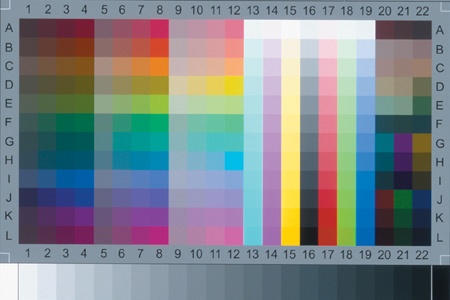
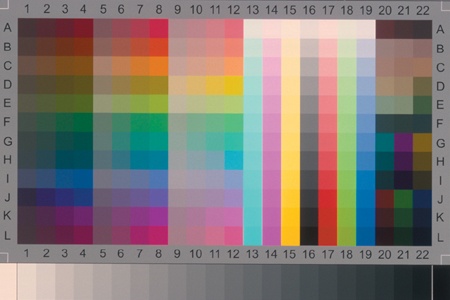
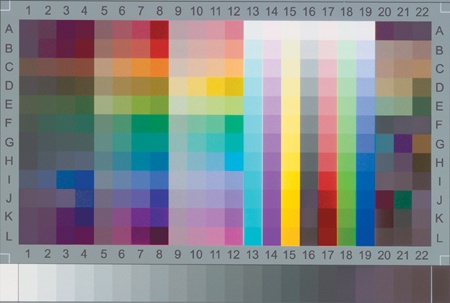
As already mentioned, the use of a Scanhancer causes a different color representation. It would therefore make sense to calibrate the scanner to compensate for this effect. This requires scanning software that supports IT8 scanner profiles. The images in the example have been scanned with a Nikon Coolscan IV and SilverFast Ai scanning software. Without correction, the Scanhancer cannot be used for color film. Most colors will be significantly off and the scan will have only experimental value, so this is not a practical solution for productive use. Theoretically, calibration should rectify this, since the calibration process compares a test chart to a reference file. However, you can see from the images below that only the basic color cast will be eliminated. The color characteristic modified by the Scanhancer still differs from the reference scan. As can be seen from the individual color patches, tampering with the scanner hardware cannot simply be rectified with calibration. For certain color tones, there will still be deviations. Consequently, this solution is currently not recommended for color material. This is true at least for the Nikon scanners I tested; other scanners may be different.
The final verdict on the Scanhancer is mixed: It can be effective when scanning black-and-white negatives, albeit with a slight reduction in contrast and sharpness. The disadvantages, however, outweigh the advantages when it comes to scanning color negatives and slides. The potential advantages cannot compensate for its often inaccurate color reproduction. The Scanhancer principle is still convincing, but there has to be more adaption for specific scanner types before this solution is ready for the end-user market.