For some time now, the digital revolution has included photography; the presence of conventional cameras in photo shops is dwindling. Unjustly so, because photographers who want to continue to work with film can also enjoy all the advantages of digital image processing by using a high-quality scanner. Owners of an archive of slides or negatives can also benefit from digitizing their existing collection. Despite the omnipresence of digital photography, there are still good reasons to shoot on film. This chapter will compare the various working methods.
Contents
| Analog and Digital Workflows |
| Alternatives to the Film Scanner |
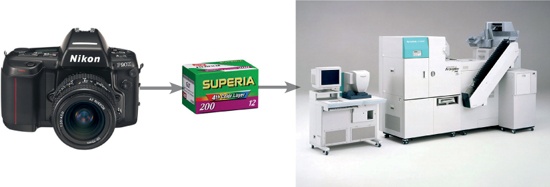
Over years, or even decades, many photographers accumulate boxes filled with countless negatives (although more professional storage containers are available, too). The classic workflow for negative film is as follows:
Exposure – although this is not as critical as with slide film
Developing and printing
Proper archiving
However, there are some drawbacks to working with negative film:
Negatives age and fade over time
Negatives scratch easily
Each trip to the lab causes new scratches, and wear and tear on the negatives
It can be difficult to locate a particular image within a large archive
Customized image processing is possible only in one’s own darkroom
The lab work is crucial to the final result. But many photographers neither do their own processing nor do they deal with professional labs. Therefore, it is questionable whether the printed image meets their expectations. Even if the lab does a good job, there is still some latitude for variations.
The default settings of one-hour labs are generally suitable for typical snapshots from a holiday on the beach. It is a different story for photos taken in nonstandard lighting conditions. High-key, low-key, or sunset pictures often do not work well with the lab’s default settings. Standard lab settings are adjusted for an average gray value, which can ruin the intended mood and render the prints unusable. Even when reordering a print from the same photo lab, the result is rarely identical to an earlier print. Only in a custom darkroom can all the parameters be controlled to create the desired image. To make a long story short, only with a personal darkroom can one benefit from all advantages of negative film.

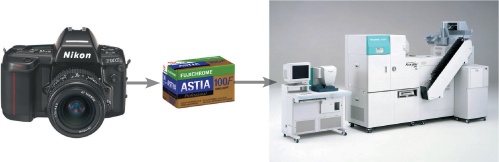
The typical workflow for slide film differs from negative film in a few important points. It looks roughly like this:
Accurate exposure is necessary; slide film is not forgiving
Filmstrips are cut and framed
The framed slides are filled into slide trays
The images can now be projected or viewed on a light tablet
This conventional practice has disadvantages:
Slides age and fade
Slides get scratches, although they are less delicate than negatives
For frequent slide shows, duplicates are needed because slides fade easily in the intense light of the projector; this is especially a concern for Kodachrome slides
It is time-consuming to find a particular slide in a large collection
Rearranging a slide show takes a lot of effort; to run more than one slide show simultaneously, duplicates are needed
It is almost impossible to post-process slides


The biggest problem with slides is that they can hardly be post-processed. Poor exposure or a color cast can only be corrected with great difficulty. On the other hand, an underappreciated advantage is that the lab can do very little wrong during the processing of slides. The result is pretty close to what the camera produced. This tight control over the created image is a significant reason why ambitious photographers prefer slide film to negative film.
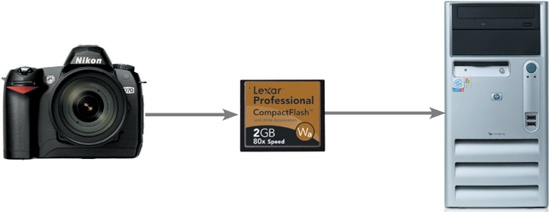
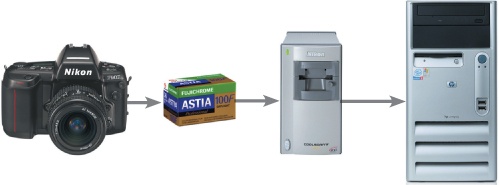
In recent years computer technology has advanced dramatically. Today, a standard PC actually delivers what the computer manufacturers promised more than 10 years ago: high-quality digital image processing. For those who still shoot on film, the question remains how to best get the slides and negatives into the computer.
A standard PC and a film scanner are all the hardware needed to achieve this, and the investment is manageable. The key to good quality scans is in the skill of the user. Satisfying results can only be achieved with extensive study of the matter.
Of course a quick scan is possible, but the results generally will be of poor quality. Photographers who spend a lot of effort to take quality pictures with film cameras will be unable to avoid familiarizing themselves with the subject of scanning. Only then will they be able to transfer the quality of their film-based images to the digital world.
Just like the skill of taking pictures, the skill of scanning film needs to be acquired first, in order to get good results. Sufficient time for acquiring this skill should be allowed.
This mixed workflow – shooting analog, scanning, digital processing – is also called hybrid photography. It offers all the advantages of digital image processing:
Digital Negatives don’t age, scratch, or fade
A well-maintained image database can retrieve images in a matter of seconds
Digital images are easy to edit
Digital images are easily turned into slide shows or galleries
Digital images are easily sent over the Internet
Digital images don’t need to be touched up by the photo lab; the photographer has almost full control over the final image
It is possible to make lossless backup copies of the images
However, there are a few disadvantages:
Scanning is time-consuming and fairly complex
The image information of the film cannot be read without loss; unavoidably, there are losses in the transfer from analog to digital
Scratches, dust, and other blemishes cannot always be removed from the film automatically during the scan (post-processing is a solution here)
Not all types of film are equally suitable for scanning
To sum up, there are many good reasons for digitizing your film material, so don’t put it off much longer. The latest high-grade film scanners do a fine job of extracting the image information from the film material. Unlike with an analog workflow, all relevant parameters for image quality can be defined on the computer. When ordering prints from a lab, using digital images leads to significantly better results than working from negatives. In addition, there are no more annoying scratches and fingerprints, which usually further damages the negative with every trip to the lab.
In the early days of digital photography, when digicams were as expensive as picture quality was poor, there were many photo enthusiasts who propagated hybrid photography as the best solution for quality-conscious people. Since then, however, much has happened in the world of photography and there are only a few who still shoot pictures on old-fashioned film. We are living in a fast world, and nobody has the time to scan filmrolls all evening. Due to this, everybody has a digital camera and hybrid photography is only important for archiving purposes.
Purely digital workflow requires that images be generated and processed digitally. Technically this is desirable because it eliminates the potentially degrading analog to digital conversion between image and image file. However, for practical photography, there are a few limitations:
There is still no common standard for a “digital negative”
Existing equipment for analog SLR camera systems can only be used with certain restrictions
High-resolution digital cameras with a full format sensor are significantly more expensive than analog cameras, although prices keep dropping (in addition, there are fewer analog cameras available)
Still, the advantages are undeniable and have led to the unstoppable success of digital photography:
Digital images can be edited directly on the computer
Subsequent quality-degrading steps of Analog/Digital (A/D) conversions of the picture are eliminated
No more burning film – memory cards are much less expensive in the long run
The picture can be checked immediately after it has been taken – good cameras have a built-in histogram display for checking the exposure
An often-underappreciated benefit of the hybrid workflow over the digital workflow is having a tangible piece of film. In addition to the digital image file, there is always the analog backup. As long as there is no cross-platform standard for file formats and storage media, this is a major advantage over the purely digital workflow. With technology constantly progressing, digital images must be periodically transferred onto different backup media. Neglecting this step can cause the data to become unreadable or completely lost. As an example, in the early nineties home computers had floppy disks, then came CD-ROMs, and now we have DVDs, external hard disks, and USB (Universal Serial Bus) thumb drives. A current computer system can no longer read the types of media that were common in the mid-eighties.
Analog images must merely be stored dry and free of dust; no other measures are needed. However, if you store both a slide tray and a DVD with image files in the attic and 30 years later someone finds them, the chances are low that the image files on the DVD can still be used – provided that the DVD can still be read at all. The slides, on the other hand, will be slightly faded, but with recognizable images.
The digital photography boom has raised the level of image quality and availability to a level unimaginable to most amateurs in the old, analog photography world. The price for this ease of use is often paid with flawed or faulty data storage, and there is still no digital storage method that is as robust as conventional camera film. In 2008, for example, lost pictures taken over 70 years ago by the legendary Magnum photographer Robert Capa turned up largely unharmed after decades of storage in a suitcase. Digital images would certainly not have been able to survive that long without being professionally archived. There are services that offer to expose your digital pictures on slide film for archiving purposes. But to be completely on the safe side, neither analog nor digital photography is useful anyway. For maximum durability, you should do as in Egypt: carve your information in a solid piece of stone and bury this in a protected place in your garden.