Scanning film is normally done at the maximum optical resolution of the scanner. Even a scanner with 2900 dpi can produce 4100 × 2700 pixels from a 35mm negative. At 48 MB, the resulting file in NEF format is rather unwieldy and too large for many uses, such as sending it by email. The resolution should not be changed in the scan file (your digital negative), but for certain purposes it is unavoidable to have copies with lower resolutions.
For printing, the image resolution is expressed in dpi. A resolution of 100 dpi means that 1 inch of paper width will depict 100 picture elements. This is a relative resolution, since the number of pixels relates to the physical print size. It can be changed at will without quality loss (just make sure to uncheck the option “Resample Image” in Photoshop, which by default is on). More important is the absolute resolution, which is expressed in pixels. For instance, reducing the absolute resolution will result in loss of detail and should never be done in the digital negative.
The absolute resolution of a desktop wallpaper might be 1024 × 768 pixels. From the absolute resolution and the relative resolution, the output size in inches can be calculated. Most viewers and editors calculate this automatically for you. In Adobe Photoshop, you can define each parameter separately, and the program will adjust the other parameters accordingly.
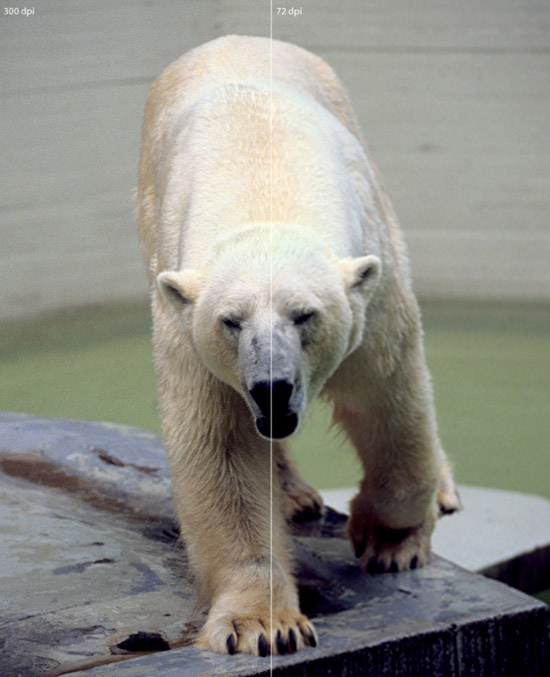
The output size of an image depends on the resolution of the output device. In our case the output devices are monitors, home printers, or the photo lab printer. To stay with the example of desktop wallpaper: if you display it on a 17″ and a 19″ LCD monitor, and both are set to a resolution of 1024 × 768, then you’ll get one image displayed with a 17″ diagonal and the other with a 19″ diagonal. As we can see, the output size depends on the output device, or rather on its relative resolution. Depending on the chosen output device, the image requires different minimum relative resolutions in order to look sharp. Magazines, books, and prints from the lab use a print resolution of 300 dpi; inkjet printers use 200–300 dpi. Considerably lower values result in soft images.
Note
35mm film is not suitable for poster-size scans If you have a 4000 spi scanner, you can, theoretically, use a 35mm negative to produce a file suitable for a 300 dpi 12″ x 18″ print. You should, however, not expect dazzling results. The extreme magnification will show any flaws in the original in extreme detail, and the scanner’s own analog-digital conversion process will also increase image quality loss. 35mm originals are best for producing 4″ x 6″ or 5″ x 7″ prints. Medium or large format originals are better for producing genuine poster-sized results.
What’s the Ideal Resolution for Printing?
Let’s say you want to make a 5″ x 7″ print at 300 dpi. What image size in pixels do you need for the image file? Simply multiply the size in inches by the print resolution in dpi, and you will get 1500 × 2100 pixels. (Note that 300 dpi is the best relative resolution for printing with HP and Canon; for Epson it is 360 dpi.)
Once you have bought a scanner, you’ll want to make prints from the image files either with your own printer or with the help of a service provider. You’ll want to know how far you can push the quality of your scanner. The size of the scanned file (in pixels) depends on its optical resolution (in spi, or as is more commonly used, in dpi).
From that you can calculate the maximum print size in inches. It is no problem technically to down-sample a large file, but it is not possible the other way around. If you have a 4000 dpi scan and scale it to 8000 dpi afterwards, you will not produce more picture information than was in the original scan. The only effect is that you waste a remarkable amount of storage space, as the 8000 dpi file is twice as large as the 4000 dpi file. Therefore, scanning is the key process that determines the quality of the image that can be achieved.
Always keep in mind, that the bottleneck in scanning resolution is in most cases the quality of the slide and not the ability of the scanner!
You can calculate the maximum print size quite easily yourself as shown in the following three steps.
First, consider the negative size. The bigger it is, the better. The nominal negative size of 24mm ×36mm is often a little smaller than 24mm × 36mm. For a Nikon F801s it is 35.95mm × 23.61mm. But it depends on the lens as well. To be on the safe side, the negative needs to be cropped a little to avoid black borders, since the scan preview is not completely accurate. Let’s say we have now only 35.7mm × 23mm for scanning, which is 1.4055″ × 0.9055″ (1″ = 25.4mm).
Next, take the optical resolution of a Coolscan IV with 2900 dpi and multiply this by the cropped film size: this gives an image size of 4075 × 2627 pixels.
To get the final print size, divide this image size by the print resolution of 300 dpi. 300 dpi has become the established print resolution standard for magazines and labs, so what is sufficient for this purpose should be sufficient for you as well. This gives a print size of 13½″ × 8¾″.
Crops Need High-Resolution Scanners
With a 4,000 dpi scanner you can print as large as 12.6″ × 18.9″ at 300 dpi. A 5400 dpi scanner lets you print up to 17″ × 25.5″ at 300 dpi. In practical use, an upgrade from a 2900 dpi film scanner to a 4000 dpi film scanner makes a big difference for large size printing – provided the scanners are otherwise comparable and the film stock is of very good quality. Much higher resolutions, such as 7200 dpi, make no sense since the film material cannot match that resolution.
Here is a very simple trick to improve image quality: set the scan resolution to the optical resolution, e.g., 4000 dpi, and the scale to 50 percent (= 2000 dpi). This effect cannot be reproduced afterwards in an image editor; it has to be done during scanning. It is due to the effect that scanning in full resolution produces more noise, than scanning with a lower resolution. If you just scale down the scan afterwards, the noise is still there; at least in subjective matter, it gets even more visible through scaling. The best practice is to scan the slide at the same resolution you want to use later. If you scan primarily for archiving purposes, 2000 dpi is a good compromise.
Resolution of Scanned Image (24 × 36 mm) | |||||
|---|---|---|---|---|---|
Scanner Resolution | Scanned Image | Print Resolution | Print Size | Standard Lab Print | |
Size in Pixels | Equivalent Megapixel of Digicam | ||||
1700 spi | 1 606 × 2 409 | 3.9 MP | 300 dpi | 5.35″ × 8″ | 5″ × 7″ |
150 dpi | 10.7″ × 16″ | ||||
1800 spi | 1 701 × 2 551 | 4.3 MP | 300 dpi | 5.67″ × 8.5″ | 5″ × 7″ |
150 dpi | 11.34″ × 17″ | ||||
2900 spi | 2 740 × 4 110 | 11.3 MP | 300 dpi | 9.13″ × 13.7″ | |
150 dpi | 18.26″ × 27.4″ | ||||
3200 spi | 3 024 × 4 535 | 13.7 MP | 300 dpi | 10.08″ × 15.12″ | |
150 dpi | 20.16″ × 30.24″ | 20″ × 30″ | |||
3600 spi | 3 402 × 5 102 | 17.4 MP | 300 dpi | 11.34″ × 17″ | |
150 dpi | 22.68″ × 34″ | 20″ × 36″ | |||
4000 spi | 3 780 × 5 669 | 21.4 MP | 300 dpi | 12.6″ × 18.9″ | 16″ × 20″ |
150 dpi | 25.2″ × 37.8″ | 20″ × 36″ | |||
5400 spi | 5 102 × 7 654 | 39.1 MP | 300 dpi | 17″ × 25.5″ | 18″ × 24″ |
150 dpi | 34″ × 51″ | ||||
7200 spi | 6 803 × 1 0 205 | 69.4 MP | 300 dpi | 22.68″ × 34″ | 24″ × 36″ |
150 dpi | 45.35″ × 68″ | ||||