Scanning filmstrips with a film scanner is time-consuming and has a steep learning curve. Because not everybody has the time, knowledge, or hardware needed, let’s discuss the possible alternatives.
Quite often, only the nominal resolution is considered when comparing DSLR, film scanner, and 35mm film. According to this criterion alone, analog cameras would come out on top. However, it is not that simple. For a DSLR, the sensor and the lens determine the resolution of the final image. This limiting factor is always the weakest link in the camera-lens combination: if you mount an inferior lens on an excellent DSLR, the sensor cannot utilize its maximum resolution.
Only high-grade lenses have enough quality reserves for a good DSLR. The resolution of current 35mm DSLRs is between 6 and 16 MP. Lens aberrations are very noticeable with DSLRs. Unlike an image from an analog camera, the digital image is usually examined at maximum size on the computer monitor. To notice such aberrations on a 35mm slide, it would take a high-power loupe. Scanning film is a more complex issue. Here the image is generated in two steps: first, the subject is shot on 35mm film, and then this image is scanned. Therefore, we have to look not only at the quality of the material to be scanned, but also at whether the scanner is capable of capturing the image adequately. For the resolution of the film – let’s say 35mm film – the combination of film and lens is crucial. A high-quality, fine-grain 35mm film has a resolution corresponding to 40–60 MP. Standard film has a substantially lower resolution, which corresponds to around 20–30 MP; but even that resolution can be achieved only with high-quality lenses. Simple lenses achieve a resolution of approximately 10 MP; only high-grade lenses will surpass 20 MP. The popular amateur zoom lenses are typically inferior to the optical performance of comparable prime lenses. More than likely, the majority of amateur pictures have a resolution of less than 20 MP.
Note
The nominal resolution of a scanner is often the single most important purchase criterion for the layman. For this reason, manufacturers (especially those of lower quality scanners) tend to advertise their products using improbably high resolutions. Plustek, for example, advertises resolutions of up to 7200 dpi which are rarely actually achieved. Furthermore, a resolution of more than 4000 dpi is not actually necessary for most practical purposes. Artificially high resolutions also lead to unnecessary use of additional storage resources.
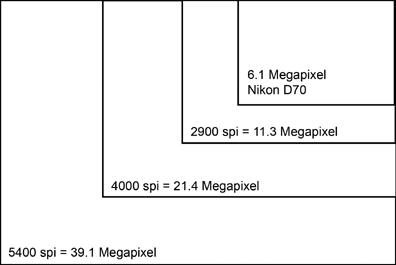
The effective resolution of a film scanner is potentially a bottleneck that can limit the resolution of the image. Currently most high-quality film scanners have a resolution of 4000 dots per inch (DPI or dpi), which corresponds to around 20 MP. If you choose a film scanner that not only promises this resolution on paper, but can also scan it optically, then loss in image resolution will not be noticed.
There are already 35mm film scanners with 7200 dpi, which corresponds to a resolution of 70 MP. To fully utilize this dpi, the slide or negative has to be of excellent quality, which means a fine-grain film exposed with a very sharp lens. The same is true for the scanner. It not only has to have a high-resolution sensor but also excellent optics.
I am not aware of any current desktop film scanner that in actual use resolves more than 4000 dpi. For most source material, a resolution of 2900 dpi would be sufficient. Also, keep in mind that file sizes get very large with increasing resolution, especially with medium and large format scans. With file sizes of over 200 megabytes (MB), image processing will be very difficult on a regular home PC. When choosing the suitable scan resolution, the entire workflow has to be considered.
Meanwhile, professional DSLRs have approached the nominal resolution of far less expensive analog cameras. For example, the Canon EOS 1Ds Mark II is fitted with a full-frame sensor which has a nominal resolution of 16.7 MP. According to the tests in www.dpreview.com, the actual resolution is only 2800 lines horizontally and 2400 lines vertically. Thus, the high nominal resolution translates into an actual, measured resolution of only 6.7 MP. A similar ratio between nominal and measured resolution applies to all models of digital cameras.
When comparing image quality between scanned analog images and digital images, it is not sufficient to only consider nominal resolutions. The degree of quality loss that occurs during film scanning depends on various factors such as scan density and film flatness. But keep in mind that there is always a loss when converting analog to digital. Due to this, even a 6 MP DSLR is superior to a 4000 dpi (20 MP) scan in most cases, despite the nominally lower resolution.
Some years ago there was an ongoing battle among photographers as to whether analog or digital cameras would be the best choice for superior quality. According to current sales figures, this battle has been won by digital cameras, but the technology still has some limitations.
Digital cameras are without discussion the best for product shots and other technical pictures. For portraits, it is a complete different story. On the one hand, the skin tones of the digital image are rarely as expected; on the other hand, the faithful and accurate digital reproduction is not always flattering to the subject, since even the slightest skin imperfection will be precisely recorded. Therefore, in the area of portrait photography, many professionals still prefer film for its very particular, slightly grainy appearance.
The other weak point of digital photography is the always touchy subject of data backup. In the hybrid workflow, there is always the original filmstrip to go back to, but with digital photography all will be lost should the computer crash one day. It remains to be seen how “future-proof” digital images will be.
A 50-year-old negative can still be processed today without any problem. This may in the future not be the case for all of today’s popular file formats. Image files without backup can be quickly and permanently lost in a computer crash, while slides and negatives have shown more robustness over the last decade.
And last but not least, there is one crucial reason why even the latest digital camera will never be able to replace a scanner. It has no go-back button; you cannot use it for pictures of your own childhood or anything else that happened in the past. Due to this, you will sooner or later need to make use of a scanner. Digital cameras are great, but not of much use when you are digitizing your analog archives.
Flatbed scanners have developed enormously over the last few years. They were originally developed for scanning documents. But, flatbed scanners have achieved a resolution which is unnecessary for scanning documents alone. There are many models with transparency units that allow the scanning of film. At present, this technology remains inferior to specialized film scanners.
However, flatbed scanners are faster than film scanners, an advantage not to be underestimated. Though flatbed scanners advertise resolutions of up to 4800 dpi, tests show that this is incorrect. Flatbed scanners that boast a nominal resolution of 4800 dpi can actually only capture 1700 dpi from a transparency. At that resolution, a 35mm slide can only be enlarged up to 5″ × 7″ at 300 dpi. Also, the color and contrast do not come close to what you can expect from a good quality film scanner. Please compare the scanned files on the DVD accompanying this book.
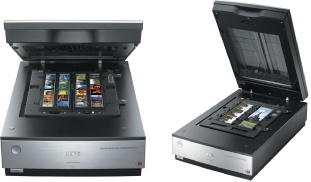
For scanning medium- and large-format film, the maximum resolution is not so critical, since the film size is several times larger than 35mm film. Average flatbed scanners have a glass stage for holding the originals. However, this glass plate reduces the optical performance of the scanner. In a dedicated film scanner, there is no glass between sensor and medium. This is the reason that, for the foreseeable future, conventional desktop flatbed scanners will not match the performance of dedicated film scanners. Epson tried to improve the unsatisfactory performance of flatbed scanners with a new design approach. The Perfection V700 has a separate lens for scanning film. It achieves an effective resolution of 1920 × 1770 dpi and a maximum density (Dmax) of 3.4, which is just below a good film scanner.
Even the best flatbed scanners cannot achieve the quality you can obtain using a specially designed film scanner, but they are more flexible when it comes to the sizes and formats of originals that can be scanned. If you only want to scan negatives and slides, you are better off using a film scanner, whereas flatbed is better if you need to scan varying formats. Ideally, you should have both types for use in different situations.


Occasionally, there are discussions on various forums about first making a print from a negative that is as large as possible, then scanning the print with a flatbed scanner. This method is one possibility – but the quality is noticeably worse than when scanning directly from the negative. Scanning the print is not inexpensive, either. Technically speaking, it is an analog-analog-digital conversion. The film is turned into a print, and then the print is scanned. With each step, some information gets lost, which is seen in the final image file. The additional step of printing causes noticeable quality loss. It is equivalent to playing a song on a record player and then recording it with a microphone from the speakers. Although technically possible, it is not optimal in terms of quality.
Note
You should always keep your original negatives or slides, as they are the only source of the complete original image information, regardless of how good your scan may be. Experience has also shown that analog images often have a longer shelf-life than digitally stored images.
The quality may be acceptable if the image size is reduced by scanning, but this method cannot match the quality of a scan from the original slide or negative. Scanning the original film – if it is still available – is definitely the better solution. If the original slide or negative is still available, it should be scanned directly. Even though it can yield enlargements up to poster size, enlarging scanned prints should be avoid ed. Reductions in size usually yield better results than enlargement; even a 1:1 scan of a print is not ideal.
As can be seen from the following images, fine details get lost when scanning from a print. This is clearly evident in the texture of the leaves. Compared to a scan from a negative, a scan from a print suffers a noticeable loss of information. The print was scanned at 1200 dpi; the negative, at 2900 dpi. Again, the print should be scanned only if the slide or negative is not available.
Another option is to project a slide onto a wall and photograph it using a digital camera. The image will then be digitized. The concept is a good one, though not new; it was already being discussed in the old analog days. The idea is to project two slides on top of each other to create a sandwich slide. This way, one would not have to invest in a dedicated slide duplication attachment. Today, as in the past, the results are rather poor. The images are flat, dark, and soft. The slide loses a large degree of its sharpness when projected onto a wall. Therefore, for good quality digitized slides, this is not a suitable method.
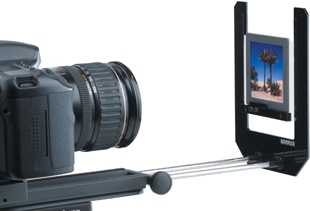
A good DSLR with a macro lens and a slide duplicator can indeed be used to digitize slides. A bellows can also be added. However, the quality of the images resulting from this combination does not match that of using a film scanner. In addition, there is no hardware-based scratch and dust removal available. For now, this is not a real alternative to a film scanner. If you need to digitize slides only occasionally and already have suitable equipment, it is worth a try, especially since a slide copy attachment is relatively inexpensive. Although this technique is still in its infancy, it does have potential. It is blazingly fast. No film scanner comes even close.
The most convenient way to generate files from film is through a Photo CD, because the lab does all the work for you. Photo CDs are offered inexpensively with film processing. Even if you do your own scanning, it can make sense to add a Photo CD to your developing and processing order. For a small charge, you get an overview of the images and can select those images that are worth rescanning at a higher resolution. It saves time, and the image quality is sufficient to let friends and relatives have quick prints made from the images.
A picture CD from Kodak is very inexpensive, but only provides images with a resolution of 1536 × 1024. An entire roll of film adds up to around 25 MB, so a disk can hold 26 rolls. Even though the quality is only good enough for 3R to 4R prints, for this small extra cost you can see whether any images are worth scanning yourself at a higher resolution. Picture CDs are typically offered only when developing negative film. The cost is around $2.50 per roll and about three times that for slides. For more demanding needs, the Photo CD is a good option. It is more expensive than Picture CD and is available for slides and negatives. The image format used is called Image Pac. This format is supported by most image editing software, either directly or through plug-ins. The images are stored at five different resolutions simultaneously, ranging from 128 × 192 to 2048 × 3072 pixels. A Photo CD costs around $5.
Note
Whichever scanning service or lab you decide to use, the quality of the results will depend almost entirely on the quality of the work done by the individual technician. Making good quality scans is time-consuming work, and a large, mass-production lab will rarely produce scans of high enough quality to satisfy serious photographers. If you scan your own images, you can control all of the most critical parameters yourself.
Even third-party service providers can scan images onto Kodak’s Photo CD. They typically charge per scan. The Pro-Photo CD, which costs around $11 per CD, is geared more toward professional use. With its high resolution of 4096 × 6144, it nearly matches the quality of the original. The lab devotes a greater processing effort compared to the Photo CD. However, currently, only around 25 images fit on one Pro-Photo CD.
Kodak Photo CDs are an established standard and can be displayed on most DVD players, which is handy for displaying images on TV without much effort. You can find more information about Kodak Photo CDs at www.kodak.com and www.tedfelix.com/photocd. However, with the continuing spread of digital cameras, it seems inevitable that these Kodak formats will be replaced before long.
Fuji can produce scans from 35mm or Advanced Photo System (APS) negatives in JPEG format. The resolution is 1024 × 1527 pixels with a color depth of 24 bits. The cost per Fujicolor CD is around $2.50. It is a counterpart to the Kodak Picture CD and therefore is also not for the quality-minded.
With all current formats of photo CDs, photos undergo extensive processing. Although you are spared the trouble of processing yourself, you give up control over critical parameters of image capture. Since the possibility of post-processing JPEG images is limited, you have to accept the results you get if you do not want to rescan the images yourself.
For shots in normal lighting, the results from the photo CDs are generally usable; but scanning yourself can yield much more from the originals. The images on the following pages clearly show how much image information gets lost in a standard scan from a chain lab. In the example shown, the lighting wasn’t even difficult.
The scan from the lab is of only moderate quality because the tonal range is clipped. This is especially noticeable in the foliage in the background, which disappears into a featureless blackness. This cannot be rectified, since the compressed JPEG image from the CD doesn’t respond very well to image processing. Also, the possibilities for enlarged crops are limited due to the small resolution (1024 × 1536 pixels).
Only a manual scan will reveal all the unused image information in the original, but it takes a correspondingly long amount of time. Using standard corrections such as setting the black/white/gray points and the analog gain before the scan, and following that with the shadow/highlight filter in Photoshop, can give a much better-looking result.

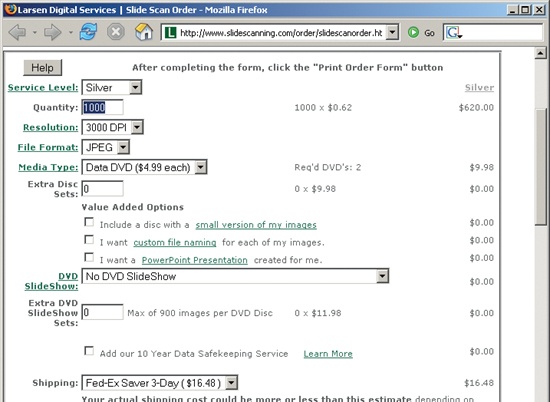
Subsequent scanning of film material for improved quality is time-consuming and bothersome. There are good arguments for using professional services, such as www.slidescanning.com, www.digmypics.com, www.imagerylab.com, and www.gemega.com. These services usually only scan processed film, since they don’t have their own photo labs. Although the cost for a single image may be manageable, if you have a large number of slides or negatives to scan, total costs can add up to a substantial amount. Prices for processing vary markedly, as can the quality of the results. Unlike the CDs offered by photo labs, specialized services support many different resolutions and file formats. Almost anything is possible, but the price increases with the resolution.
The standard file formats TIFF and JPEG are common. High-resolution images in TIFF format are of high quality and are well-suited for postprocessing. RAW formats are not offered very often, since no dominant standard has emerged so far. A scanning service should automatically remove scratch and dust with Image Correction and Enhancement (ICE) or Film Automatic Retouching and Enhancement (FARE). Some companies also offer correction schemes to revive the colors of faded originals.
Note
* Before you hand over large numbers of slides or negatives to a lab for scanning, you should do a “test run” with a few selected images, in order to make sure that scan quality is up to standard. Even if such a test produces good results, it is always prudent to divide your originals into smaller lots, thus minimizing the risk of losing your images at the lab or in the mail.
Scanning services are a good choice if you do not have the time or the inclination to deal with a scanner yourself. This would be the case if you want to completely digitize your old stock and intend to shoot new images digitally. To limit costs, you should sort through your archive beforehand. Many photo enthusiasts have collections of 10,000 or more slides. Only in rare cases would all images be good enough to justify digitizing an entire archive. If only a few hundred originals need scanning, buying a scanner is not cost-effective.