
Digital images, including files from a film scanner, always appear soft in their unprocessed state. Correction filters, such as GEM and ICE, further exaggerate this effect. Unsharp Masking is the best function to sharpen images.
The sharpening occurs by increasing the contrast along edges inside the image. The control parameters for sharpening are Amount, Radius, and Threshold. The goal is to improve perceived sharpness without losing important details and without creating unwanted artifacts, such as halos.
An important factor in sharpening is the resolution of the image. It is rarely useful to sharpen directly during scanning. For example, if the scan goes straight to the printer (i.e., if the digitized image is output in a different resolution from the scan resolution), it is not meaningful to set the “ideal” sharpening parameters during scanning.
In my opinion, Unsharp Masking belongs in post-processing. Even during image processing, Unsharp Masking belongs at the end of the workflow. It is possible with Unsharp Masking to sharpen all color channels together or each color channel individually. Also, simple viewers such as IrfanView provide basic sharpening functions. IrfanView offers only one option for Sharpen, without any adjustable parameters. It is easy to use, but the result is inferior to a sharpening function that can be configured in more detail with Amount, Radius, and Threshold. The USM function in SilverFast is particularly nice: unlike Nikon Scan, the SilverFast USM function uses a preview window for judging the effect of the correction.
The slider Amount defines how much the edge contrast will be increased. Ultimately this increase in contrast creates the impression of greater sharpness.
The slider Radius determines how many adjacent pixels will be involved in edge sharpening process. The bigger the radius, the greater the chance unwanted halos will occur.
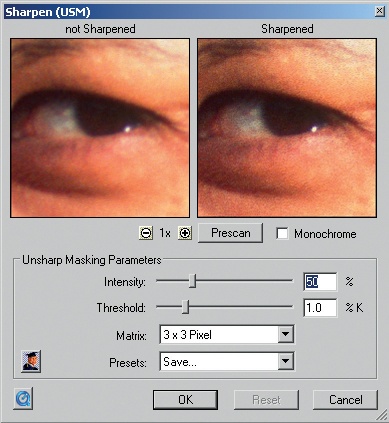
Threshold defines the minimum level difference between adjacent pixels at which a pixel is considered part of an edge and sharpening kicks in. Setting a high threshold can exclude areas with low contrast. A good example is sharpening eyelashes without affecting the texture of the skin around the eyes.
Sharpening in Two Steps
An alternative to sharpening at the end of image processing is using a two-step approach: first, sharpen mildly after the scan, and then perform final sharpening at the end of image processing. With TIFF files, never sharpen on the scan file - use a backup copy instead. Because sharpening is no trivial matter, countless Photoshop plug-ins, such as Nikon Sharpener Pro, are available to make the job easier.