This chapter discusses all the essential parameters for evaluating a film scanner. Apart from the numerically definable aspects such as resolution and dynamic range, the not so easily quantifiable quality of the optics is critical. Because specifications on paper rarely match actual performance, test reports should definitely be read before purchasing a scanner. The DVD for this book contains sample scans from almost all current film scanners. These can be used to compare scanners directly, or for an overview of the different quality levels of the various models. Detailed test reports in different languages can be found on the Internet at www.filmscanner.info.
Contents
| Key Specifications of a Film Scanner |
| Scanhancer |
| Interfaces: Connection Between Scanner and Computer |
| Life After the Purchase |
| Wish List for Future Film Scanners |
The resolution of a film scanner defines its ability to record even the smallest details of the original image scanned. Usually it is defined in pixels per inch (PPI or ppi). Occasionally the units DPI (dots per inch) and SPI (samples per inch) may also be used. Hence, a film scanner with 4000 ppi can resolve 4000 pixels per inch. The higher the resolution of the film scanner, the larger the generated images will be. This is a good thing, because high-resolution images can still be reduced any time. However, the higher the resolution, the larger the image file becomes. A modern 35mm film scanner produces 16-bit TIFF files with more than 110 MB per image. If you scan a few thousand images, storage requirements will grow accordingly. Even if you do not plan to use the maximum resolution for normal scanning, it should still be as high as possible to allow for tight crops.
With a print resolution of 300 dpi, a 4000 spi scan can be printed up to 12″ × 18″. In theory, a 4000 spi scan can be printed with a resolution of 300 dpi at up to 12″ × 18″. In practice, however, most originals are not of high enough quality, and even the smallest flaws can no longer be effectively touched up at such high resolutions. At the end of the day, 2000 spi is sufficient for most scans.
Only the scanner’s actual optical resolution is of interest. Catalogs often state the interpolated resolution, which is considerably higher. Interpolated resolutions are meaningless; the optical resolution of the scanner is only mathematically up-sampled, resulting in artificially inflated image files. Yet, they only contain information that the scanner can physically record with its optical resolution. If you want to print at a larger size, you should use an image editor for up-sampling. For that, you do not need a special scanner. It is not recommended to interpolate the scan data directly in the scanning software. It is better to scan at the scanner’s native resolution, at which it delivers the best image quality.
Hands-on Tip: With Small Formats, Determine Output Size First
If the scanner automatically scales the image, the film grain will often look more pleasing than that produced from a high-resolution scan down-sampled to the desired size in an image editor afterwards. This effect is very pronounced with Nikon scanners.

A scanner’s resolution is specified in PPI, SPI, or DPI. All these terms are units for resolution per inch. Which one to use depends on the field to which it refers.
This unit refers to an image display on a monitor. It describes the number of pixels for every inch of the image on the screen. A pixel is the smallest unit the monitor uses to represent an image.
This unit refers to the number of samples (scanning points) per inch on the original that the scanner can record. A sample is the smallest image spot the scanner can detect.
This unit refers to the resolution of a printer. It defines the number of printed dots per inch the printer can deposit on the print medium. For an inkjet printer, one dot corresponds to its technically smallest possible ink droplet. The printer cannot deposit less than one droplet. Consequently, a high-resolution inkjet printer must be able to generate very small droplets.
Note
PPI, SPI & DPI: Each of these terms is precisely defined, depending on its intended usage. These definitions tend, however, to be loosely or even wrongly applied in daily use. For this reason, you can generally use the term DPI to describe a scanner’s resolution, even though it is not technically correct.
Unfortunately, few people adhere to these textbook definitions. In this book, the terms are used according to common practice. It is only of academic concern whether the resolution of a scanner is quoted in ppi, dpi, or correctly in spi. Even popular image editors commonly confuse the terms. Since resolution is the most prominent feature of a scanner and is crucial to a customer making a purchasing decision, some manufacturers resort to printing unrealistic resolution specifications on their boxes. There are clear standards for measuring resolution, like ISO 16667 certification, but unfortunately certification is not mandatory for the manufacturers. Test reports from independent computer or photo magazines are better for providing information about resolution, since such reports measure advertising specifications against harsh reality.
If a manufacturer promises 3600 dpi, but in reality the scanner only resolves 1800 dpi, you not only get just half the promised resolution; adding insult to injury you also have to suffer large file sizes resulting from a 3600 dpi scan. Plenty of storage space is wasted without getting better pictures. For high-grade film scanners, the difference between advertised and actual resolution is usually small, somewhere in the range of 10 percent. Flatbed scanners with transparency units are a completely different story. With typical resolution reported at around 4800 dpi, on paper they surpass film scanners; but the current crop of flatbed scanners – at the time of this printing – only resolve 1700 dpi in transparency mode. In general, you should not trust resolution promises blindly.
You will need a dedicated USAF-1951 test target to determine the actual resolution of a scanner by yourself. You can order such targets from www.sinepatterns.com or www.appliedimage.com. They come in different sizes; to test a film scanner, you will need a 35mm target. Typically the targets are delivered as unframed transparencies. They can be used with film scanners as well as flatbed scanners with transparency adapters.
After you mount the target in a slide frame, it fits into a film scanner or flatbed scanner without problems. The target contains black bars of different sizes on a clear background. The bars are aligned horizontally and vertically because the scanner can attain different resolutions in horizontal and vertical directions.
Set the scanner to its optical resolution and save in a lossless file format, such as TIFF. Do not apply any image corrections or filters as they would distort the results. This is easier said than done, as some scanners have the unsharp filtering function implemented in the software or even in the hardware. That means you can untick the unsharp masking box in the software GUI, but actually the scanner still sharpens the picture. This effect happens especially with cheap scanning devices. The only thing you can do about it is to use proper software like SilverFast or Vuescan.
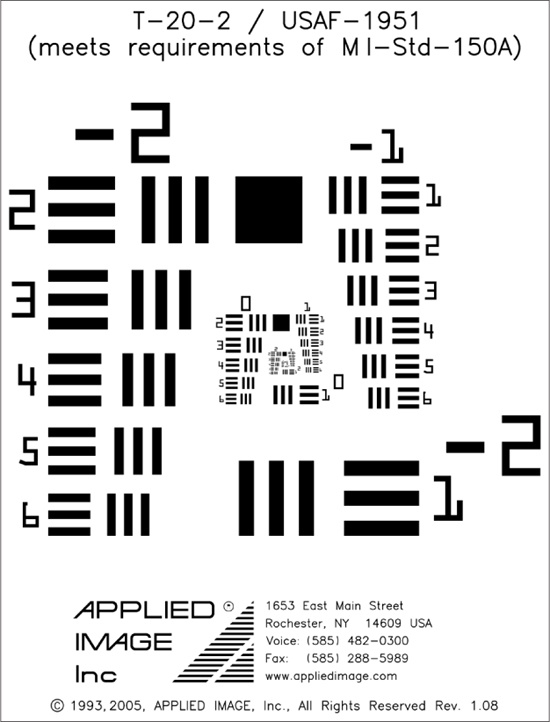
Once you have completed the scan, open the image file in a viewer and set the zoom factor to 100 percent. Then, interpret the displayed target elements by using the lookup table that comes with the target. This method, is, however, not particularly precise, as judging whether a pixel has been precisely rendered or not is subjective.
When comparing scanners, it is also important to remember that some manufacturers are playing with a marked deck. Most scan software allows you (theoretically) to switch off the unsharp mask feature, but many cheaper flatbed scanners leave unsharp mask permanently switched on in order to make the scan results more usable. Remember: even the most complex post-processing tricks cannot effectively compensate for a low-quality scan. All in all, the USAF target is an effective tool, for comparing scanners directly on your own. It is especially helpful to find out if your own scanner has been manufactured properly.
As will be shown later in Chapter 4 on the topic of file formats, maximum color depth is an important criterion for evaluating a scanner. Common color depths of scanners are 8-, 12-, 14-, and 16-bit. These correspond to the following grayscale values:
| 256 (28) grayscales |
| 4096 (212) grayscales |
| 16 384 (214) grayscales |
| 65 536 (216) grayscales |
Note
Color depth only describes how many bits are used to store a pixel and has no direct relevance to the quality of color reproduction. An 8-bit scanner can potentially reproduce colors better than a 16-bit scanner.
In Red, Green, and Blue (RGB) mode, each image point is generated from three values (one each for red, green, and blue). The number of bits refers to each of the three color channels. These correspond to the following number of possible colors in RGB mode:
| = 224 = | 16.777.216 colors |
| = 236 = | 68.719.476.736 colors |
| = 242 = | 4.398.046.511.104 colors |
| = 248 = | 281.474.976.710.656 colors |
Obviously, the numbers of colors for RGB are somewhat unwieldy, which is why bit-depth is more commonly used for expressing color depth. It is important to keep in mind that a 16-bit file only uses twice as much storage space as an 8-bit file but offers an exponentially higher color depth. Storing the files in RAW format makes the best use of your hard disk space. Storing the images in TIFF can take up more space, except for 8-bit and 16-bit scans, which are directly supported by TIFF. The only lossless way to save 12-bit and 14-bit scan data in TIFF is in 16-bit color space, where either 4/16 or 2/16 of the storage space will be wasted.
Many image editing programs still work only in 8-bit, but a few also work in 16-bit color depth. A 16-bit color depth is technically by far the better solution, but the question is whether or not it is worth the effort. Working in 16-bit is very demanding. Not all image editors support 16-bit throughout. Furthermore, 16-bit images occupy twice as much memory as 8-bit images, which are already quite large. You would need a much faster computer, too.
For image output, 16-bit offers no advantage. That is, the human eye cannot detect any additional image information with 16-bit. It is a different case, however, for image editing. If you modify color curves, change contrasts, or adjust brightness, a 16-bit source file can contain the decisive bit of extra information to allow for certain adjustments without visible degradation. If you are not planning to do any extensive post-processing on your scanned images, 16-bit unnecessarily wastes time and storage space.
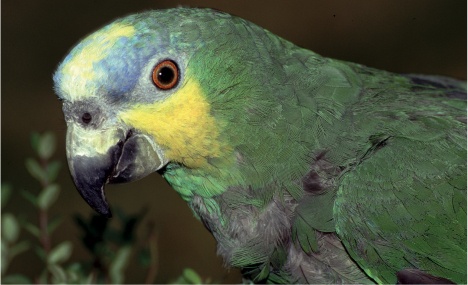
Apart from resolution and color depth, density range is an important criterion for selecting a scanner. Density range describes the difference between the area with the maximum density (Dmax) and the area with the minimum density (Dmin). It is the difference between the darkest and the brightest image points that the scanner can differentiate from pure black or white, respectively. The higher the density of the original, the more brilliant and contrasty the image will be. If the film scanner has a lower density range than the original slide, the scan will suffer some quality loss. Not all nuances in color and grayscale can be captured entirely. The scanner cannot record all details in the highlight and shadow areas simultaneously. Either the shadow details will drown in darkness, or highlight details will be bleached away. Especially for slides, a high Dmax on the scanner is essential for a good image quality.
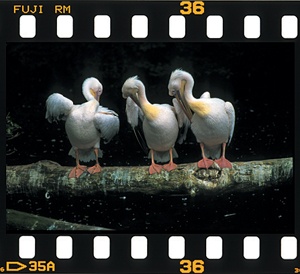
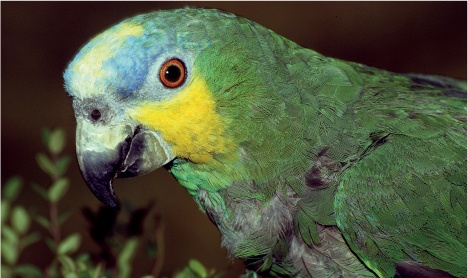
Of course it is unfair to compare a current and high-priced scanner like the Nikon Coolscan 5000 to the Minolta Scan Dual II, which is out of production and was in a lower price range. However the sample image with the bird demonstrates the obvious disparity in quality between different scanners. In both cases, the density range published in the specification sheets is to be taken with a grain of salt. Regardless, the Nikon Coolscan 5000 undoubtedly has the higher tonal range, which shows in the image result. While the Minolta scan appears flat, Nikon brings out the brilliance of the slide nicely.
Note
* Density Range = Tonal Range The density range is also measured as tonal range with the unit D (for Density). It can be clearly determined with the ISO 21550 standard.
In both cases the manufacturer’s software was used for scanning. Comparing different scanners is like comparing apples and oranges, because the result depends not only on the hardware but also greatly on the software used. The brilliance of a slide can translate into a good scan only if the scanner has a high actual density range. Fallacious numbers from the specification sheet will be quickly exposed.
Despite the fact that a high density range always needs good scanning hardware behind it, it is possible to expand the scanner limitations by software. Some time ago software manufacturer SilverFast introduced its Multi Exposure feature, which basically means that the scanner takes two samples of the slide while scanning with different exposure durations. Both samples are combined by the software and you get a picture with an extended density range. This reduces grain, too. But of course your scanning time will reduplicate.
Do not mix up this technique with Multi Sampling. In Multi Sampling you process several passes, too, but all with the same exposure time. VueScan has a similar feature which is called Multi Exposure. Nikon Scan has no comparable functionality to offer.
Scanning speed is a limiting factor when digitizing film. Generally, it takes longer to scan negative film than slides because the scanner needs to invert the negative, which requires additional computing time. For a complete scan of a single negative frame, even the fastest desktop film scanners need around one minute per frame with scratch removal enabled. Unfortunately, substantially longer times are the norm. If the scanner supports bulk scanning, this is still acceptable, since the scanner can work unattended. However, if you do many single scans, a fast scanner is a must. You can find extensive test reports for most of the film scanners on the market at www.filmscanner.info, including detailed information about scanner processing speed, provided in German, English, French, Spanish and Italian.
Note
Even using a fast scanner, scanning a complete roll of 35mm film usually takes about two hours, excluding any additional post-processing.
Most film scanners are not set up to let you quickly digitize a few pictures. Scanning takes quite a bit of time and can test your patience. Resolution and image quality of modern film scanners are already very good, but there is still plenty of room for improvement as far as processing speed is concerned. If you need a fast system now, you will have to dig deep into your pockets for the scanner and a computer powerful enough to adequately support the scanner. Currently, the fastest scanner is the Nikon Coolscan 5000 ED. You should use at least a PC in the 3GHz class with enough RAM to run the scanner at its optimal speed.
Modern film scanners employ special correction methods for removing dust and scratches, and for equalizing film grain. These technologies are not luxuries but rather basic requirements for turning good originals into high-quality image files. In addition, it is possible to boost colors of faded originals and to correct shadows and highlights at the scanning stage. The best methods for dust and scratch removal involve inspecting the film surface with an infrared beam. This method cannot be replicated in software with equally good results. To make use of this feature, your scanner will need a separate infrared channel. Most modern scanners have this feature nowadays.
Apart from this, all other image corrections can be performed afterwards with an image editor. Color restoration and grain reduction can be done in Nikon Scan, SilverFast, VueScan, or in a Photoshop plug-in (which you have to buy separately). The general advantage of image corrections in the scanner and scanning software is that they happen during scanning, and therefore require less time-consuming post-processing in the image editor. In most cases, the corrections will be firmly embedded in the image file, even when using RAW. You can save time by making sure the scanner is set up properly. If you want to change the level of correction afterwards, you must scan again, which can be a pain. To speed up your workflow, it should be your goal to scan your slides and negatives once, and to do everything else in post-processing.
You should already know before you purchase a scanner whether you want to scan 35mm, APS, medium format, or large format film. Currently, there is no affordable scanner for processing all formats in good quality. All common desktop scanners can handle 35mm negatives and slides, but support for additional formats varies.
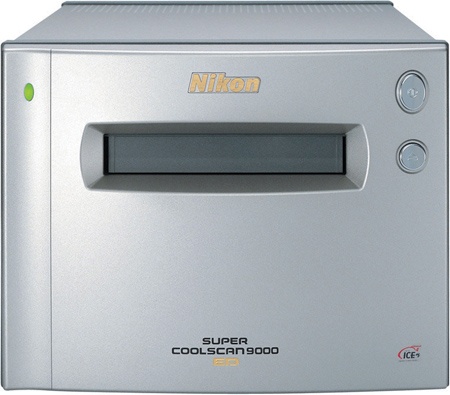
For example, Nikon’s Super Coolscan 9000 ED scans 35mm and medium format from 4.5 × 6cm to 6 × 9cm. There are even adapters for such exotic formats as 16mm film, 24 × 65mm panoramas, medical slides, and electron microscope film, but they are all rather expensive.
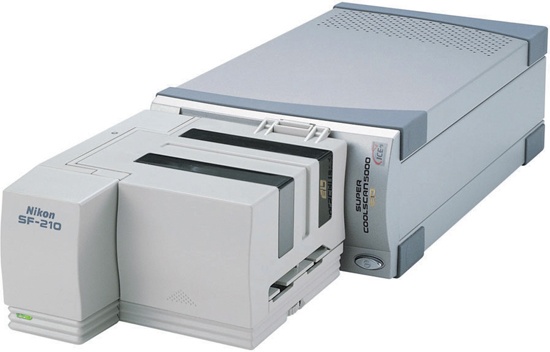
Another important feature is the scanner’s capacity for bulk scanning. For that, you load the scanner with material, configure the scan, and let it run unattended. It is almost impossible to digitize an extensive image archive without powerful bulk processing. It is simply unrealistic to digitize several thousand slides one by one. The slide feeder SF-210 lets you run stacks of up to 75 slides (with thin mounts) through the Nikon Coolscan 5000 without supervision. This vastly reduces your workload - as long as no slides jam.
Note
IR Scratch removal is a must. An up-to-date film scanner has to have a good implementation of scratch and dust removal. Although you can remove dust and scratches by software, too, this is way too time consuming and of inferior quality. Only use the software option when you have no other choice, i.e., when you scan b/w negatives.
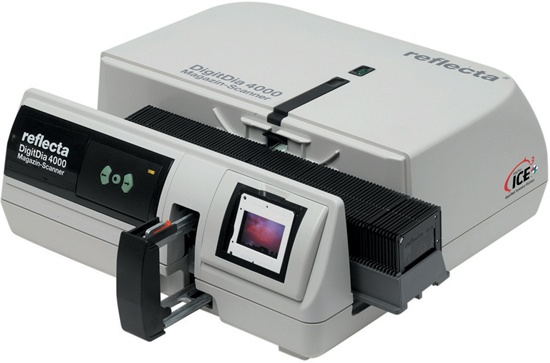
A film scanner should support bulk scanning at least for negative strips. A motorized filmstrip adapter is now a standard piece of equipment. Here the mechanical quality of the scanner is important, so that the film is advanced precisely to the next frame after every scan. Bulk scanning requires high quality mechanical hardware. If the film transport or the slide feeder frequently jams and requires manual interaction, the feature becomes useless. Scanners such as the Reflecta DigitDia 4000 can scan entire slide trays even in their basic configuration.

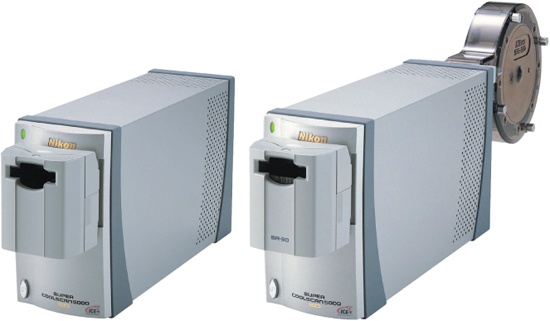
Nikon has a different approach. Mounted slides, filmstrips, film rolls, slide stacks, and APS film can be scanned, but the scanner only comes with the slide mount and filmstrip adapters; any other adapter must be purchased separately. A film roll adapter alone costs far more than a basic film scanner. At that price, you get a slightly modified filmstrip adapter and a large film spool for winding up the film nicely.
Using a sophisticated adapter for this purpose is unnecessary, and it is not economical if you scan film rolls only occasionally. The Reflecta ProScan 4000 provides a much simpler solution: A second opening in the scanner lets you feed long filmstrips. Nikon offers no solution for scanning slides directly from the slide tray. You have to manually insert stacks of slides into the slide feeder. If you do not want to do that, you can get the DigitDia 4000 mentioned earlier, which is structurally identical with the Braun Multimag SlideScan 4000.
The scanner’s light source greatly affects the scanning process. Traditional lamp technologies for scanners, such as halogen or fluorescent lamps, require a certain warm-up time before they can deliver a stable light. Meanwhile, newer technologies are taking over: for example, modern LED light sources provide stable lighting and therefore do not need any warm-up time. They also don’t heat up, which is an advantage when scanning delicate originals.
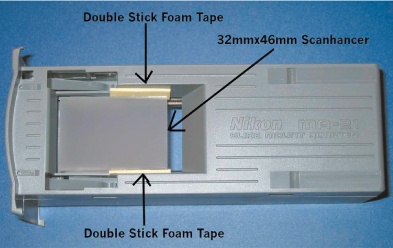
For their current generation of scanners, Nikon and Konica-Minolta use LED lights. There are separate LEDs for each individual color channel. The disadvantage of LEDs is that they produce harsh lighting. With damaged originals, such as scratched black-and-white negatives, every scratch shows up prominently. This makes post-processing more time-consuming. A simple sheet of diffusing film placed in front of the scanner’s light source can greatly reduce this unwanted effect. Alternatively, you can insert a special translucent plastic plate, such as the Scanhancer (see www.scanhancer.com).
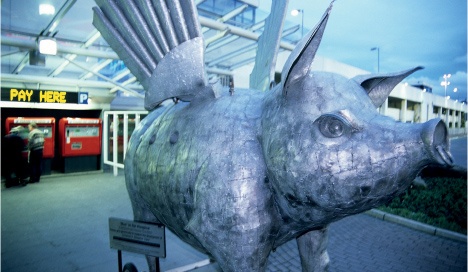
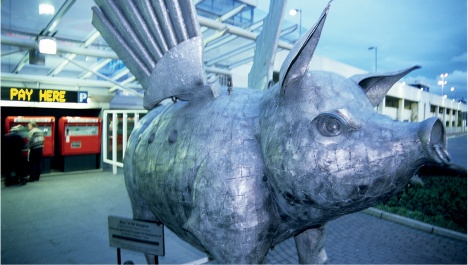
While the Nikon image on the next page clearly needs touching up for the obvious scratches, the scratches on the Microtek scanned image are hardly noticeable. This shows how a scanner’s design determines its performance. Harsh lighting adversely affects not only how scratches are handled but also how the film grain shows in the image. Soft lighting generates a much more pleasing image of the grain. Of course, having a scanner that does not emphasize the grain is better than performing grain reduction afterwards in software.
As demonstrated, you should be aware that, for technical reasons, one single scanner model cannot produce equally good results for all types of film.


A scanner lens projects the width of the film onto a CCD line sensor. This lens has to meet optical requirements typical of a top quality 35mm macro lens. State-of-the-art scanners have sophisticated lenses such as seven-element designs with exotic low-dispersion glass. Multi-format film scanners are even more demanding: the Coolscan 9000 ED has a lens with an astonishing 14 elements. Poor lenses are the main reason that scanners perform below their advertised resolution.
Note
Identifying your scanner’s lamp type is easy. LED lamps are ready for action immediately after power-on, whereas older, cold-cathode fluorescent lamps need to warm up before they can be used.
Ultimately you can always tell from the scans how much went into the design and manufacture of the film scanner. Please look at the test images on the included DVD. You will find big differences between scanners that have the same nominal specifications. A good film scanner can read enough information off 35mm film to enable high-quality 11″ × 17″ enlargements, provided that the source slide is of excellent quality. A good scan makes the weak points of the slide unmistakably clear, as it is like viewing the slide with an excellent magnifying glass. To get maximum picture quality on film, it is always recommended to use a tripod while taking pictures.
Just as in the case of conventional photography, the lens of a scanner is crucial for image quality. Only high-quality optics can generate a good image. You should consider this when comparing scanners. If the scanner’s lens is of poor quality, good values for color depth and scanning speed are useless. In the end, only the final image results count. As manufacturing quality can vary over time, you should test your personal scanner with a USAF-1951 test-target. Even the best lens has to be centered properly during assembly to deliver good quality scans later on.