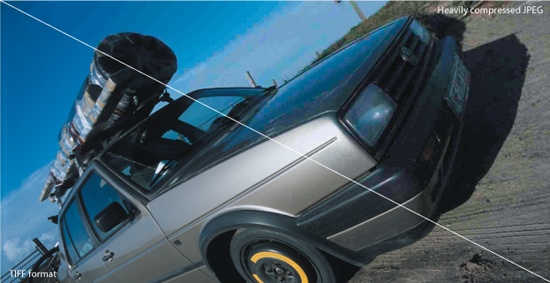
The JPEG format uses strong compression. This process reduces the RAW data from the scanner to a fraction of its original size. When opened, the file is decompressed, and the image expands in RAM. The small file size has many advantages: more files fit on a data carrier, and files can be easily sent over the Internet. Furthermore, JPEG is a popular standard and is supported by practically all image viewers and editors. But, it has one major flaw: with compression, some of the image quality gets lost permanently.
The degradation depends on the chosen compression ratio. The smallest file size requires the highest compression, which in turn causes the greatest loss of detail. A JPEG file in digital photography could be compared to a print from the lab in analog photography. The quality of the result depends on many factors, most of which are unfortunately out of your control. There are few possibilities to enhance the image afterwards; you have to accept it the way it is.
JPEG is poorly suited for processing in an image editor. If your goal is high image quality, JPEG should be used only at the very end of the image editing chain. JPEG only supports 8 bits per color channel, which is perfectly acceptable for the intended purpose of this format. However, as a file format for scans, JPEG is not ideal. It is fine for simple, quick scans; but if you want to postprocess your images, you will quickly run into limitations.
Compared to TIFF or NEF, JPEG achieves good compression rates, but at the cost of detail and image quality. It has been more than 15 years since JPEG was invented, and its successor, JPEG 2000, is waiting in the wings to replace it. JPEG 2000 allows high compression rates with less degradation, and it even offers a lossless compression option. You can choose between lossy and lossless compression. It mostly avoids loss of sharpness and some JPEG compression artifacts. While JPEG is not at all suitable as a digital negative, JPEG 2000 is basically acceptable. However, it is too early to recommend this new format since too few programs support it at present.
Note
Image formats in a nutshell In spite of the many image formats available, it is relatively easy to choose the right one for your purposes. If you want to save storage space and you don’t wish to post-process your images, JPEG is the right format for you. I nevertheless recommend that you scan your images in TIFF format, as this provides good image quality without compatibility problems. If you want to achieve the best possible image quality, and you have time and energy to spare, you should experiment with RAW data formats.
TIFF is a general file format that accommodates many internal formats, several different compression methods, and different color depths ranging from 1-bit to 32-bit. 16-bit TIFF files from the scanner contain the maximum image information the scanner can produce. Since many scanners produce RAW data with 12-bit or 14-bit color depth, storage space is not fully utilized with a 16-bit TIFF file. A 12-bit scan must be saved as a 16-bit TIFF file. A corresponding RAW file would be more compact and use fewer system resources during editing and storage.
Most image editors support TIFF, but not always all of its many versions. In the analog world, a TIFF file would be comparable to a slide: with proper exposure, the ideal (analog) result is obtained. Carried over to the scanner world, exposure would correspond to the setting of the scanner software and the converter. Initially the scanner always generates RAW data. Afterwards, the data are converted to TIFF, which is a potential source of errors. For example, if you select excessive sharpening for the scan, it is almost impossible to fix it in TIFF. At RAW level with NEF this is no problem, but after converting to TIFF you lose the ability to correct the sharpening features.
Lossless compression of TIFF files is achieved in some image editors with Run Length Encoding (RLE), ZIP, or Lempel Ziv Welch algorithm (LZW) compression. Photoshop also offers JPEG-compressed TIFF, but a few scanning programs do not support it. For scanning, only the uncompressed 8-bit and 16-bit versions are of interest.
CMYK-TIFF is different from RGB-TIFF format in its use of the CMYK color space. Each pixel is described with four color values: Cyan, Magenta, Yellow, and Black (Key). Storage requirements for this format increase accordingly. This mode is needed only for prepress, and conversion from RGB to CMYK should only occur at the end of the job. There is no way to reverse the conversion from RGB to CMYK without loss, so the RGB original should always be kept.
The BMP format is only relevant for Windows. The Mac counterpart is PICT. Both formats support neither 16-bit color depth nor color profiles. Therefore, they play no role in high-end image processing and should not be used for scanning.
Note
Difference between RAW and TIFF The scanner generates TIFF files in a lossless conversion from RAW data. Therefore, it is a first-class file format. The difference between TIFF and RAW is that all the image corrections from the scanner program and converter are permanently applied to the TIFF file; the unmodified data from the scanner is only available with RAW.
RAW files are the internal data formats of particular scanners. They are not standardized – each manufacturer has its own format. Adobe’s push to establish a standard with DNG format has not had overwhelming success – at least not with scanners. Neither Nikon, VueScan, nor SilverFast RAW files can be opened with Camera RAW and converted to DNG format. During scanning, the exact format of the RAW file will be determined by the combination of scanner and scanning software. RAW files from VueScan cannot be processed with Nikon Scan, and vice versa. Also, SilverFast HDR is not compatible with the other formats. (Note: SilverFast HDR has nothing to do with what Adobe means by “HDR”.) In order to display and edit RAW files in conventional editors, the files must first be converted. The converter is the interface between RAW file and image editor.
Conversion is another source of potential degradation, since there are quality differences between converters. Conversion normally works only in one direction. Just one example: You open a digicam NEF-file with Photoshop (remember that NEF-Scanned is not supported by Adobe Camera Raw). Now the program is working not with the RAW file, but with a converted copy. Photoshop cannot save the edited image as a Nikon RAW file; it has to use alternatives such as TIFF. True RAW editors such as Nikon Capture Editor work differently where both editing and saving are performed at RAW level.
Meanwhile, there are RAW converters that have “write access” to RAW files, but only for camera RAW files. I don’t know of any converter that can do that with scanner RAW files. This is a problem in that all RAW formats are proprietary and most applications need a suitable converter to open them. If you have a scanner and several different digital cameras, you will probably have to deal with at least three different RAW formats and the corresponding converters. You can avoid this problem if you work with JPEG or TIFF.
Open standards simplify data exchange in many parts of the IT world, and it is always a benefit to the community in general when manufacturers open their standards to everyone. This is, however, often not the case with RAW data formats. Nikon keeps the specifications of NEF secret in order to promote sales not only of its digital cameras, but also of its own scanners and RAW processing software (Capture/Capture NX).
This practice guarantees the manufacturer short-term turnover, but it artificially restricts the customer in his/her choice of software. Third-party manufacturers who want to construct NEF editors have to obtain their knowledge slowly and painfully using reverse engineering. Such practices are simply not worth the effort for less well-known NEF variations such as NEF Scanned, which explains the current lack of support for this particular format.
Note
Poor support for NEF scan files These days, there are many programs that support the Nikon NEF image file format, although this largely applies to files that were created using digital cameras. NEF scan file support is still something of a rarity. Adobe Bridge, for example, can preview a NEF scan file, but Photoshop cannot open it. To open and process NEF scan files, you need either the scan program itself or a Nikon image processor.
NEF is a proprietary RAW format developed by Nikon. This format is a bit ambiguous. Files with the ending .nef can belong to one of four major categories, all of which are different. Nikon has created a seamless workflow for NEF files with its own programs Nikon Scan, Nikon View, and Nikon Capture NX2 Editor. The following chart shows the substantial differences in file size between uncompressed NEF/TIFF files and highly compressed JPEG files. As you can see, you can save a remarkabel amount of storage space, if you prefer JPEG over TIFF or RAW. But always remember: you have to pay the price through loss of picture information.
File Sizes of 35mm Scan @ 4000 dpi (Resolution 5292 × 3509 Pixel) | ||
|---|---|---|
JPEG-RGB | ||
Highest compression | 626 KB | |
High compression | 1385 KB | |
Best compromise | 2269 KB | |
High quality | 4664 KB | |
Maximum quality | 20111 KB | |
TIFF-RGB | ||
8-Bit | 55728 KB | |
16-Bit | 111159 KB | |
NEF-RGB | ||
8-Bit | 56365 KB | |
12-Bit | 84548 KB | |
16-Bit | 112730 KB | |
VueScan is another program that can save in RAW format. Unlike Nikon, VueScan did not create a new RAW format, but rather uses special TIFF files. To use this format, you have to select the output option RAW file. These RAW files can only be properly displayed and edited with VueScan. The scanning program also works as a RAW editor. Unlike data in the Nikon NEF format, these are true scanner RAW data; no image corrections are applied to the file. This allows you to perform dust and scratch removal after scanning.
SilverFast’s own HDR files are also special TIFF files. Although HDR files are similar to the VueScan RAW files, the two formats are not compatible. HDR files generated by the scanner software SilverFast Ai are best edited in SilverFast HDR. SilverFast RAW is less consistent than VueScan, because ICE is applied to the data. All other corrections can still be done afterwards.
Speaking about the NEF-format is quite tricky, because such a thing as a single Nikon NEF format simply does not exist! There are four major categories of NEF, and some of these even have dozens of subcategories. In the following section you will get a short introduction to help you understand why these files are all NEFs, but still can be very different in handling and processing.
Uncompressed NEF files created by Nikon digital cameras are called Original NEF files. They can vary from camera to camera, which means that an editor like Capture NX2 has to be updated in most cases when new cameras hit the market.
NEF Compressed refers to compressed NEF files from Nikon top-end digital cameras. The aforementioned Original NEF offers maximum image quality. Unfortunately, these files are big and quickly fill up expensive memory cards. Also, the writing cycles in the camera are relatively long, which can slow down continuous shooting. Good cameras can continuously shoot in the much smaller JPEG format without interruption until the memory card is full. When shooting NEF, the buffer fills up quickly and the shooting has to pause. Nikon has addressed this problem with the Compressed NEF format. The files are about half the size of the Original NEF files, and according to Nikon there is no visible difference between them and Original NEF. But, it is obviously not an entirely lossless compression. So far only a few camera models can generate Compressed NEF files. This format is not relevant for scanning.
Note
Scanned NEF Files: Post-Processing Can Cause Crash! This example demonstrates a reproducible way to crash your scanner software: Take a scanned image in NEF format and rotate it with the editor, which comes with the free Nikon View (not to be confused with Nikon Capture Editor, which you have to buy). Save the image. Now any attempt to open this file in Nikon Scan will crash the program; you can only open it with Nikon View, Nikon Editor, or Nikon Capture Editor.
NEF III files are RAW data files generated by a Nikon scanner and saved by the program Nikon Scan. The software lets you select a color depth of 8-, 12-, 14- or 16-bit. Scanned NEF is a lossless format. With Nikon Scan several types of changes can be made to the Scanned NEF after the scan, such as the settings for brightness and contrast. Using this format affords image editing at RAW level with all its advantages.
Nikon Scan 4 can edit any type of file it has generated. However, postprocessing scanned NEF files with Nikon View or Nikon Capture Editor will change the files irreversibly. Apart from this minor nuisance, the NEF format comes closest to the ideal of a digital negative among all the formats introduced here. For an analogy in the world of analog photography, it is like a color negative that you can develop in your own lab. You have control over all key parameters and still can tweak it to a certain degree afterwards. This is the advantage NEF has over TIFF.
Strictly speaking, Scanned NEF files are not real RAW files; image corrections like Digital ICE, ROC, GEM, and DEE are applied to the data during scanning. If you want to change any of the settings, you’ll have to rescan. In a true RAW file, all corrections are still possible afterwards without having to rescan. Unlike with VueScan, where you always have to create an additional image file from the RAW files first, you can open, edit, and save NEF files directly. Therefore, with NEF a single file is in many cases sufficient; image and negative are one. All changes are saved in configuration files in addition to the image data and thus can be reversed if necessary.
Existing JPEG or TIFF files can still be converted to NEF files. All advantages of editing at RAW level are available, but you will not get real RAW data. Still, Converted NEF is a good way to protect files against accidental changes.
Consider the following example: you scan a slide as TIFF, whereby the scanner extracts the image information from the slide in RAW form. This RAW data gets converted, which means the converter’s changes and manual changes – if any – will be firmly applied to the TIFF file. This TIFF can be turned into a Converted NEF. This Converted NEF file does not contain the original RAW data, but merely the image information of the TIFF file. The original RAW data was lost in the first conversion.
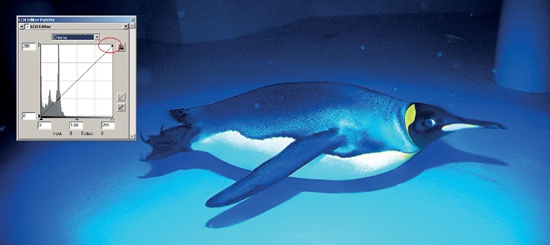
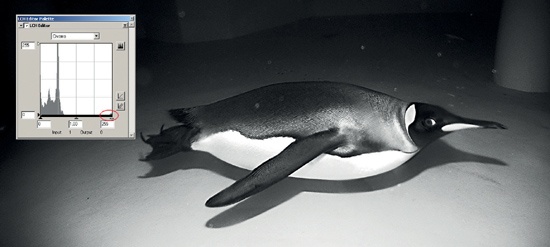
Nikon Scan offers the choice of scanning in RGB or grayscale mode. Grayscale saves storage space, which makes it an obvious choice for scanning b/w negatives. B/W negatives can always be scanned in color, but then the images contain the color cast of the original. Neither Nikon View nor Nikon Capture Editor can open the grayscale scans since they do not support this color space. Editing at RAW level is only possible with Nikon Scan. Consequently, image editors that use the NEF plug-ins packaged with Nikon View also cannot open grayscale files. All in all it is the best choice to scan scan black and white negatives as NEF-RGB. You have to remove the color cast during post-processing.