Color negatives are not very troublesome for shooting or for scanning. That is the reason why the overwhelming majority of photos taken in the past have been shot with negative film. For the purpose of scanning, these films have advantages, too. Even an inexpensive scanner can yield acceptable results when color images are scanned. One disadvantage is that the film base for color negatives is susceptible to scratches. You can get good scans from color negatives only if you use a scanner with good hardware-based scratch removal.

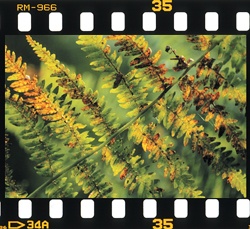
When looking at the inverted filmstrip with the orange masking, it is difficult to predict how the final image will appear. Even proper exposure and sharpness are difficult to judge. This shows that it is not easy to sort out unusable shots. The characteristics of film emulsions are as manifold as the offerings of color negative films. The data read by the scanner must be interpreted accordingly, and the result of scanning depends greatly on the settings of the scanning software. Matching the original film, in this case, is much more difficult than it is for slides. Up to the moment there is no calibration possible for color negatives, i.e., USAF-1951 only works with slides. Additionally, the scanning process for negatives takes longer than for slides because conversion from a negative to a positive image requires more processing effort.
The color correction of scans can be automated partly in scanning software, which supports film profiles, but it is not very reliable. Silver-Fast and VueScan ship with a large number of profiles for common film types. Nikon Scan has only one standard profile for negatives.
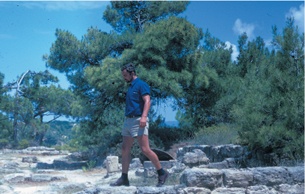
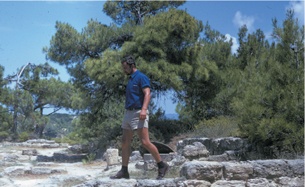
In a purely analog workflow, slides offer the maximum obtainable image quality. Slides offer much more vivid images than color negatives; their contrast range is clearly higher. However, slides demand accurate exposure from the photographer as there is little margin for error. Even a small exposure error affects the image. In comparison, one has much more leeway with exposure when using color negative film. The processing lab has little impact on the image result when working with slides. With negatives, it is a different matter. Slides are superior to negatives because they have finer grain, more contrast, better color depth, and a much better density range. For scanning, slides are more demanding than negatives. For example, scanning slides using low-end scanners often leaves much to be desired, since such scanners cannot typically handle the wide range of colors, contrast, and density inherent in the slides. On the other hand, a great advantage of scanning slides is that the image on the monitor can be compared directly with the original. Scanning slides is also faster than scanning negatives since there is no need for processor-intensive image conversion when slides are scanned.
Kodachrome films are color transparency films that have been on the market for more than half a century. They are not developed with the common E-6 process, but rather with the special K-14 process from Kodak. There are still good reasons for professional photographers to use Kodachrome:
With proper storage (in darkness), Kodachrome colors can remain stable over decades. However, under projection, they tend to fade faster than E-6 slides.
Colors within the Kodachrome family of films are consistent, which is an advantage when different films are mixed in a slide show.
Kodachrome films have very fine grain.
These films cannot be scanned in the same way as the common E-6 color slide films. They can be scanned like normal color slides, but with only modest results. You will get a good scan only if the scanning software offers a special setting for Kodachrome. If you scan Kodachrome with an E-6 setting, the images will have a bluish cast, and generally the colors will be less than satisfactory. Hardware-based scratch removal systems such as ICE or FARE, which were developed for E-6 and C-41 films, work for Kodachrome, but only partially. If you use scratch removal anyway, expect some loss in image detail.
In general, scanning black and white negatives is problematic. As with color negatives, black and white negatives suffer from dust and scratches; but in this case, hardware-based scratch removal does not work at all. Neither ICE nor FARE function properly for black and white negatives; they actually degrade image quality. However, ICE and FARE work for black and white films based on the C-41 developing process. These films are closer in technology to color film; therefore, the infrared beam used in ICE and FARE can scan the surface for dust and scratches. These films are called “chromogenic” color films, such as the Ilford XP2 Super, Kodak BW400CN, Konica Monochrome VX 400, Tura BW-C41, and Fujifilm Nexia Sepia. Traditional black and white films such as the Kodak T-MAX family are silver-based.
Improving Flatness for Negative Films
If a negative strip cannot be scanned properly, it can be cut and mounted. Tensioning slide mounts produce flatness that is superior to typical film holders. Note that once the strip is cut up, labs will no longer handle it. This is basically not a problem, however, since you will have a high-quality image file once the negative is scanned.
Opinions are divided about the ideal film for scanning, but it is certainly not black and white negative film. Black and white does not allow dust and scratch removal with ICE. In a purely analog workflow, the qualities of good black and white films remain unsurpassed, but the annoying problem of scratch removal makes it difficult to take advantage of those qualities in digital processing. High-quality scanners reproduce even the smallest scratch, which can actually degrade a high-resolution image. Theoretically, you can use image-editing software to touch up scratches, but doing this is very tedious and time-consuming and is not practical for scanning a large number of images.
The advantages of using color negative film for scanning are wide exposure latitude and limited contrast range. Even with a low-cost scanner, quite passable scans are possible with color negatives. It can be difficult to visually match the scanned image with the negative. Orange masking makes it difficult to judge image sharpness, and it takes a lot of experience to guess the colors hidden underneath. Still, with matching film profiles, you can easily produce scans with good colors. Negative film is more prone to scratches than slide film, but in most cases these scratches are handled automatically with ICE. For average quality needs, color negative film is a good compromise.
Slides have more vivid and vibrant colors and a wider density range than negatives. Only superior film scanners are able to read such image information. A cheap scanner won’t make you happy in the long term, and it is always better to invest a little more in your equipment at the outset. Matching a scanned image with a slide is straightforward. Correct exposure is more critical for slide film and requires more caution during shooting. Slide film also has the advantage that it is less sensitive to scratching than negative material. Scanning slides is faster than negative scanning, as it does not involve the processor-hungry inversion and de-masking steps. You also don’t need to use individual film profiles in order to render colors accurately. If you know you are going to scan your results at some point, you should always use slide film in preference to negative film, as this will produce the best results—especially if you have use of a high-quality scanner. Even the best scans, however, can never be as vivid as the image produced when the original slide is projected onto a screen. The best stock for good scans is a slide film with fine grain; the finer the better. While expensive drum scanners used by professionals can handle almost any film stock, desktop film scanners used by amateurs and semi-professionals are more limited. Before the digicam boom, large film manufacturers developed several films optimized for their ability to scan. If you are still shooting film and scanning by yourself, you should use film with this newer technology. The difference is obvious; with older film you will get inferior results.
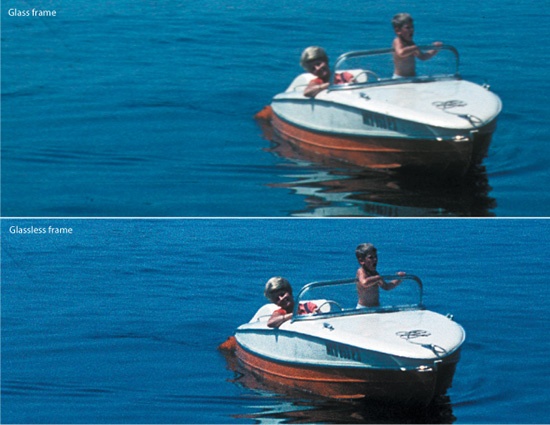
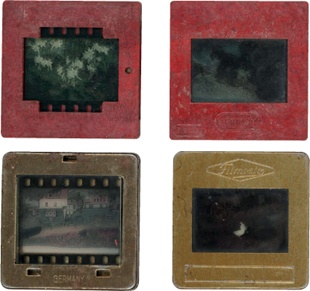
The type of slide mount has a big effect on the quality of the scanned image. Slide mounts with glass inserts are not suitable for scanning, and should be replaced before scanning in order to avoid significant loss of sharpness.
Note
Granularity of Film The familiar root-mean-square (rms) granularity values have been gradually replaced by print grain index. While rms granularity is an absolute value, print grain index varies with print magnification. There is no direct correlation between the two. An rms granularity of less than 10 and a print grain index of less than 25 (35mm film enlarged to 4″ × 6″ print size) represent a very fine grain.
Slides mounted behind glass stay flat, which at first glance seems equally advantageous for both projection and scanning. With scanning it prevents popping of the slides and keeps the surface even. However, for scanning, the glass layer is an additional obstacle when it comes to image quality – even more so with anti-Newton glass mounts. If you want a good-quality scan of your glass-mounted slides, it will be necessary to remount your slides into glassless frames. This applies to single and double-sided glass frames. Unlike slides that are projected, slides will not “pop” in modern scanners since they do not heat up.
Glassless mounts are ideal for scanning, since there are no troublesome glass layers involved. In many cases, however, flatness of the film is a problem. Mounts are necessary to ensure good flatness. Machine-mounted slides from the lab are usually firmly fixed and do not buckle. Other mounts, such as those used with the Hama DSR system, do not offer any locators for the film. Wess has addressed this problem by developing several mounts with a tensioning feature; but they are all rather expensive and may be difficult to find. It is usually sufficient to purchase a single pack of mounts, as you will only be using them for scanning but not for actual archiving. As far as I know, these mounts are only available at www.filmscanner.info. The www.wess-diarahmen.de site is no longer online.
Granularity of 35mm Kodak Film | |||
|---|---|---|---|
Film Designation and ISO Sensitivity | RMS Granularity | Print Grain Index (enlarged to 4″ × 6″) | Remarks |
Color Negative | |||
Portra 160NC | n/a | 36 | Portrait film for natural colors |
Portra 160VC | n/a | 40 | Portrait film for vivid colors |
Portra 400NC | n/a | 44 | Natural colors and high speed |
Portra 400VC | n/a | 48 | Vivid colors and high speed |
Portra 800 | n/a | 40 | Finer grain than Portra 400 films |
Portra 100 T | n/a | 33 | For tungsten light (3200K) |
Elite Color 200 | n/a | 32 | General-purpose standard film |
Elite Color 400 | n/a | 39 | For action shots |
Gold 100 | n/a | 45 | Standard consumer grade film |
Gold 200 | n/a | 47 | Gradually replacing Gold 100 as standard film |
Gold 400 | n/a | 49 | Standard film for point-and-shoot zoom cameras |
Color Transparency | |||
Elite Chrome 100 | RMS 8 | n/a | Universal fine grain film |
Elite Chrome 100 Extra Color | RMS 11 | n/a | Extra high color saturation |
Elite Chrome 200 | RMS 12 | n/a | All-purpose film, fine grain for ISO 200 |
Elite Chrome 400 | RMS 19 | n/a | For low-light and action shots |
Ektachrome E100G | RMS 8 | n/a | Extremely fine grain |
Ektachrome E100GX | RMS 8 | n/a | For warmer colors |
Ektachrome E100VS | RMS 11 | n/a | Vivid, saturated colors |
Ektachrome E200 | RMS 12 | n/a | Can be pushed to ISO 800 |
Kodachrome 64 | RMS 10 | n/a | Proven veteran of several decades; uses K-14 process. Color characteristic noticeably different from modern films. |
Kodachrome 200 | RMS 16 | n/a | Quite a bit faster than Kodachrome 64; both films need to be processed in one of three remaining centralized labs in the world. Future support for 35mm is unclear; for Super8 and 16mm film, it was discontinued in 2006.. |
Black and White Negative | |||
T-Max 100 | RMS 8 | n/a | B&W film with extremely fine grain |
T-Max 400 | RMS 10 | n/a | Still fine grain despite higher speed |
T-Max 3200 | RMS 18 | n/a | The ISO-wonder: can be pushed to 25,000 |
Tri-X 400 | RMS 17 | n/a | Good for pushing, has characteristic grain |
Tri-X 320 | RMS 16 | n/a | Slightly finer grain, otherwise like Tri-X 400 |
PX 125 | RMS 10 | n/a | Very sharp with fine grain |
BW400CN | n/a | < 25 | Extremely fine grain, uses C-41 process |
Source: www.kodak.com | |||